Christmas Fruit Mince Tarts
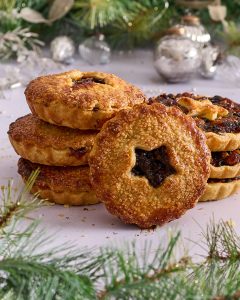
Why are fruit mince tarts so polarising in Australia? It seems you're either in the ‘I hate mince tarts’ camp or the ‘I love mince tarts’ camp. I've met very few Australians who sit on the fence in this regard. But I’m a squarely in the ‘I love mince tarts’ camp! My fruit mince origin story can be found in the intro to my Homemade Fruit Mince recipe. I’ve been working on this recipe for over three decades and it's the star of my Christmas fruit mince tarts recipe. The supporting act is my flaky shortcrust pastry recipe, which coincidentally also originated from my Great Grandma Downs' early 20th century recipe, which she brought to Canada from the UK.
Equipment
- Food processor (optional)
- 8 9-10cm fluted mini tart pans
- 2 Silicone mats (or baking paper)
- 2 Biscuit sheets
- Rolling Pin
- Rolling guides (optional)
- Bench scraper (optional)
- Round cookie cutter 105-10mm (optional)
- 250ml Measuring jug
Ingredients
Fruit mince:
- 640 g fruit mince - see Homemade Fruit Mince recipe
Pastry dough ingredients:
- 200 g unsalted butter
- 1 large egg
- 1 teaspoon apple cider vinegar
- 350 g all-purpose flour
- Pinch cream of tartar
- 1 1/2 teaspoons salt
- 2 teaspoons caster sugar
- iced water
Instructions
Preparing pastry dough:
- Assemble ingredients for dough.
- Cut butter into 1-2cm cubes and freeze.
- Add flour, salt, sugar and cream of tartar to food processor bowl, pulse a couple times.
- In a 250ml measuring jug beat egg, apple cider vinegar and enough iced water to make 135ml total fluid. Refrigerate until required.
- Add frozen butter to flour mix and process until butter is between the size of a lentil and a small pea.
- With the food processor running, stream in egg mix down the shute and process until just combined. When the food processor engine starts to rumble stop.
- Turn out the dough onto a clean kitchen bench. The dough will be crumbly.
- Gather the dough together using a bench scraper. Using the scraper, press the dough together and cut it in half. Then stack the halves on top of each other and press together. Repeat this a couple times until the dough starts to be less crumbly and form a dough.
- Do not overwork the dough at this stage, it can look a bit rough and crumbly.
- Divide dough in half and shape each half into a rough rectangle, wrap in plastic wrap or put in a sealed container and refrigerate for at least 30 minutes.
Rolling pastry:
- Assemble equipment and baking paper or silicone mats. You’ll need two 40cm lengths of baking paper for each block of dough.
- Let the dough rest between the sheets of baking paper, it can come to room temperature at this stage.
- Prepare one half of the pastry at a time.
- Roll the pastry between the sheets of the baking paper to 3mm. Turning a quarter turn between rolls. Do not use extra flour.
- Refrigerate the rolled dough on a biscuit sheet, leaving the baking paper in place, for 30 minutes or until firm.
- Repeat with the second half of the dough.
- Keep scraps of dough to reroll if you need to cut circles or want to bake some shapes for decoration. The shapes can be baked on top of the tarts or separately (brush with egg wash and sprinkle with demerara sugar).
Assembling tarts:
- Put some flour in a shallow bowl to dredge the cookie cutter in. Have your tart pans ready.
- Remove one sheet of rolled dough from the fridge. You know it is firm enough if the baking paper or silicone mat comes away clean. If it pulls off dough, leave it in the fridge until the paper/mat comes away clean.
- Cut out 8 circles of dough. I return the dough to the fridge/freezer at this stage to firm up again before removing from paper and shaping tarts.
- Work quickly to shape the tart shells, trying not to stretch the dough. Place a circle of dough on top of the tart pan and gently press in, being sure to press into the inner seam of the pan.
- Dock the bottom of the tart shell with a fork.
- Spoon 80g of fruit mince into each tart shell about 3mm from the top of the pastry. Gently press into the sides of the tart shell and smooth the top.
- Return assembled tarts to fridge for at least 30 minutes.
- Preheat oven 180°C fan / 190°C conventional, with oven rack on the bottom rung. Or, if using two racks, both in the bottom half of the oven.
Baking tarts:
- Place individual tart pans on a low sided baking sheet to make it easier getting them in and out of the oven.
- Bake at 180°C fan / 190°C conventional for 15 minutes.
- Turn the temperature down to 160°C fan / 170°C conventional and continue baking for 30-35 minutes until pastry golden brown and filling is bubbling.
- Turn the baking sheets once or twice to achieve even browning.
- Remove from oven and cool to room temperature before removing from tart pans.
Just before you cook with abandon…
Kitchen scale: If you are going to bake, you need a kitchen scale. It’s really in the necessity column not the optional column. You don’t need to spend a fortune on them, decent ones can be bought for about $70. I find the expensive ones break down just as quickly as the cheaper versions. But I would recommend you go for a known brand from a reputable kitchen shop.
Eggs: Large eggs weigh about 52g each in the shell.
What’s a rolling guide? Rolling pin guides assist in rolling dough out to an even depth. Many rolling pins now come with guides that can be attached to the ends of the rolling pin. I prefer to use guides that are made from acrylic in the shape of a ruler. They come in pairs and are place either side of the dough as you roll it out. I use guides that are 3mm high for pastry.
Is this a fruit mince tarts or pies recipe? My apologies for any confusion over the images that show the Christmas fruit mince tarts with and without top crusts. Yes, technically a tart does not have a top crust, as then it would be a pie. I know but it’s poetic licence! The recipe is proportioned to create eight tart bases for 9-10cm tart pans or Texas muffin tins. You can re-roll the pastry scraps and make some lids. If you want to make eight top crusts, I recommend making 1½ batches of the pastry dough. If you make the top crusts, you’ll also need a couple of extra egg yolks to make an egg wash with a few drops of water or milk and use a sprinkle of demerara sugar.
Do I always add all the water? There are recipes that advise holding part of the water back depending on the time of year and weather on the day. That has never been a successful method for me. I find adding all the fluid according to the recipe and then giving the dough plenty of time to absorb the water you’ve added works best for me. Some days the dough is a bit stickier than other days but that doesn't affect my ability to roll it out as it sits between two sheets of baking paper. Once it’s well chilled it can be handled and shaped into tart shells.
The fridge and freezer are your best friends when working with pastry dough. The keys to successful flaky shortcrust pastry bakes are having the ingredients super cold (even frozen) before you start and returning the pastry dough to the fridge or freezer at each stage. My shortcrust pastry routine starts with clearing space in my freezer (or fridge) to hold the measured ingredients, rolled out pastry dough, and the formed tarts. Then I measure out the butter and cube it into a sealed container and leave it in the freezer until needed. I also measure out the dry ingredients into another sealed container and put it in the freezer. If you have room, you can prechill the food processor bowl as well (you may just have room for the blade). On the day I make the pastry dough, I mix together the egg, vinegar and water in a small measuring jug and leave it in the fridge until needed. After forming the dough, it needs to rest in the fridge for at least 30 minutes, preferably overnight. This is not just for the gluten to relax but to allow the liquid to evenly hydrate the dough and to get the butter firmed up again. Following this initial rest, each time the dough is handled, rolled or shaped it goes back into the fridge. Following these steps will ensure a super flaky buttery shortcrust.
Freezing fruit mince tarts. This fruit mince tart recipe is freezer friendly. The tarts can be assembled, frozen and baked at a later date. Baking from frozen is my preferred method. The tarts are not deep so there’s no risk of the filling being undercooked. Plus, the fruit mince filling does not need as long to cook as the pastry. Starting frozen also allows the filling to cook at a slower rate than the crust, ensuring that the filling does not boil over before the crust is finished baking.
Freezing pie dough. The pie dough can be frozen in a block wrapped tightly in several layers of plastic wrap. It will keep for up to three months. It needs to be defrosted overnight in the fridge before rolling out.
What is a substitute for cream of tartar. The cream of tartar reacts with the vinegar to produce carbon dioxide, which assists in creating a flakier crust. If you don’t have cream of tartar you can substitute carbonated water and the result is the same.