Devil’s Food Mini Cakes with Whipped Peppermint Bark Ganache
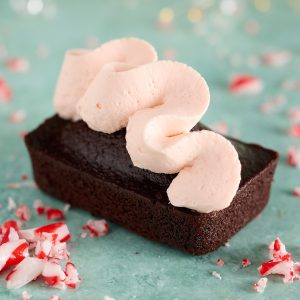
I know—devil’s food mini cakes with whipped peppermint bark ganache is a whopping great big verbose recipe title for what is actually a petite and straightforward make-ahead Christmas dessert. These mini devil’s food cakes are my Christmas answer to the “what are we going to do with all those candy canes?” situation: rich, deeply chocolatey little devil’s food mini cakes topped with whipped candy cane white chocolate ganache. It tastes like peppermint bark grew up and got its act together.
Equipment
- 2 x 8-hole mini loaf pans (non-stick)
- Digital scales
- Large mixing bowl
- 2–3 litre jug (for wet ingredients)
- Coarse sieve
- Large balloon whisk
- Microwave-safe tall jug or container (for ganache)
- Stick blender (or hand whisk)
- Stand mixer with whisk attachment (or electric beaters)
- cooling rack
- Cake tester (or wooden skewer)
- Piping bag (optional)
- Loyal St Honore piping tip no. 880 (optional)
- Electric spice grinder (optional, for crushing candy canes)
Ingredients
Devil’s food mini cakes:
- 240 g all-purpose flour
- 75 g Dutch processed cacao powder
- 2 teaspoons espresso powder
- 275 ml boiling water
- 150 g granulated white sugar
- 125 g light brown sugar
- 1 teaspoons baking powder
- 1/4 teaspoon baking soda
- 3/4 teaspoon table salt
- 135 ml grapeseed oil
- 1 teaspoon vanilla extract
- 2 large eggs
- 175 gm full fat sour cream
Candy cane white chocolate ganache:
- 120 g white chocolate
- 2 g gelatine sheet (gold)
- 30 g crushed candy canes
- 85 g pure cream - Cream A (35%)
- 10 g glucose
- 260 g pure cream - Cream b (35%)
Instructions
Devil’s food mini cakes
- Preheat the oven to 175°C conventional (or 155°C fan-forced).
- Grease 2 mini loaf pans (8 holes each). Cut out baking paper to snuggly fit into the base of each hole, to prevent the cakes from sticking.
- In a medium heatproof bowl, combine the cocoa powder and espresso powder. Pour over the boiling water and whisk to combine. Set aside to cool to room temperature.
- In a large mixing bowl, sift together the flour, baking powder, baking soda, salt, white sugar, and brown sugar. I use a coarse sieve—it’s easier with the brown sugar. Pass the mix through the sieve at least twice until the texture is even and fine, like soft sand.
- In a separate jug, whisk the sour cream, then add the eggs one at a time, beating well after each addition. Whisk in the grapeseed oil and vanilla extract. Then add the cooled cocoa and espresso mixture and whisk until fully combined.
- Add the wet ingredients to the dry in three batches. Use a balloon to whisk in each addition, adding the next batch as soon as the previous is mostly incorporated. After the final addition, give it one last gentle whisk—don’t overmix.
- Divide the batter evenly to create 14 mini cakes—around 80g per cake. Tap the pans gently on the bench to release any air bubbles.
- Bake for 12-14 minutes (start checking at 12). The cakes are done when a skewer or cake tester comes out clean with a few moist crumbs.
- Cool the cakes completely in their tins on a cooling rack until completely cool, then gently remove form the pan and chill until ready to decorate with ganache.
Whipped candy cane white chocolate ganache
- Bloom 1 gelatine sheet in a bowl of ice water. Alternatively, bloom 1 teaspoon powdered gelatine in 1 tablespoon cold water.
- Crush the candy canes just before you start (they get sticky fast in summer humidity). To end up with 30g crushed candy canes, start with about 50g whole candy canes and blitz (or bash) until you have a fine, sand-like dust. Measure out 30g and set aside.
- Weigh 120g white chocolate into a microwave-safe container (a tall jug works best if you’re using a stick blender). Microwave on medium power in 15-second bursts, stirring between each burst, until the chocolate is warm and starting to melt (it does not need to be fully melted).
- Squeeze out the gelatine leaf and add it to the warm chocolate (or add the bloomed powdered gelatine). Add the 30g crushed candy canes.
- Heat 85g pure cream (Cream A) with 10g glucose in the microwave in 15 second bursts on high until very hot but not boiling.
- Pour the hot Cream A mix over the chocolate mixture and leave it to sit for a few minutes so the heat finishes melting the chocolate and dissolves the gelatine. Then blend until smooth and fully emulsified using a stick blender (or whisk thoroughly by hand). Do not use electric beaters here.
- Add 260g cold pure cream (Cream B) straight from the fridge and blend again until fully incorporated.
- Cover with plastic wrap pressed directly onto the surface of the ganache and refrigerate for at least 6 hours, preferably overnight.
- Just before serving, whip the chilled ganache using a stand mixer with whisk attachment or electric beaters until thick and dense, just past firm peaks (for piping).
- Pipe or spoon onto the chilled mini cakes and serve immediately or keep the decorated cakes in the fridge until serving (the whipped ganache doesn’t hold its shape at room temperature).
Just before you cook with abandon…
Espresso powder vs instant coffee: This mini devil’s food cakes recipe includes espresso powder for a reason. It boosts the chocolate flavour without making the cake taste like coffee. If all you’ve got is instant granules, they’ll still do the job—just know the flavour won’t be quite as smooth or deep. Either way, they steep with the Dutch-processed cocoa to bring out that rich, bittersweet intensity these moist devil’s food mini cakes are all about.
Why Dutch-processed cocoa is worth it: This isn’t the place for skimping on the cocoa powder with no name brands. Dutch-processed cocoa powder gives these mini devil’s food cakes their signature dark crumb and rounded, complex flavour. It also bakes up beautifully with the baking powder in this recipe, helping keep the texture soft and luxurious. Natural cocoa will work but expect a sharper taste and lighter colour.
What if I don’t have grapeseed oil?: I use grapeseed oil here for its lightness and neutral flavour. But if you don’t have it, don’t panic. Canola, rice bran or sunflower oil will all work well in this devil’s food mini cakes recipe. Just steer clear of olive oil unless it’s very mild—you want the whipped peppermint bark ganache to shine, not fight with the grassy notes of EVOO.
All white chocolate is not created equal: A successful whipped peppermint bark ganache is honestly most dependent on the quality of the white chocolate you use. This isn’t the recipe for compound chocolate, melts, buttons, or chips. It’s the cocoa butter content that assists—along with the gelatine—to stabilise the ganache so it can be piped and maintain its shape. Before buying a block, check the ingredients: you’re looking for a minimum declaration of 23% cocoa solids. If it just lists vegetable oils, that’s not actually a bar of ‘chocolate’ and you should move on. For this candy cane white chocolate ganache recipe I used Cadbury Baking Chocolate (23% cocoa solids). Speciality stores may also carry Lindt couverture (36%), and if it’s in your budget you can’t go past Callebaut (32%–40.7% cocoa solids depending on the recipe you can source).
Gelatine will save the day in the summer: Gelatine plays an important role in stabilising the whipped peppermint bark ganache and I promise it doesn’t end up mouth feel like jelly—it’s a subtle supporting role only. I use McKenzie’s gelatine leaves [LINK] because they’re readily available in Australian supermarkets, and for this candy cane white chocolate ganache you need one McKenzie gelatine leaf. If you only have McKenzie’s powdered gelatine you can substitute ½ teaspoon gelatine powder bloomed in 1 tablespoon of cold water.
Wrangling candy canes in Christmas humidity: If you’re baking in Australia in December—in our full-throttle summer humidity—there’s a bit of strategy involved in wrangling candy canes. As soon as you peel off the plastic, they start absorbing moisture and turning tacky, so don’t pre-prepare the crushed candy canes. Do that step just before you start melting the chocolate. And before you even touch the candy canes, bloom your gelatine (leaf in ice water, or powdered gelatine in cold water) so you’re not trying to multitask while everything gets sticky.
How much candy cane do I start with?: To get 30g net crushed candy canes, I start with around 50g of whole candy canes to account for wastage. I also weigh them in their plastic wrapping because they start getting sticky in Queensland on a hot, humid summer day in the lead up to Christmas.
Room temperature eggs and sour cream: For this recipe the 2 large eggs and 175g full fat sour cream need to be at room temperature. Cream B is used cold straight from the fridge.
Why blooming cocoa and espresso matters: Blooming the cocoa and espresso in boiling water isn’t just theatre—it helps dissolve and intensify the flavour so you get that deeper, more complex chocolate result without any dry pockets or streaks through the batter. It also contributes to the moist texture that makes devil’s food cakes so good.
Don’t overmix the batter: The easiest way to ruin all your hard work is to overmix when the wet meets the dry. Water is the main fluid in this cake, which means gluten can develop quickly if you get overenthusiastic. Hand mixing in batches is deliberate here—incorporate gently, stop as soon as it’s combined, and let the oven do the rest.
Weighing the batter helps: I weigh the batter into the pans so the cakes bake evenly (and so I’m not left with one heroic cake and thirteen runts). Around 80g per cake is my benchmark, but the real visual cue is filling the cavities to about 1cm below the rim so they rise nicely without spilling.
Why the ganache needs an overnight rest: This isn’t me being dramatic or trying to force you into a “planned dessert” lifestyle. The fridge rest is what turns this from warm, pourable white chocolate soup into a ganache that will actually whip. You’re giving the cocoa butter time to crystallise and the gelatine time to fully set into the mix, and you’re also chilling Cream B properly so it can hold air when you whip it. If you try to rush it, the ganache will either stay loose and won’t thicken, or it’ll whip into a sad, grainy mess that refuses to hold a pipe. Six hours is the minimum, overnight is ideal—and yes, this is one of those rare moments where patience is the whole technique.
When to pipe and how to store the ganache: This ganache does not stand up at room temperature particularly well, so pipe just before serving or keep it in the fridge in a sealed container until you’re ready. I also prefer piping onto cold cakes—it encourages the ganache to stay put as you pipe.
Why these cakes work eaten cold: I’ve purposely created this as an oil-based devil’s food cake so the cakes can be eaten cold from the fridge. Oil doesn’t set firm like butter, so you still get a delicate mouthfeel even when the cakes are chilled.