Pretty In Pink Devil’s Food Cake
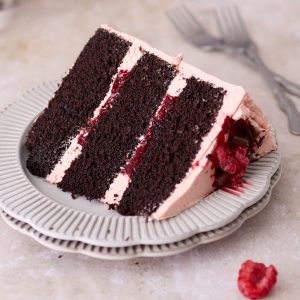
The 1970s was the decade when food met marketing—and marketing won. My mum was a single parent who fully embraced the why bake from scratch when you can reach for a box? approach. Duncan Hines or Betty Crocker—which packet mix made the best birthday cake? It was a hotly contested topic on the schoolground any time a party was looming. We were a Duncan Hines household. And every year, when it came time to choose our birthday cake flavour, there was never any question. For me, it was Devil’s Food Cake. Every time. No hesitation.
Equipment
- Cakes:
- Sieve (coarse mesh)
- Balloon whisk
- kitchen scale
- 3 x 20 cm (8-inch) round cake tins
- Baking strips or cake collars (optional)
- Bulldog clips (to secure baking strips)
- Cooling racks
- Swiss meringue buttercream:
- Small food processor, immersion blender or smoothie blender
- Stand mixer with whisk and paddle attachments (or electric hand mixer)
- Thermometer (instant-read or sugar thermometer)
- Assembly and decorating:
- Cake turntable (optional but helpful)
- Offset spatula
- Cake scraper or straight spatula
- Large, serrated knife
- 2 Extra-large piping bags
- 1 cm round piping tip
- Rubber bands (to seal piping bags)
- 8-inch cake boards (plus an optional larger board)
- Non-slip matting (for turntable)
- Small paintbrush (clean, dry, food-safe)
- Vegetable peeler (for chocolate curls)
Ingredients
Cakes:
- 475 g all-purpose flour
- 145 g Dutch processed cacao powder
- 1 tablespoon espresso powder
- 550 ml boiling water
- 300 g granulated white sugar
- 250 g light brown sugar
- 3 ¾ teaspoons baking powder
- 1 ½ teaspoon baking soda
- 1 ½ teaspoon table salt
- 270 ml grapeseed oil
- 2 teaspoons vanilla extract
- 4 large eggs
- 350 g full fat sour cream
Swiss meringue buttercream:
- 250 ml egg whites (9-10 large eggs)
- 400 g granulated white sugar
- 675 g unsalted butter
- 200 g fresh raspberries
- 3 teaspoons granulated white sugar
- Pinch salt
Decorate as much or as little as you like:
- Raspberry jam
- Fresh raspberries
- Freeze dried raspberries (optional)
- 70% dark chocolate shards
Instructions
Assemble ingredients and equipment
- This recipe has several stages—cake, buttercream, assembly, and decoration—so it’s worth measuring everything out and having your equipment ready before you begin. It’ll make the process much smoother, especially once things start moving.
Devil’s food cakes
- Preheat the oven to 175°C conventional (or 155°C fan-forced).
- Grease and line three 20 cm (8-inch) round cake tins. If using baking strips or cake collars, soak them in water and secure around the tins with bulldog clips.
- In a medium heatproof bowl, combine the cocoa powder and espresso powder. Pour over the boiling water and whisk to combine. Set aside to cool to room temperature.
- In a large mixing bowl, sift together the flour, baking powder, baking soda, salt, white sugar, and brown sugar. I use a coarse sieve—it’s easier with the brown sugar. Pass the mix through the sieve at least twice until the texture is even and fine, like soft sand.
- In a separate jug, whisk the sour cream, then add the eggs one at a time, beating well after each addition. Whisk in the grapeseed oil and vanilla extract. Then add the cooled cocoa and espresso mixture and whisk until fully combined.
- Add the wet ingredients to the dry in three batches. Use a balloon to whisk in each addition, adding the next batch as soon as the previous is mostly incorporated. After the final addition, give it one last gentle whisk—don’t overmix.
- Divide the batter evenly between the three pans—around 790g to 800g per tin. Tap the pans gently on the bench to release any air bubbles.
- Bake for 40–44 minutes with collars (start checking at 35), or 25–28 minutes without. The cakes are done when a skewer or cake tester comes out clean with a few moist crumbs.
- Cool the cakes in their tins for 10 minutes before turning out onto racks to cool completely.
Raspberry Swiss meringue buttercream
- To make the raspberry purée, blend the fresh raspberries with the sugar and salt until smooth. Set aside. You can strain the purée if you prefer a seedless buttercream, but I like the texture the seeds give.
- In a heatproof bowl set over a saucepan of simmering water, whisk the egg whites and sugar together until the mixture reaches 70°C. If you don’t have a thermometer, heat until the sugar is fully dissolved and the mixture feels hot and all the sugar has dissolved.
- Transfer to a stand mixer with the whisk attachment and beat on high speed until stiff peaks form and the bowl is cool to the touch—this may take 8–10 minutes.
- Start adding the butter—make sure it’s just shy of room temperature and cut into 2–3 cm cubes. Add half the cubes and beat on medium speed until mostly incorporated, then add the rest and beat again until smooth.
- Switch to the paddle attachment and mix on low speed to remove air bubbles and smooth the buttercream.
- With the mixer on low, slowly pour in 150 ml of raspberry purée and beat until incorporated. Scrape down the bowl and mix again briefly. Do not add more purée—even if you have extra—as it may cause the buttercream to split.
Assembly
- Level your cake layers using a serrated knife and the toothpick method—or use a cake leveller if you have one. Aim for even, flat layers.
- Place a non-slip mat on a cake turntable and secure your 8-inch cake board with a dab of buttercream. Spread a small amount of buttercream across the board and place the first cake layer trimmed-side up on the board.
- Fill a piping bag fitted with a 1 cm round tip with buttercream. Fill a separate tipless piping bag with 1 1 cup raspberry jam.
- Pipe a 4 cm circle of buttercream in the centre of the cake, followed by a buttercream dam around the edge. Make sure the dam is even and fully sealed. Fill the space between with raspberry jam, smoothing it just below the height of the buttercream.
- Place the second cake layer on top and repeat the filling process. Top with the final cake layer, trimmed-side down.
- Refrigerate the stacked cake for 15–30 minutes until the buttercream is firm but not hard.
Frosting and decorating
- Apply a thin crumb coat of raspberry buttercream to the top and sides of the cake using an offset spatula. Scrape it back with a cake scraper or straight spatula. It’s fine if the cake shows through.
- Chill cake for another 15–20 minutes. I put it in the fridge still on the turntable.
- Apply a second, thicker coat of buttercream, starting at the top and working down the sides. Smooth with a cake scraper. For a soft rustic ripple at the top edge, apply extra buttercream towards the top of the side of the cake, let the buttercream build up slightly as you scrape. For a sharper edge, chill the cake and gently trim the edge with the flat side of small paring knife.
- Chill the cake well before decorating.
- To decorate, warm the raspberry jam until spreadable. Spoon it around the top edge of the cake and use a dry 1-inch paintbrush to brush it gently toward the centre.
- Add torn fresh raspberries, then finish with dark chocolate curls made by running a vegetable peeler along the side of a chocolate bar.
Just before you cook with abandon…
Jam substitution: You can substitute the homemade low sugar raspberry jam with a good-quality shop-bought raspberry jam. Just check the label—some brands lean heavily on the sugar or use thickeners that can throw off the flavour balance. Look for one with raspberries listed first and a bright, tart flavour.
Why use cake collars or baking strips: Cake collars (also called baking strips) help your cakes bake more evenly by slowing down the rise at the edges. This reduces doming, cracking, and overbaked edges—especially useful for devil’s food cake, which tends to rise quickly in the oven and crack. They give you flatter layers, less trimming, and a more even crumb from centre to edge.
Blooming matters: Blooming the cocoa powder and espresso powder in boiling water intensifies flavour, improves texture, and ensures a moist devil’s food cake crumb. It’s worth the extra step.
Don't overmix: Because this chocolate layer cake recipe uses water as its main fluid, it develops gluten more quickly than batters made with milk or sour cream alone. Be gentle when combining the wet and dry ingredients—overmixing will lead to a tougher crumb. Use a balloon whisk and stop mixing as soon as the batter comes together.
Baking times: With baking strips or cake collars, bake the layers for 40–44 minutes (start checking at 35). Without collars, bake for 25–28 minutes. The cakes are done when a skewer comes out with just a few moist crumbs.
Making ahead and freezing: You can bake the devil’s food cake layers in advance and freeze them. Once completely cool, wrap each layer tightly in plastic wrap, then place in a Ziplock bag or wrap again in foil. Freeze for up to one month. Defrost overnight in the fridge—still wrapped. You’ll get the best results assembling this cake while the layers are cold, as it makes trimming and stacking cleaner and reduces the risk of sliding.
Levelling the cake layers: To get a properly stacked three layer chocolate cake, you need flat, even layers. If your cakes have domed or cracked on top (as devil’s food cake often does), take a moment to level them. Use the toothpick method: start where the dome is lowest, insert a toothpick, measure the height, and repeat around the edge of the cake. Then trim with a long serrated knife, keeping it steady as you rotate the cake. A cake turntable helps, but it’s fine to turn the cake by hand. Or, if you’ve got a cake leveller—use it. It’s quick, accurate, and well worth having if you bake layer cakes regularly.
Butter temperature for Swiss meringue: Bring the butter just shy of room temperature—still slightly cool and firm to the touch. This helps the buttercream emulsify properly, especially on warmer days.
Using fresh raspberries in the buttercream: This is not the time to swap in frozen raspberries. They’ll water down the purée and risk splitting the buttercream. Stick with fresh berries for the best texture and colour.
Don’t add extra raspberry purée: You may have some raspberry purée left over—resist the urge to add it all. Too much liquid will cause the Swiss meringue buttercream to split.
What's a crumb coat: A crumb coat is a thin layer of buttercream applied to the cake before the final coat. It helps trap loose crumbs and gives you a smoother, cleaner surface to frost. Chill the cake after crumb coating to set the buttercream before finishing the final layer.
Cake scraper finish (or not): You don’t need a cake scraper to finish this cake—just a steady hand and an offset spatula will do. I used a scraper here for a smooth finish, but truthfully? I ended up wishing I’d gone for something a bit looser. Some relaxed swirls or a bit of texture from a pastry brush or cake comb might’ve suited the buttercream—and the moment—better. If you’re more of a “swoop and see what happens” type, lean into it. Not everything needs to be polished to perfection.
Decorating note: If you want that rustic jam-brushed top, warm the jam slightly and use a dry paintbrush to feather it inward from the edge. Scatter torn raspberries and chocolate curls just before serving.
Storage: Once fully frosted, the cake can be stored in the fridge for up to 3 days. Bring to room temperature for at least one to two hours before serving to soften the buttercream and bring out the full flavour.
Slicing tip: For the cleanest slices, use a large sharp knife dipped in hot water and wiped dry between cuts.