Candy Cane Peppermint Chocolate Bark
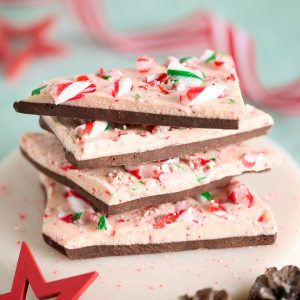
I’m not pretending I invented this. Candy cane chocolate bark is an American Christmas classic at this point – the kind of thing that shows up in tins, office kitchens and school hampers all December. My Candy Cane Peppermint Chocolate Bark is simply my version of it. The only “discovery” here is what you do with the candy canes themselves – my own personal discovery, but I’m certainly not the first to that party either. On paper, it shouldn’t have worked for me at all. Candy canes and white chocolate are, on their own, just about the last sweets I’d reach for; I’m usually the person politely saying “no thanks” when someone offers them around.
Equipment
- 3cm x 30cm (9” x 12”) baking sheet or baking pan
- Digital scales
- Wooden chopping board
- Sharp knife
- 2 Medium microwave-safe mixing bowls (plastic)
- 2 Silicone spatulas
- Offset spatula
- Baking paper or baking acetate
- Small bulldog clips (optional, for securing baking paper)
- Electric spice grinder (optional, for crushing candy canes)
- Mortar and pestle (optional, for breaking candy canes in wrappers)
- Large plastic container with lid
- Large disposable piping bag (optional, for piping white chocolate layer)
- Blow dryer or heat gun
Ingredients
- 180 g dark chocolate
- 180 g white chocolate
- 30 g crushed candy canes
- 100-150 g broken candy canes
Instructions
Prepare the pan:
- Line a 23cm x 30cm (9” x 12”) baking sheet with baking paper or baking acetate and secure it with a tape.
Crush and chop the candy canes:
- Using digital scales, weigh out 40g of candy canes while they are still in their wrappers.
- Unwrap the candy canes and use an electric spice grinder, mini food processor or a Ziplock bag and rolling pin to grind enough to give you 30g finely crushed candy cane.
- Tip this into a small plastic container with a lid and set aside.
- For the décor, keep 100-150g of candy canes in their wrappers, use a mortar and pestle (or something with a bit of weight) over a wooden chopping board to break them into irregular pieces. Snip open the wrappers with kitchen scissors, tip the broken pieces into a lidded container, breaking up any bigger chunks with your fingers, then seal until you’re ready to decorate the chocolate bark.
Melt the dark chocolate:
- Chop 180g dark chocolate into small, fairly even pieces, then transfer it to a medium microwave-safe plastic mixing bowl.
- Heat on medium power in 20–30 second bursts, stirring thoroughly with a silicone spatula between each burst.
- Stop when most of the chocolate is melted and only a few small lumps remain; the residual heat will finish melting them as you stir.
- You want smooth, pourable chocolate for this easy peppermint bark recipe, not overheated chocolate that’s starting to thicken or seize.
Spread the dark chocolate layer:
- Pour the melted dark chocolate onto the prepared pan and tilt, tip and gently shake the pan to help it spread into an even layer.
- Use an offset spatula to nudge the chocolate into the corners and smooth the surface, the layer will be about 2–3mm thick.
- Tap the pan on the bench a couple of times to get rid of any air bubbles, then set it aside at cool room temperature while you prepare the white chocolate.
- You want the dark chocolate to be mostly set but still faintly soft when you add the next layer, so don’t refrigerate it at this point.
- If you prefer to temper the chocolate for an extra glossy finish and crisper snap, there is a full microwave tempering method in the notes at the end of the recipe.
Melt the white chocolate and add the crushed candy cane:
- Chop 180g white chocolate into small, even pieces and place in a second medium microwave-safe mixing bowl.
- Melt it using the same gentle method as the dark chocolate, again stirring between short bursts in the microwave with a clean silicone spatula.
- Once the white chocolate is smooth and fully melted, add the 30g finely crushed candy cane and stir until it is evenly distributed.
- The candy cane will thicken the white chocolate more quickly than plain chocolate, so if it starts to firm up before you’re ready to pour, use a blow dryer or heat gun on a low setting to warm the chocolate, stirring until the chocolate loosens back to a smooth, pourable consistency.
Add the white chocolate layer:
- For more control, transfer the peppermint white chocolate to a large disposable piping bag and snip off the tip, then pipe it in wide ribbons over the dark chocolate layer.
- Alternatively, pour it directly from the bowl. Use a clean offset spatula to spread the white chocolate into an even layer, working quickly so the surface stays smooth.
- Again, tap the pan firmly on the bench a couple of times to remove any air bubbles and help the layers settle together.
Decorate with candy cane pieces:
- While the white chocolate layer is still slightly soft, scatter 100–150g of the broken candy cane pieces over the surface of the chocolate bark, aiming for reasonably even coverage.
- If the surface has started to set, a brief waft of warm air from the blow dryer will soften it just enough to help the candy cane pieces stick without disturbing the layers underneath.
Set, slice and serve:
- Leave the bark to set until the chocolate is completely firm.
- In a cool kitchen you can let it set at room temperature, but in a warm or humid Australian summer it’s safer to cover the pan with several layers of plastic wrap and transfer the pan to the fridge and chill for about 1–1½ hours, until the bark is fully set.
- Once firm, use a sharp knife to cut it into irregular pieces or simply snap it into shards.
Just before you cook with abandon…
Tempering or not: You don’t have to temper the chocolate for this candy cane peppermint chocolate bark. Tempering gives you a glossier finish and a crisper snap, and the bark will hold up a little better on a Christmas platter. But if your chocolate ends up behaving like untempered chocolate, it will still eat beautifully. The only real trade-off is that it will melt on your fingers a bit faster and is happiest stored in the fridge.
Using good chocolate: This is not the place for compound chocolate, melts, buttons or chips. There is nowhere for average chocolate to hide in candy cane chocolate bark like this, and you only have a handful of ingredients to work with. Use a decent eating or baking chocolate (like the Nestlé Plaistowe bars I’ve used) and you’ll get a smoother melt, better flavour and a more satisfying snap when you break up the bark.
Single batch versus double batch: The ingredients scale batch well depending on how thick you want each layer of your peppermint bark recipe to be. A single batch made on a 23cm x 30cm baking sheet gives you thinner layers, around 2–3mm, which means a crisper snap and slightly more elegant shards for gifting. A double batch in a pan of the same footprint but higher sides will give you layers closer to 5mm thick and a chunkier, more indulgent result. Both versions work – it just depends on whether you want dainty shards or more of a “slab of Christmas” energy.
Wrangling candy canes in summer: If you’re making Christmas peppermint chocolate bark in an Australian December, the humidity will start working on those candy canes the moment you peel off the plastic. They’ll pick up a lovely shine but also a fair bit of stickiness. The trick is timing: don’t crush or chop the candy canes ahead of time. Grind the fine candy cane “dust” and break the décor pieces just before you start melting the chocolate, then keep them in sealed containers until you’re ready to mix and decorate.
Keep white and dark chocolate separate: To keep the layers of your candy cane chocolate bark looking sharp, treat the dark and white chocolate like separate projects. Use different bowls and different silicone spatulas for each, and make sure there are no streaks of dark chocolate hiding in the white chocolate bowl (or vice versa) before you melt or spread. Any stray smears will show up as muddy streaks in the finished bark, especially in the white layer.
Microwave tempering (at a glance): The full microwave tempering method for this candy cane peppermint chocolate bark is set out in the blog, but here’s a short version. Gently melt the chopped chocolate in the microwave until it’s 50% melted and 50% solid, then stop applying heat and stir vigorously until the remaining pieces melt and the chocolate thickens slightly and turns glossy.
Storage and make ahead: For storage, treat this Christmas peppermint chocolate bark with the same respect you’d give any good chocolate. In a cooler climate you could leave it in an airtight container at room temperature for 1–2 weeks, somewhere dark and away from direct heat. In an Australian summer though, especially if you’re dealing with humidity, I’d move it straight to the fridge. Stored in an airtight container in the refrigerator, this candy cane chocolate bark will happily keep for 2–3 weeks. If you’re serving it on a platter, take out only what you need and keep the rest chilled; the pieces will soften a little as they sit out unless you’ve tempered the chocolate. If you’re really planning ahead, you can also freeze the bark for up to a month, layered between baking paper in a sealed container, then thaw it in the fridge before serving.