Recipes

Blueberry Cheesecake Kolaches
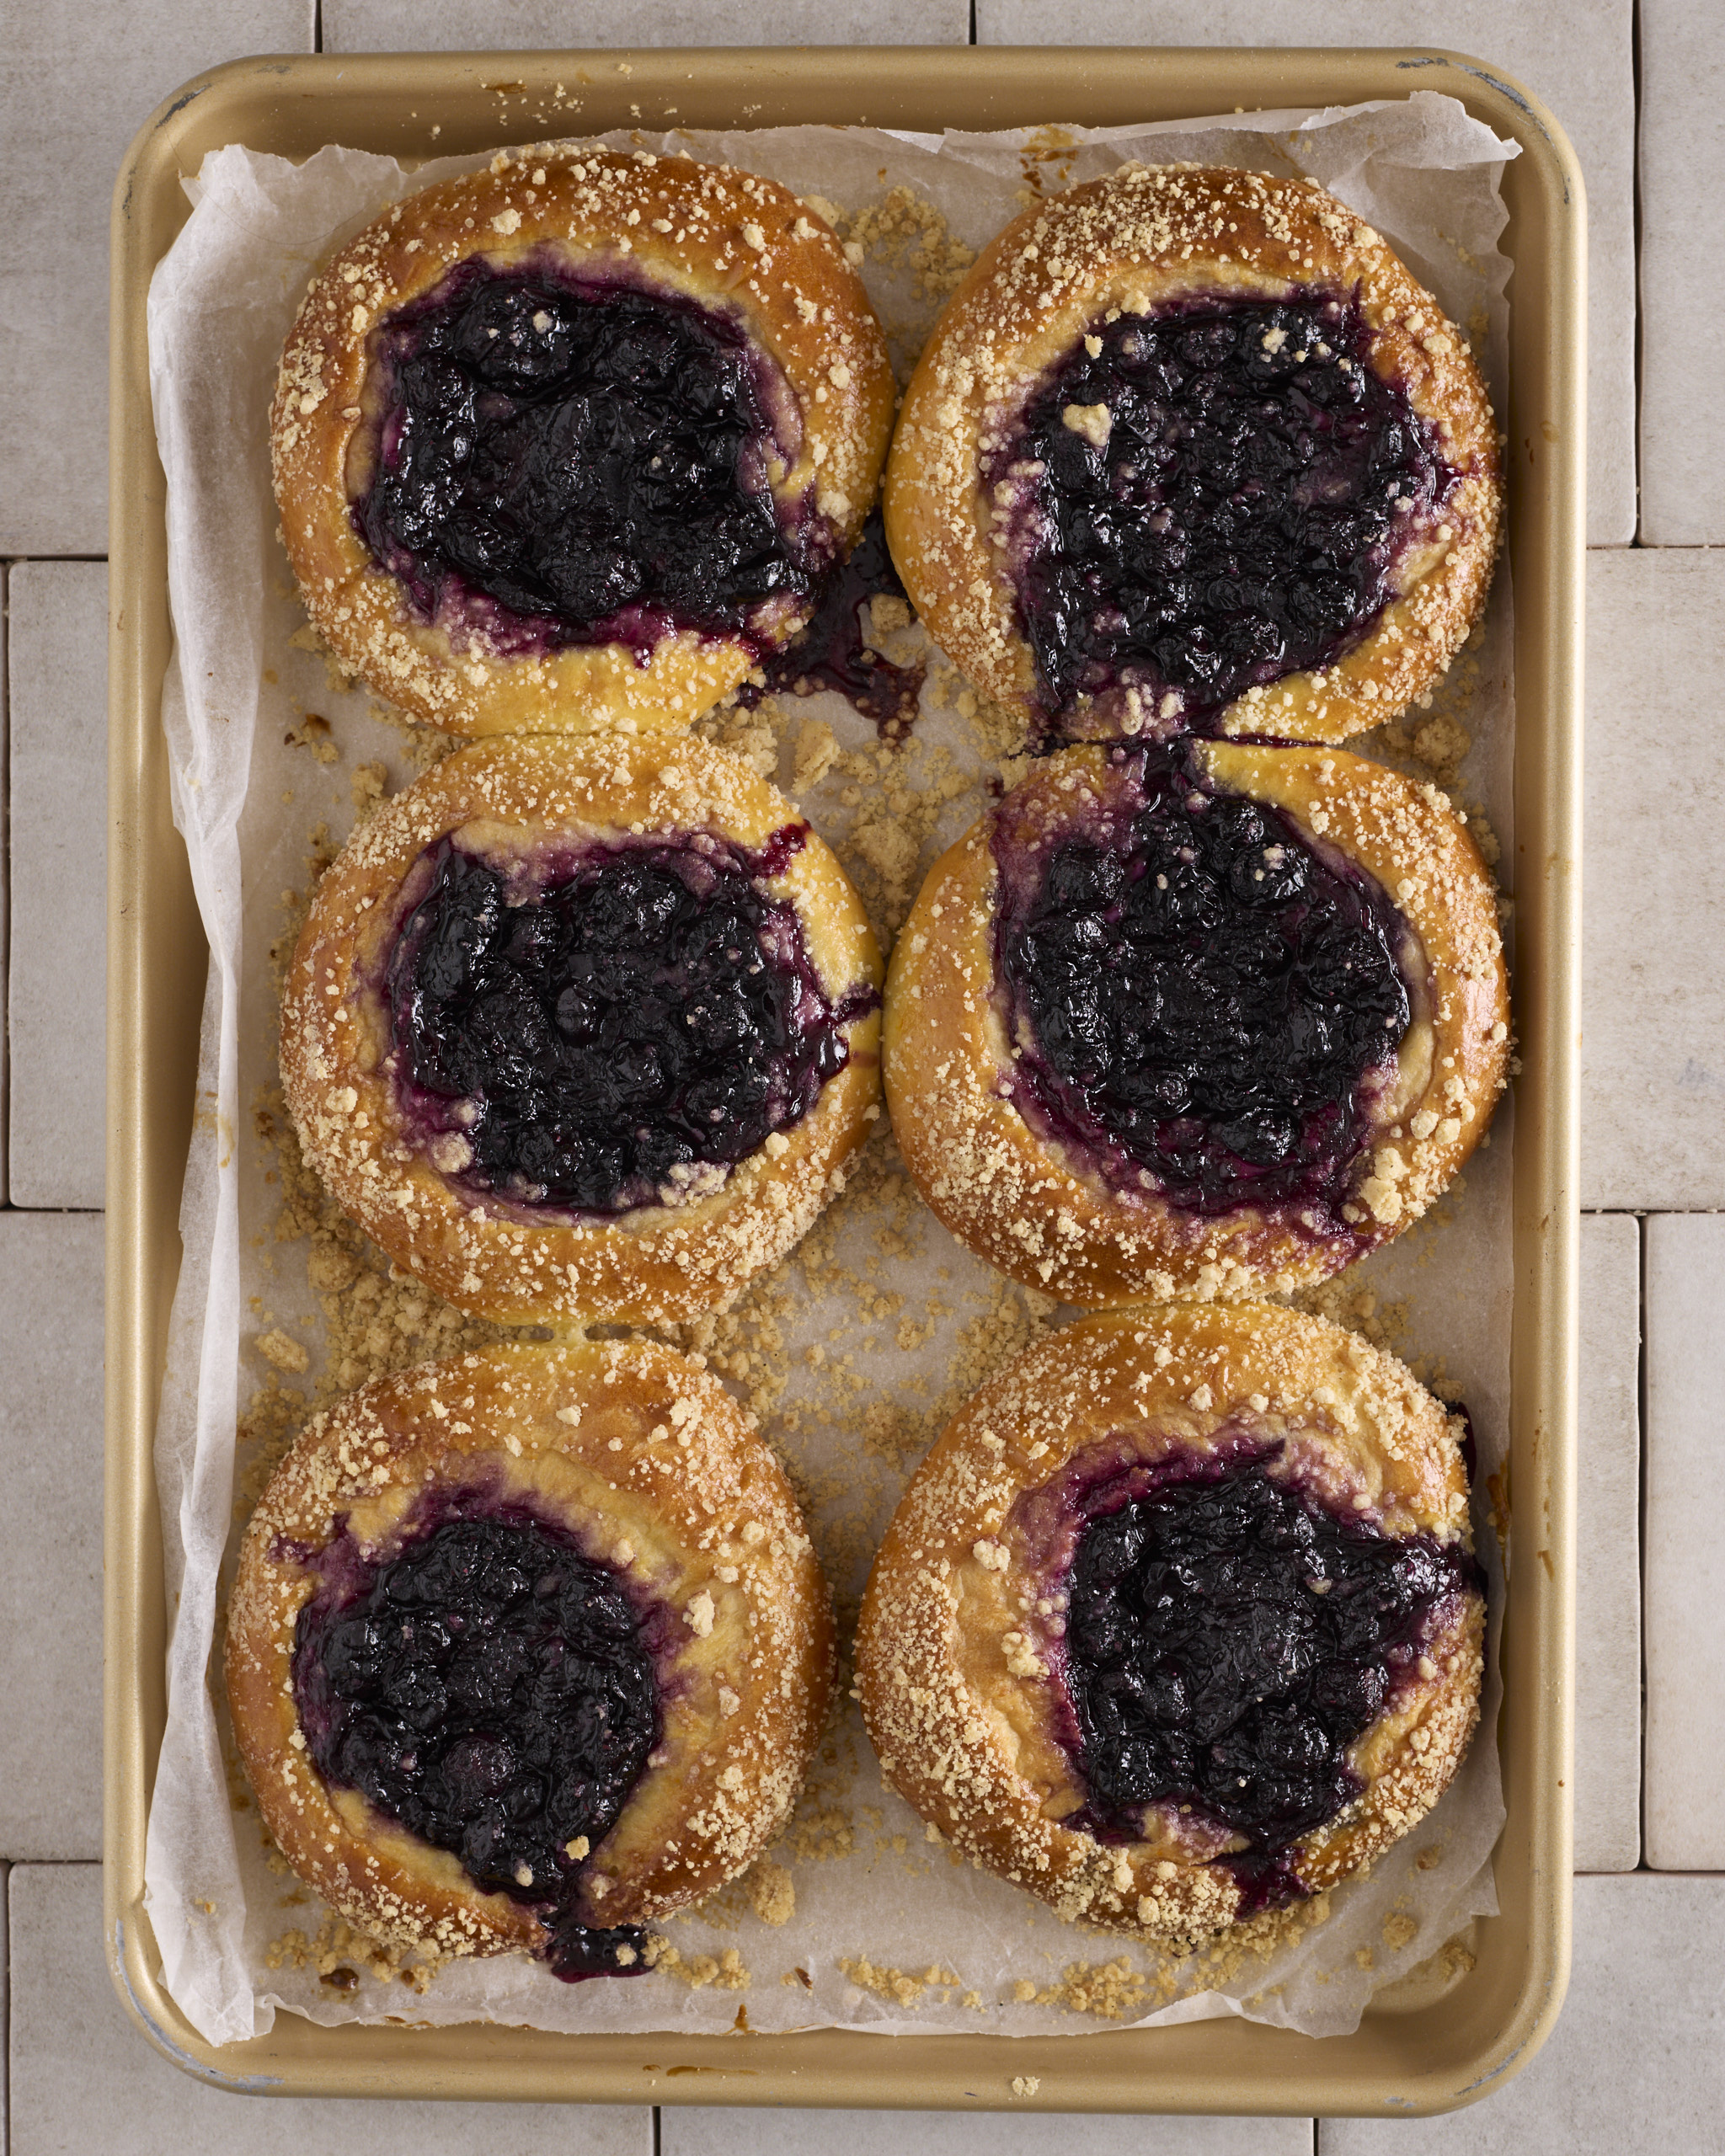
Six baked blueberry cheesecake kolache on a gold baking tray lined with baking paper. Each filled sweet bun has a centre of blueberry rosemary jam over the cheesecake filling, with cinnamon crumble scattered across the golden edges. Jam has run down the side of two of the buns onto the paper.

My Blueberry Cheesecake Kolaches recipe makes twelve filled sweet buns. While the dough I’ve used in this recipe is my foundation sweet dough, the flavours and method of filling the open buns are in the style of the Czech koláče. They have followed the Czech diaspora around the world – particularly to Texas, where they’re a common home bake and are found in many local bakeries. As you’d expect, the name has been Americanised to kolache singular and kolaches plural. 

Traditional Czech fillings for kolaches include a fresh curd cheese (tvaroh), poppy seeds, fresh fruit and plum jam. I’ve swapped in a filling that layers cheesecake with my blueberry rosemary jam. The buns are sprinkled with a cinnamon crumble before baking. The Czechs call their streusel-style topping posypka. 

My method is really straightforward and I’ve worked in a chefy technique that makes filling the buns foolproof. I think they bake up beautifully – as soon as they’re out of the oven you can see just how delicious they are going to taste. The jam finds the low side of every bun and I’ve stopped fighting it. 

Let me step it out for you. 

Ingredients

Foundation sweet dough

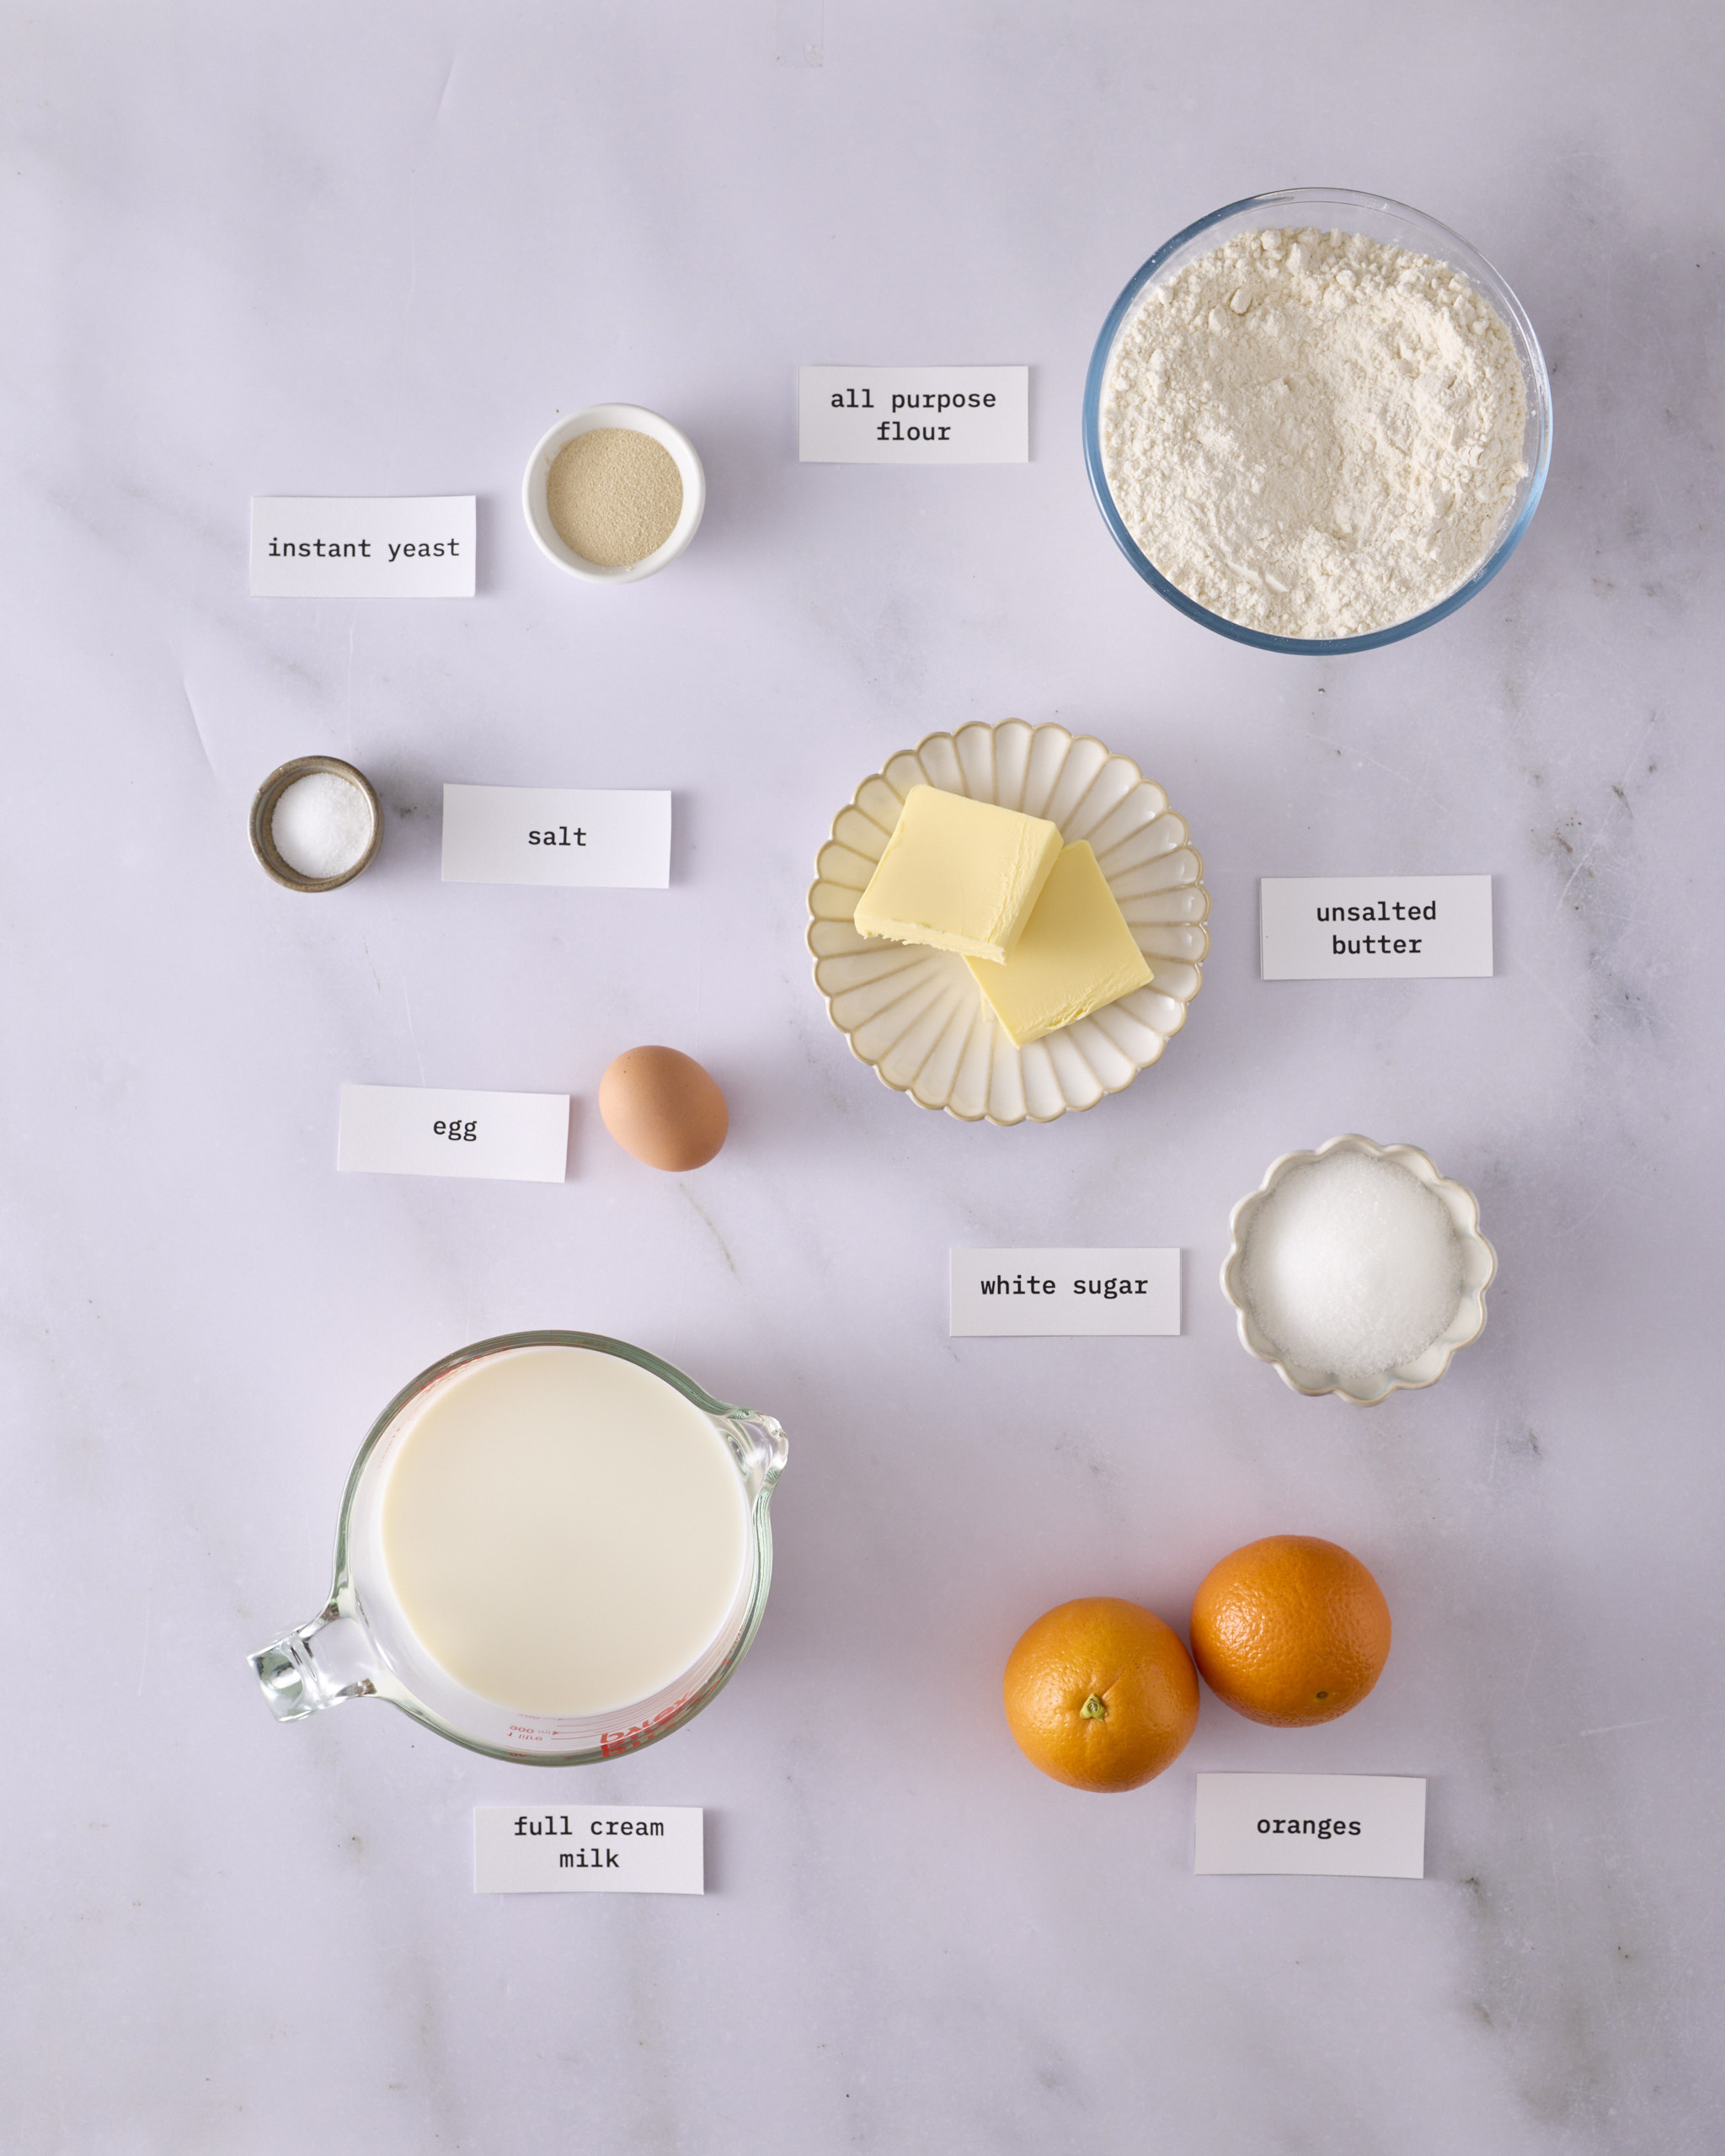
Labelled ingredients for the foundation sweet dough laid out on a marble surface. All-purpose flour, full cream milk, unsalted butter, instant yeast, white sugar, salt, one egg and two oranges.

Tangzhong: 

  • 35g all-purpose flour 
  • 120g full cream milk 
  • ½ teaspoon table salt 

Dough: 

  • 60g white sugar 
  • 2 oranges 
  • 350g full cream milk 
  • 1 large egg 
  • 575g all-purpose flour 
  • 1 tablespoon instant yeast 
  • 115g unsalted butter 

Kolache filling

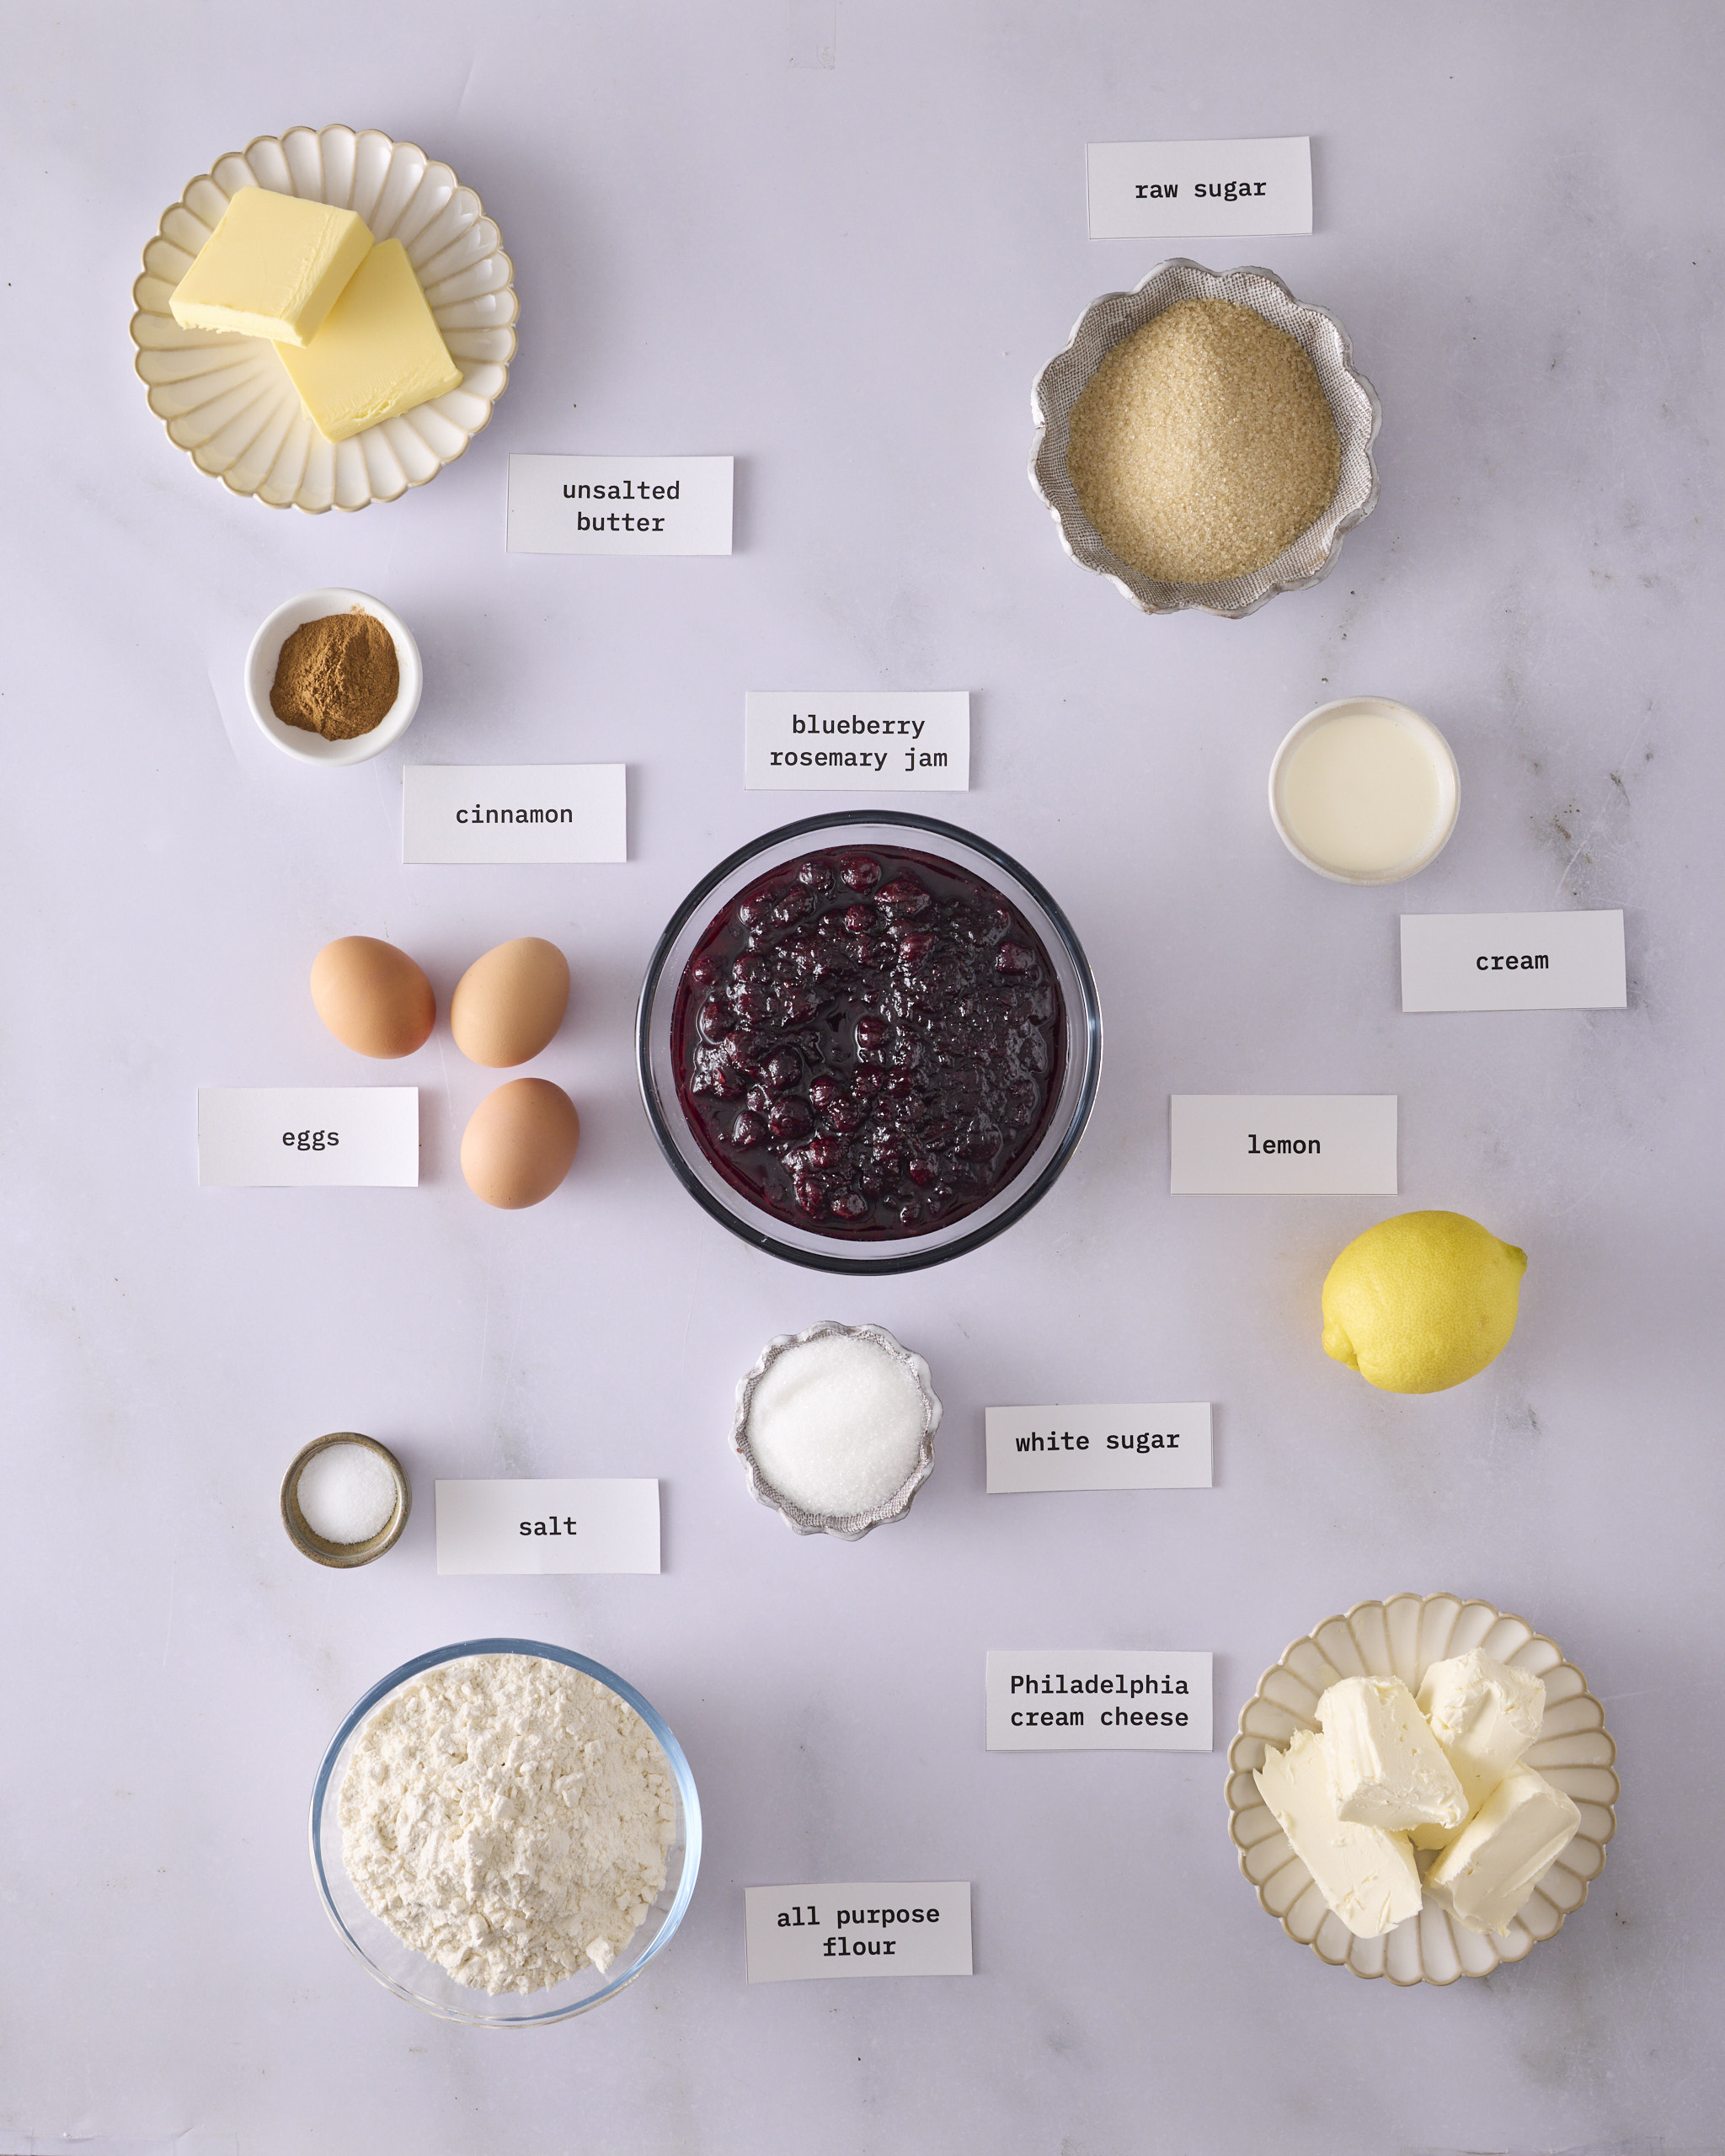
Labelled ingredients for the blueberry cheesecake kolache filling laid out on a marble surface. A bowl of blueberry rosemary jam sits in the centre with Philadelphia cream cheese, three eggs, a lemon, cream, all-purpose flour, raw sugar, white sugar, unsalted butter, cinnamon and salt for the cheesecake filling and cinnamon crumble.

Blueberry rosemary jam: 

  • 350-400g blueberry rosemary jam 

Lemon cheesecake filling: 

  • 225g original Philadelphia cream cheese  
  • 75g white sugar 
  • 1 egg yolk 
  • 1 lemon 
  • ¼ teaspoon table salt 

Cinnamon crumble: 

  • 100g all-purpose flour 
  • 50g raw sugar 
  • 50g unsalted butter 
  • ¼ teaspoon cinnamon 
  • Pinch of table salt 

Egg wash: 

  • 2 egg yolks 
  • 2 tablespoons cream or milk 

What to make ahead

Blueberry rosemary jam

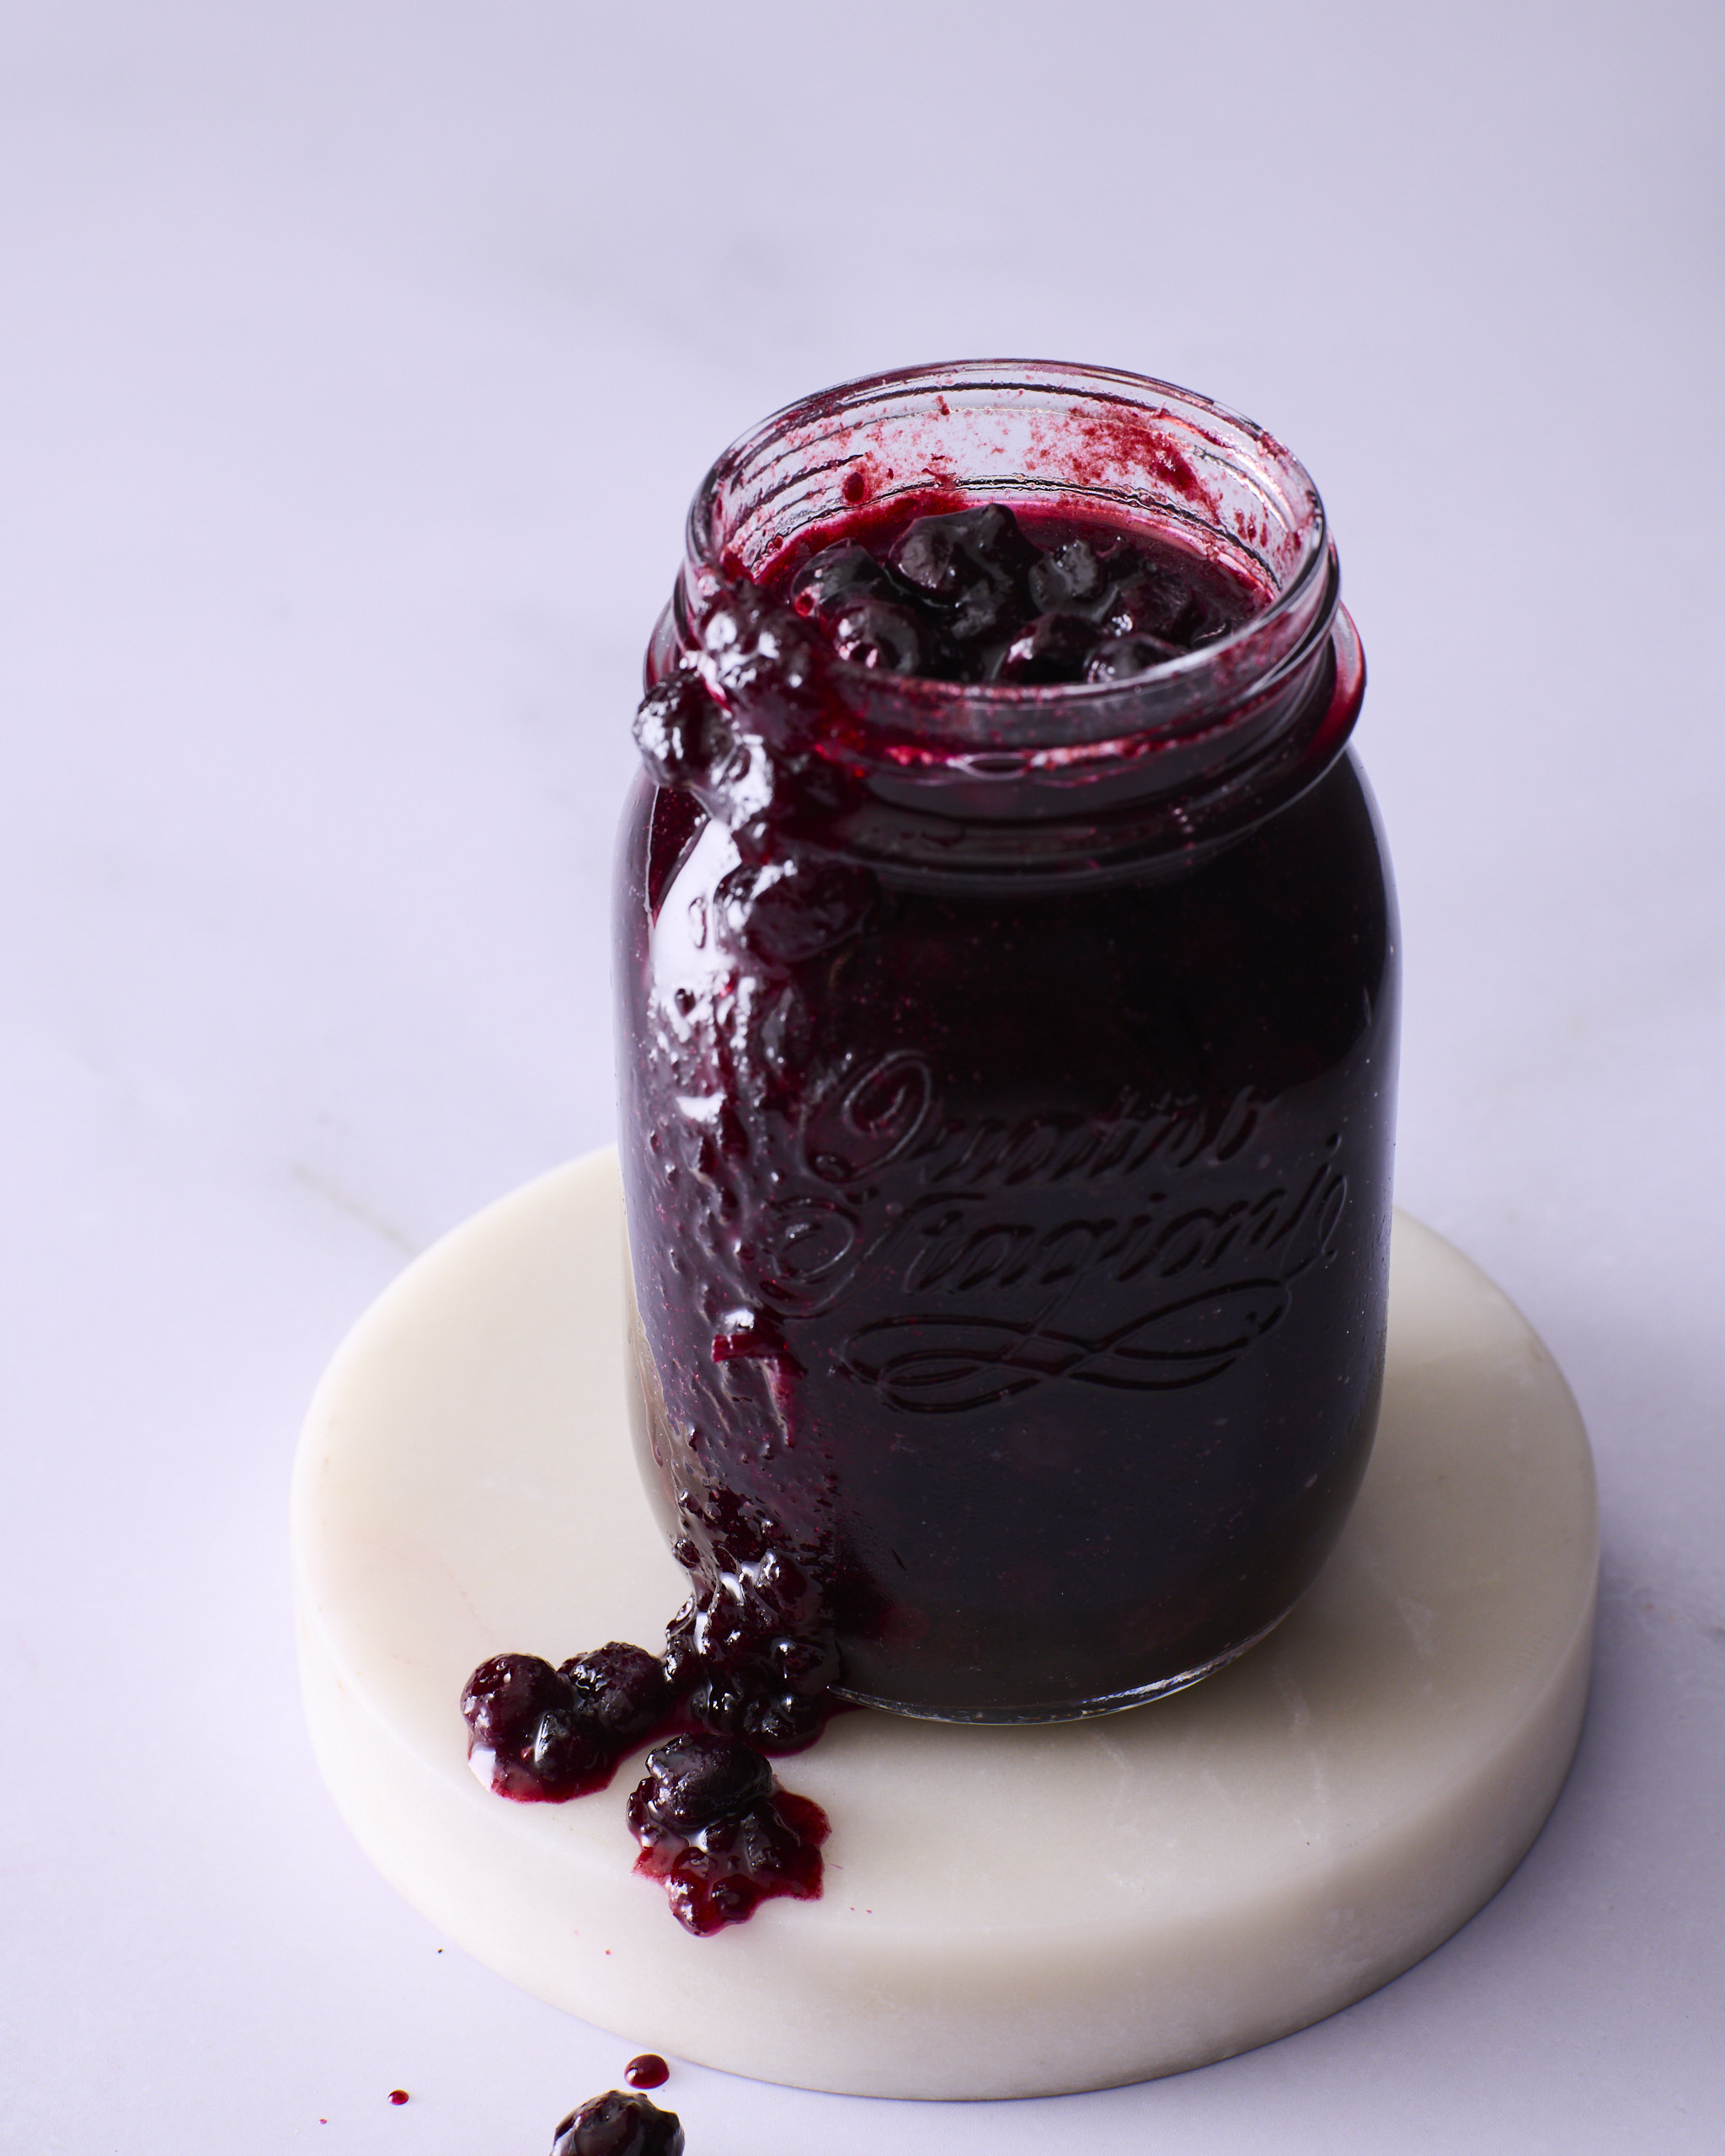
An open jar of blueberry rosemary jam for blueberry cheesecake kolache, standing on a white marble coaster. The jam is dark and glossy with whole blueberries visible at the rim, and it has run down the side of the jar onto the marble.

If you’re going to commit to baking my blueberry cheesecake buns, you won’t regret going the extra mile and making the Blueberry Rosemary Jam from scratch. Well, you’d have to if you’re set on the rosemary part, as I don’t think I’ve seen this flavour on the market shelf. The full jam recipe makes about 750ml or 1kg of jam. So you’ll have enough for two batches of buns or to slather over your breakfast toast, choose cream cheese over butter. Or take a deeper dive on my website and try out the recipe for Blueberry Coconut Mini Trifles [LINK] or Blueberry Rosemary Crumble Cheesecake. 

Lemon cheesecake filling

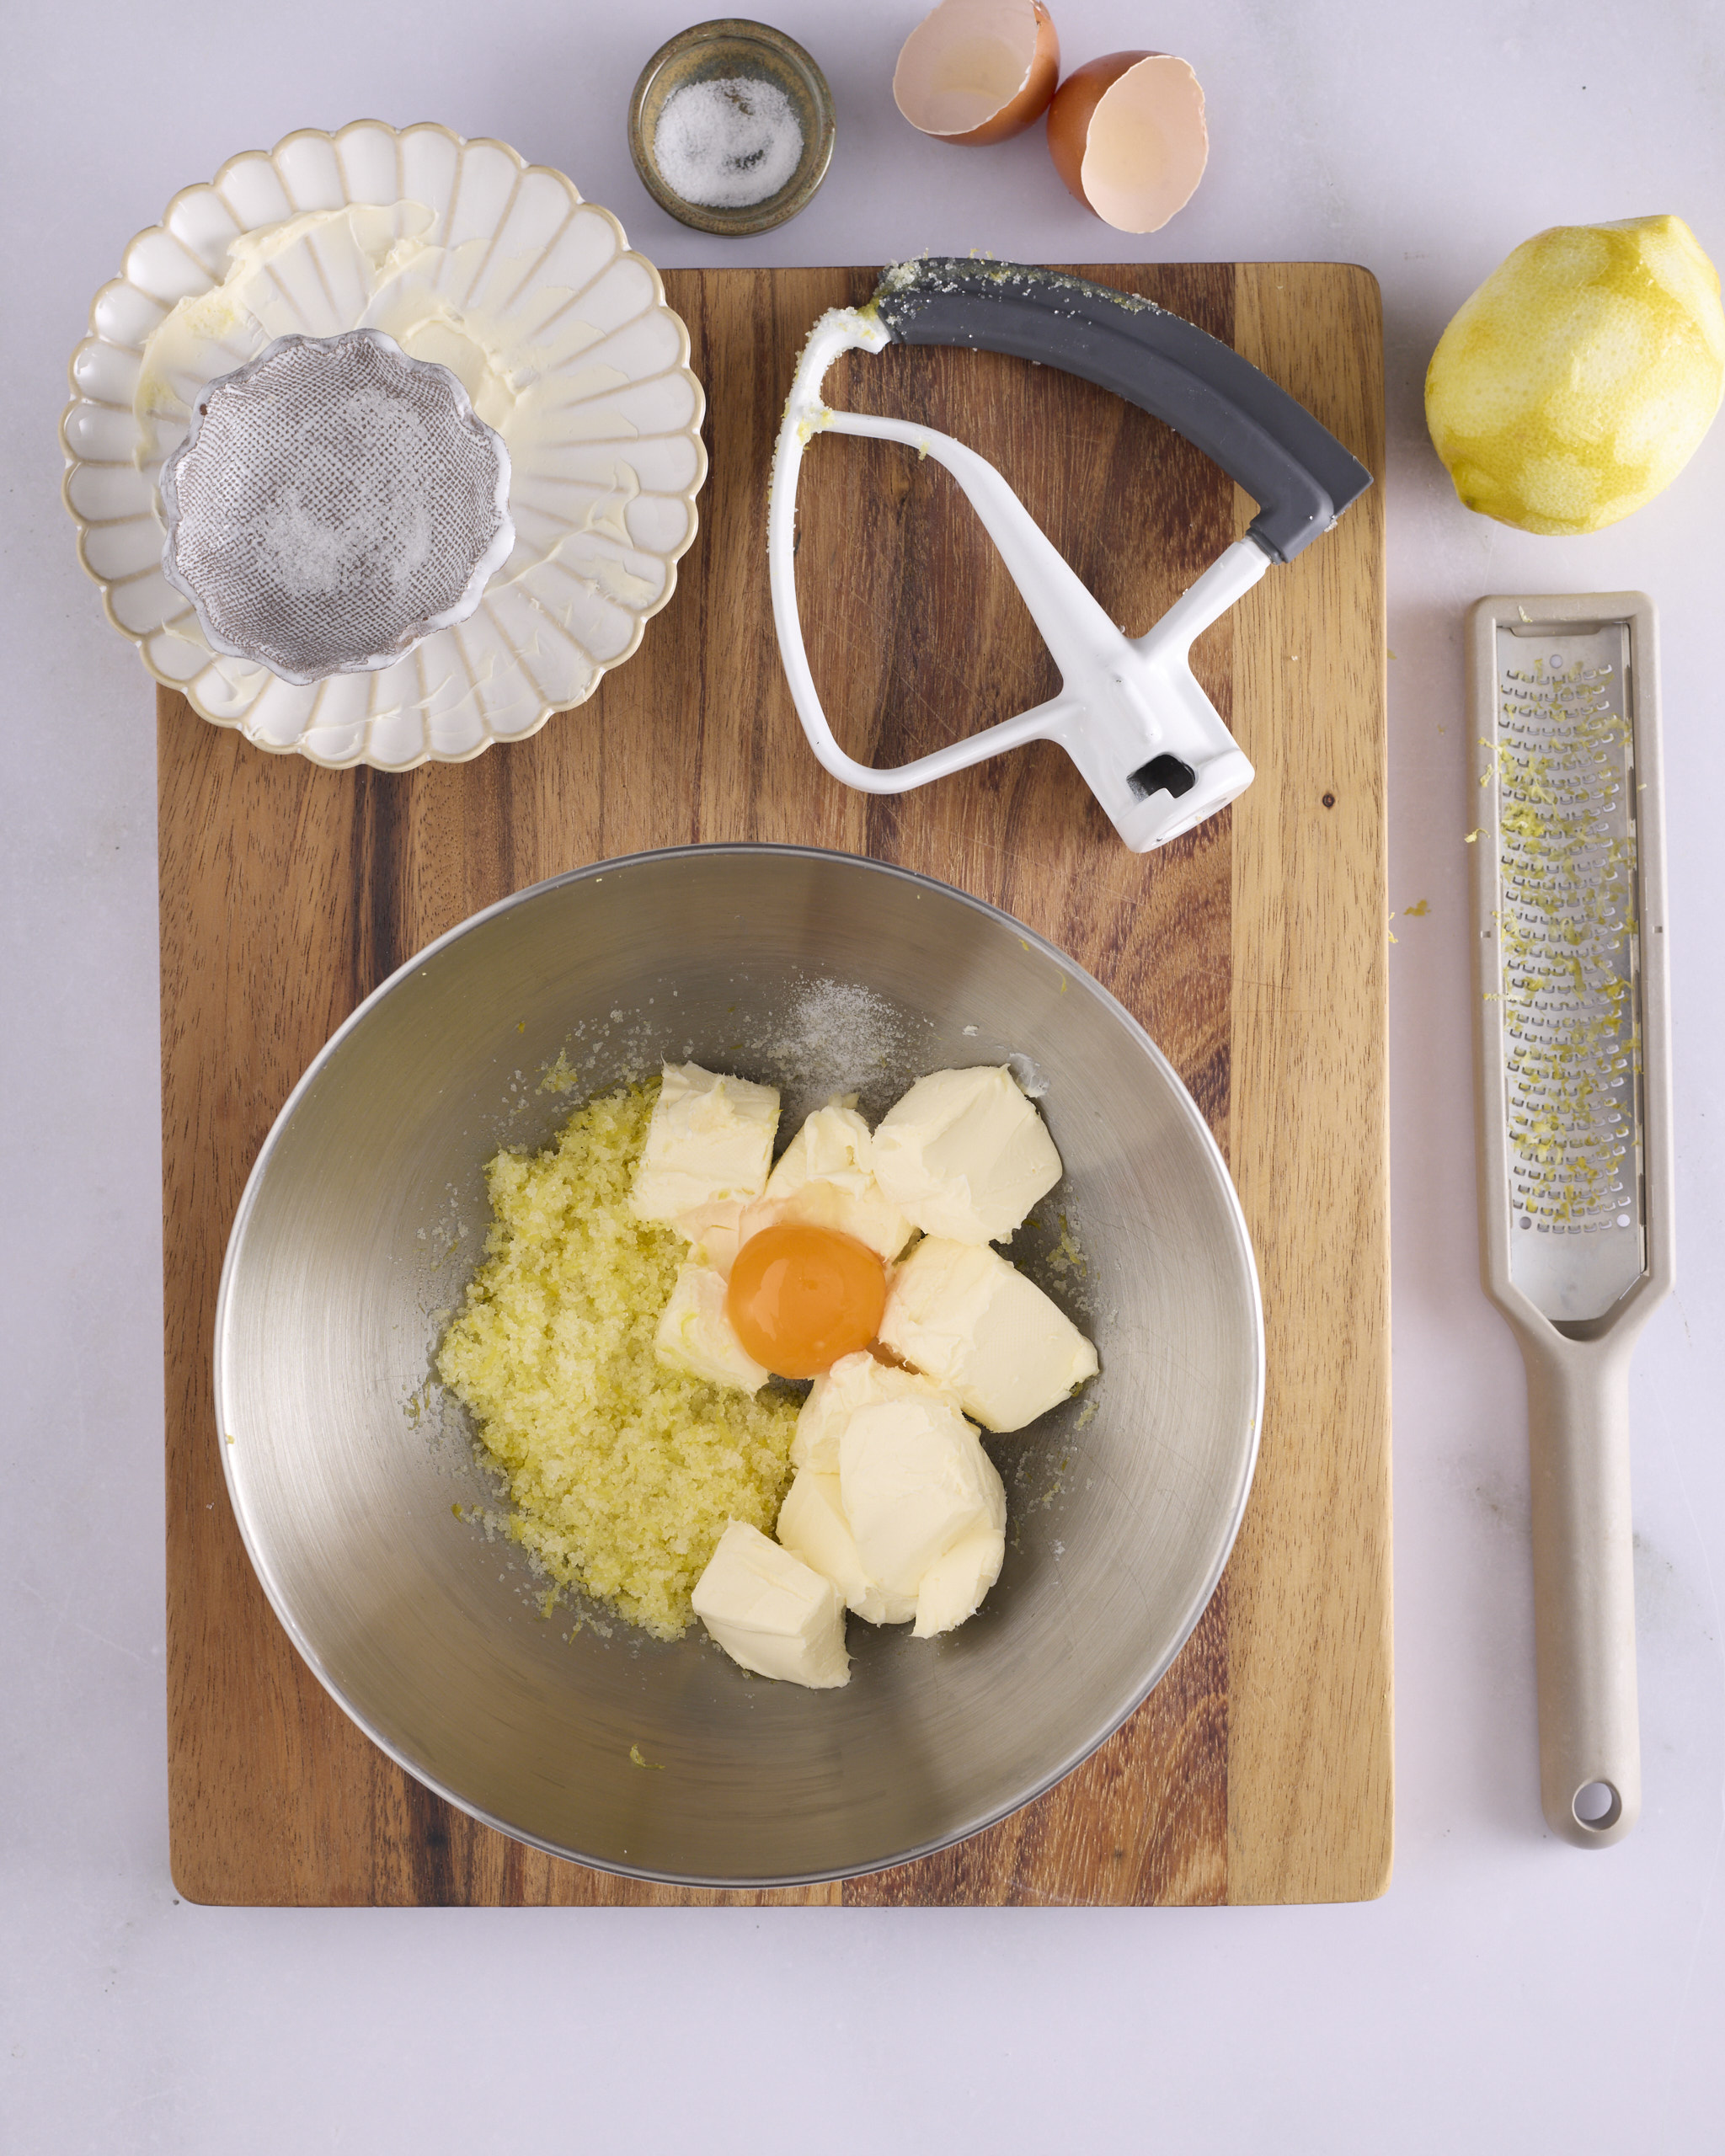
Ingredients for the lemon cheesecake filling for blueberry cheesecake kolache in a stand mixer bowl on a wooden board. Lemon zest rubbed into white sugar sits alongside cubes of Philadelphia cream cheese and an egg yolk, with salt, a zested lemon, a Microplane and the paddle attachment beside the bowl.
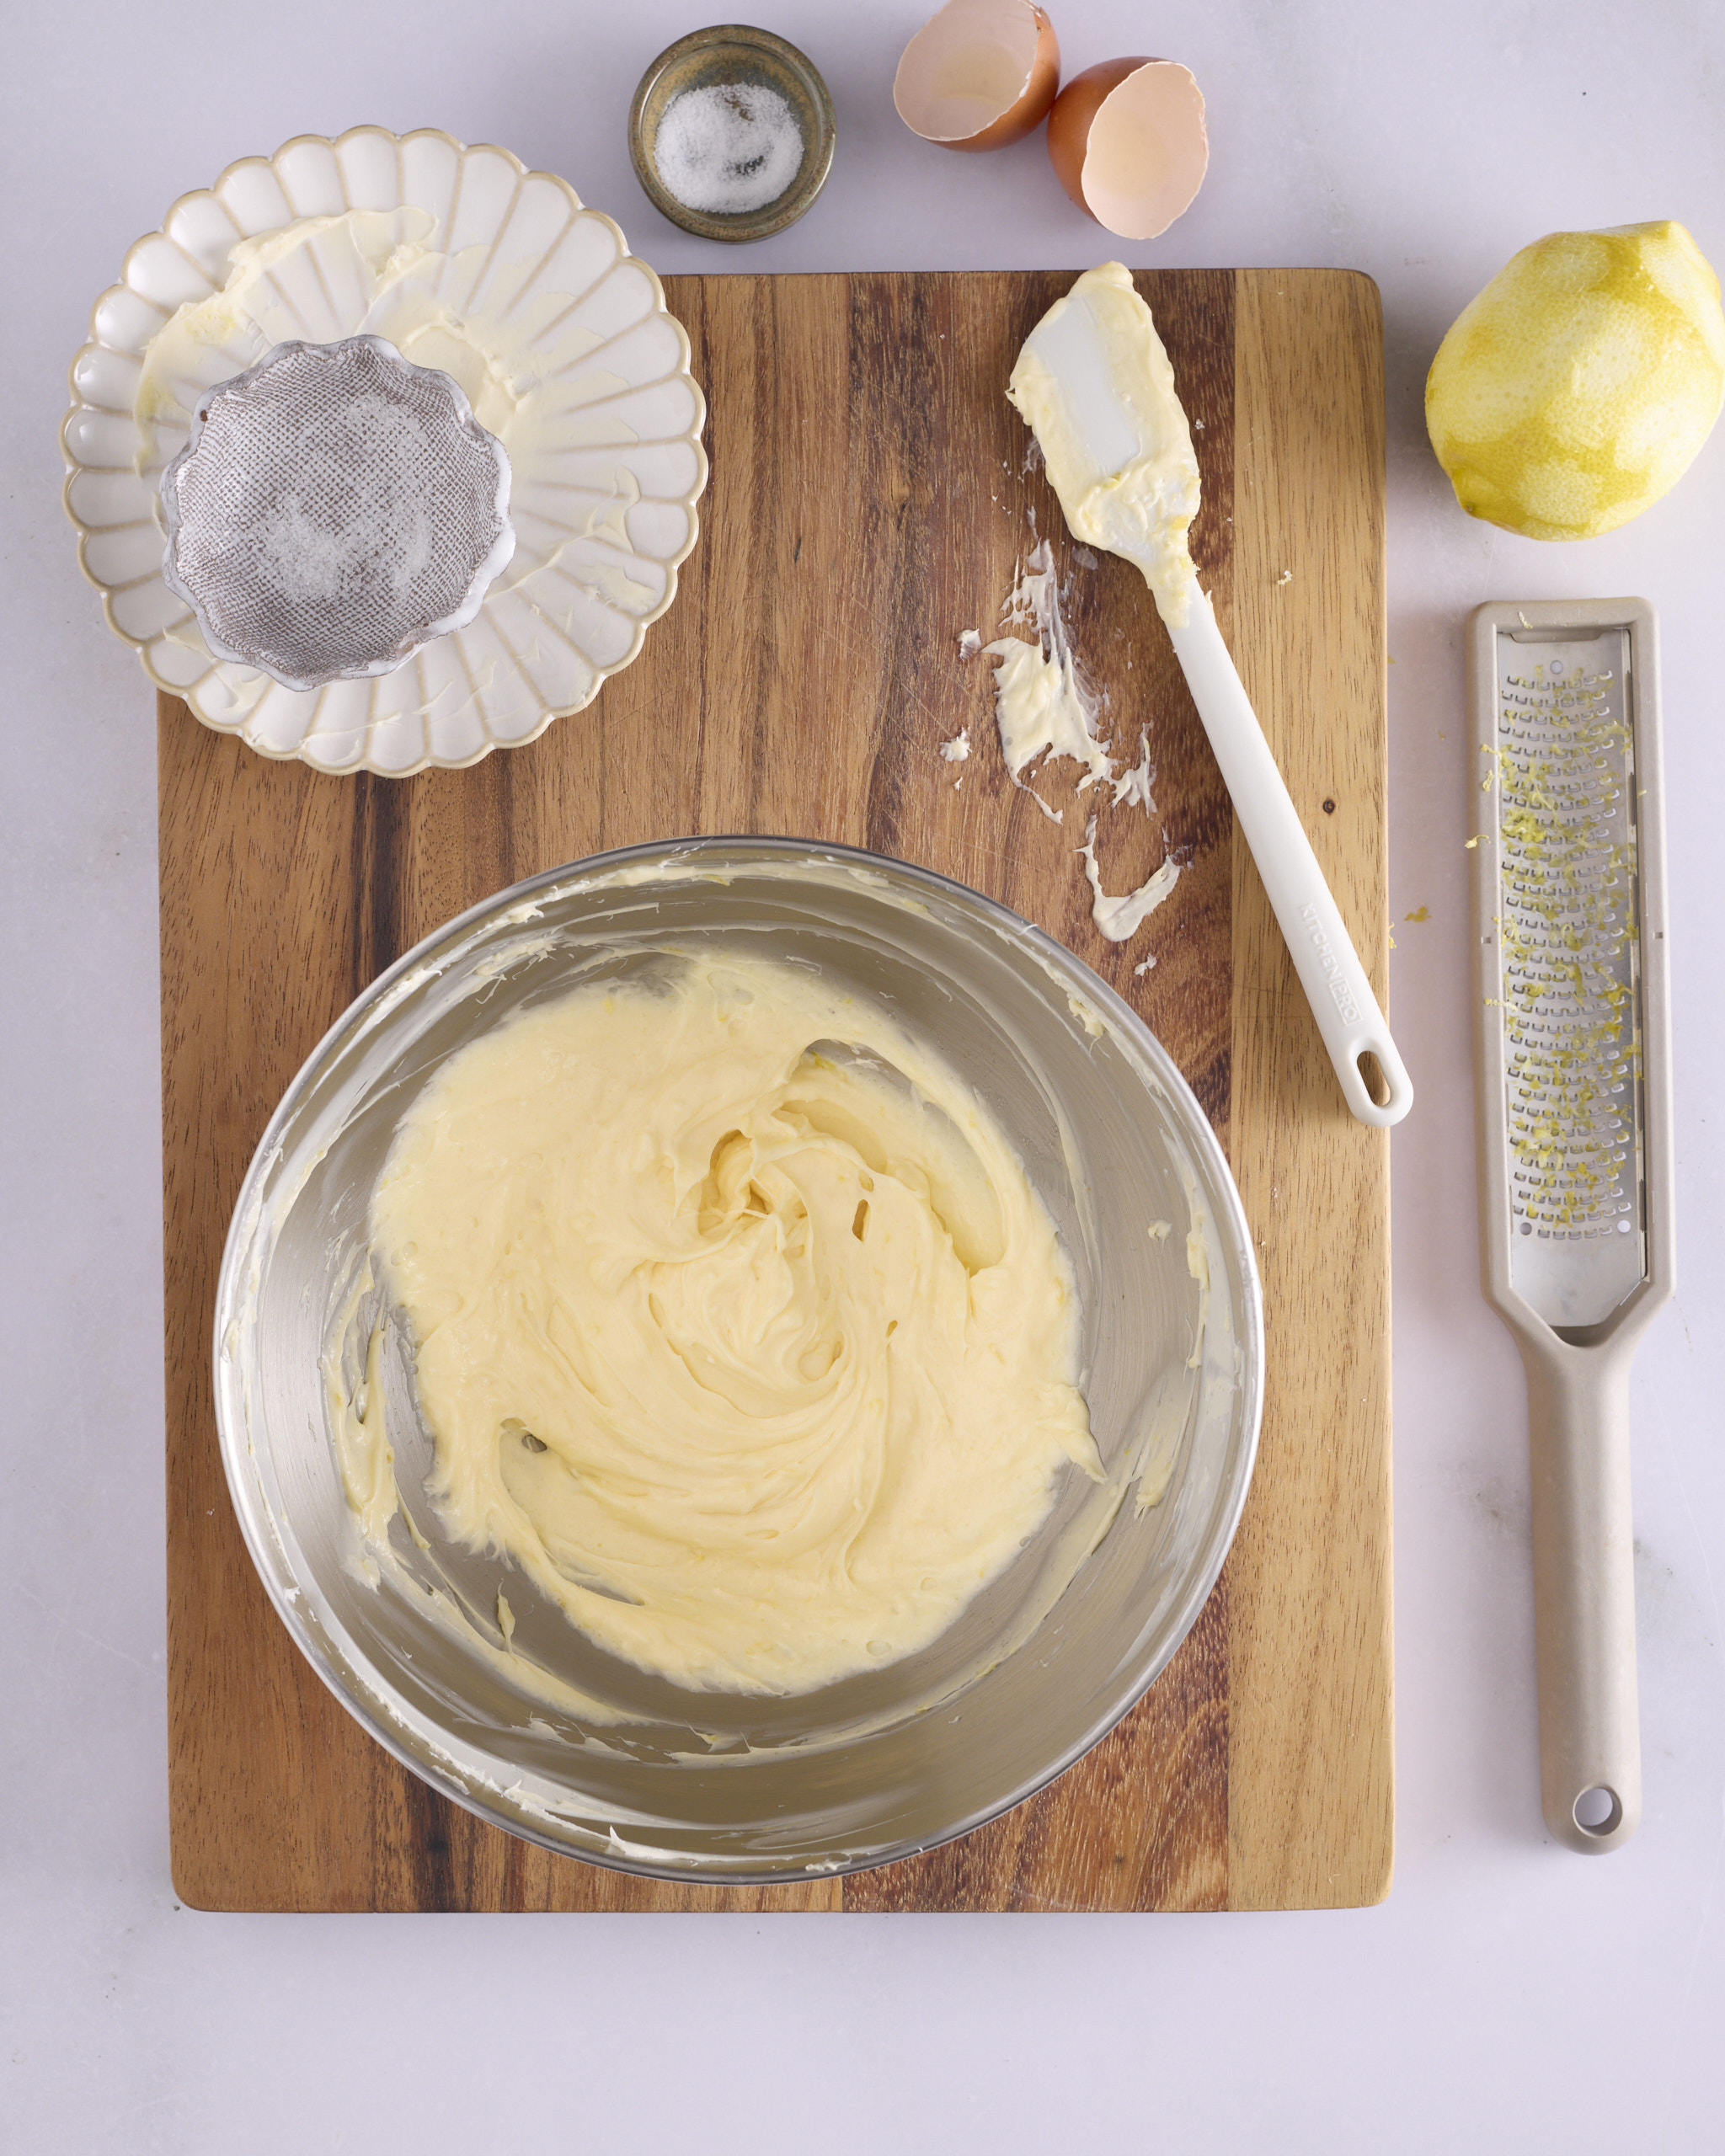
The finished lemon cheesecake filling for blueberry cheesecake kolache in a stand mixer bowl, smooth and pale yellow with flecks of lemon zest through it. A spatula, a zested lemon and a Microplane sit on the wooden board beside the bowl.

Weigh 75g white sugar into the bowl of a stand mixer and zest the lemon over the bowl using a Microplane. Using the paddle attachment, mix the sugar and zest on medium for 2 minutes. The reason this matters is in the foundation sweet dough section below. 

Add 225g original Philadelphia cream cheese, 1 egg yolk, and ¼ teaspoon table salt to the bowl. The cream cheese can be cold straight out of the fridge. Start the mixer on low and increase briefly to medium until the cheesecake batter is smooth. Transfer the cheesecake mix to a medium sized piping bag (this is optional). Refrigerate until you assemble the filling inserts.

Freezing the filling inserts

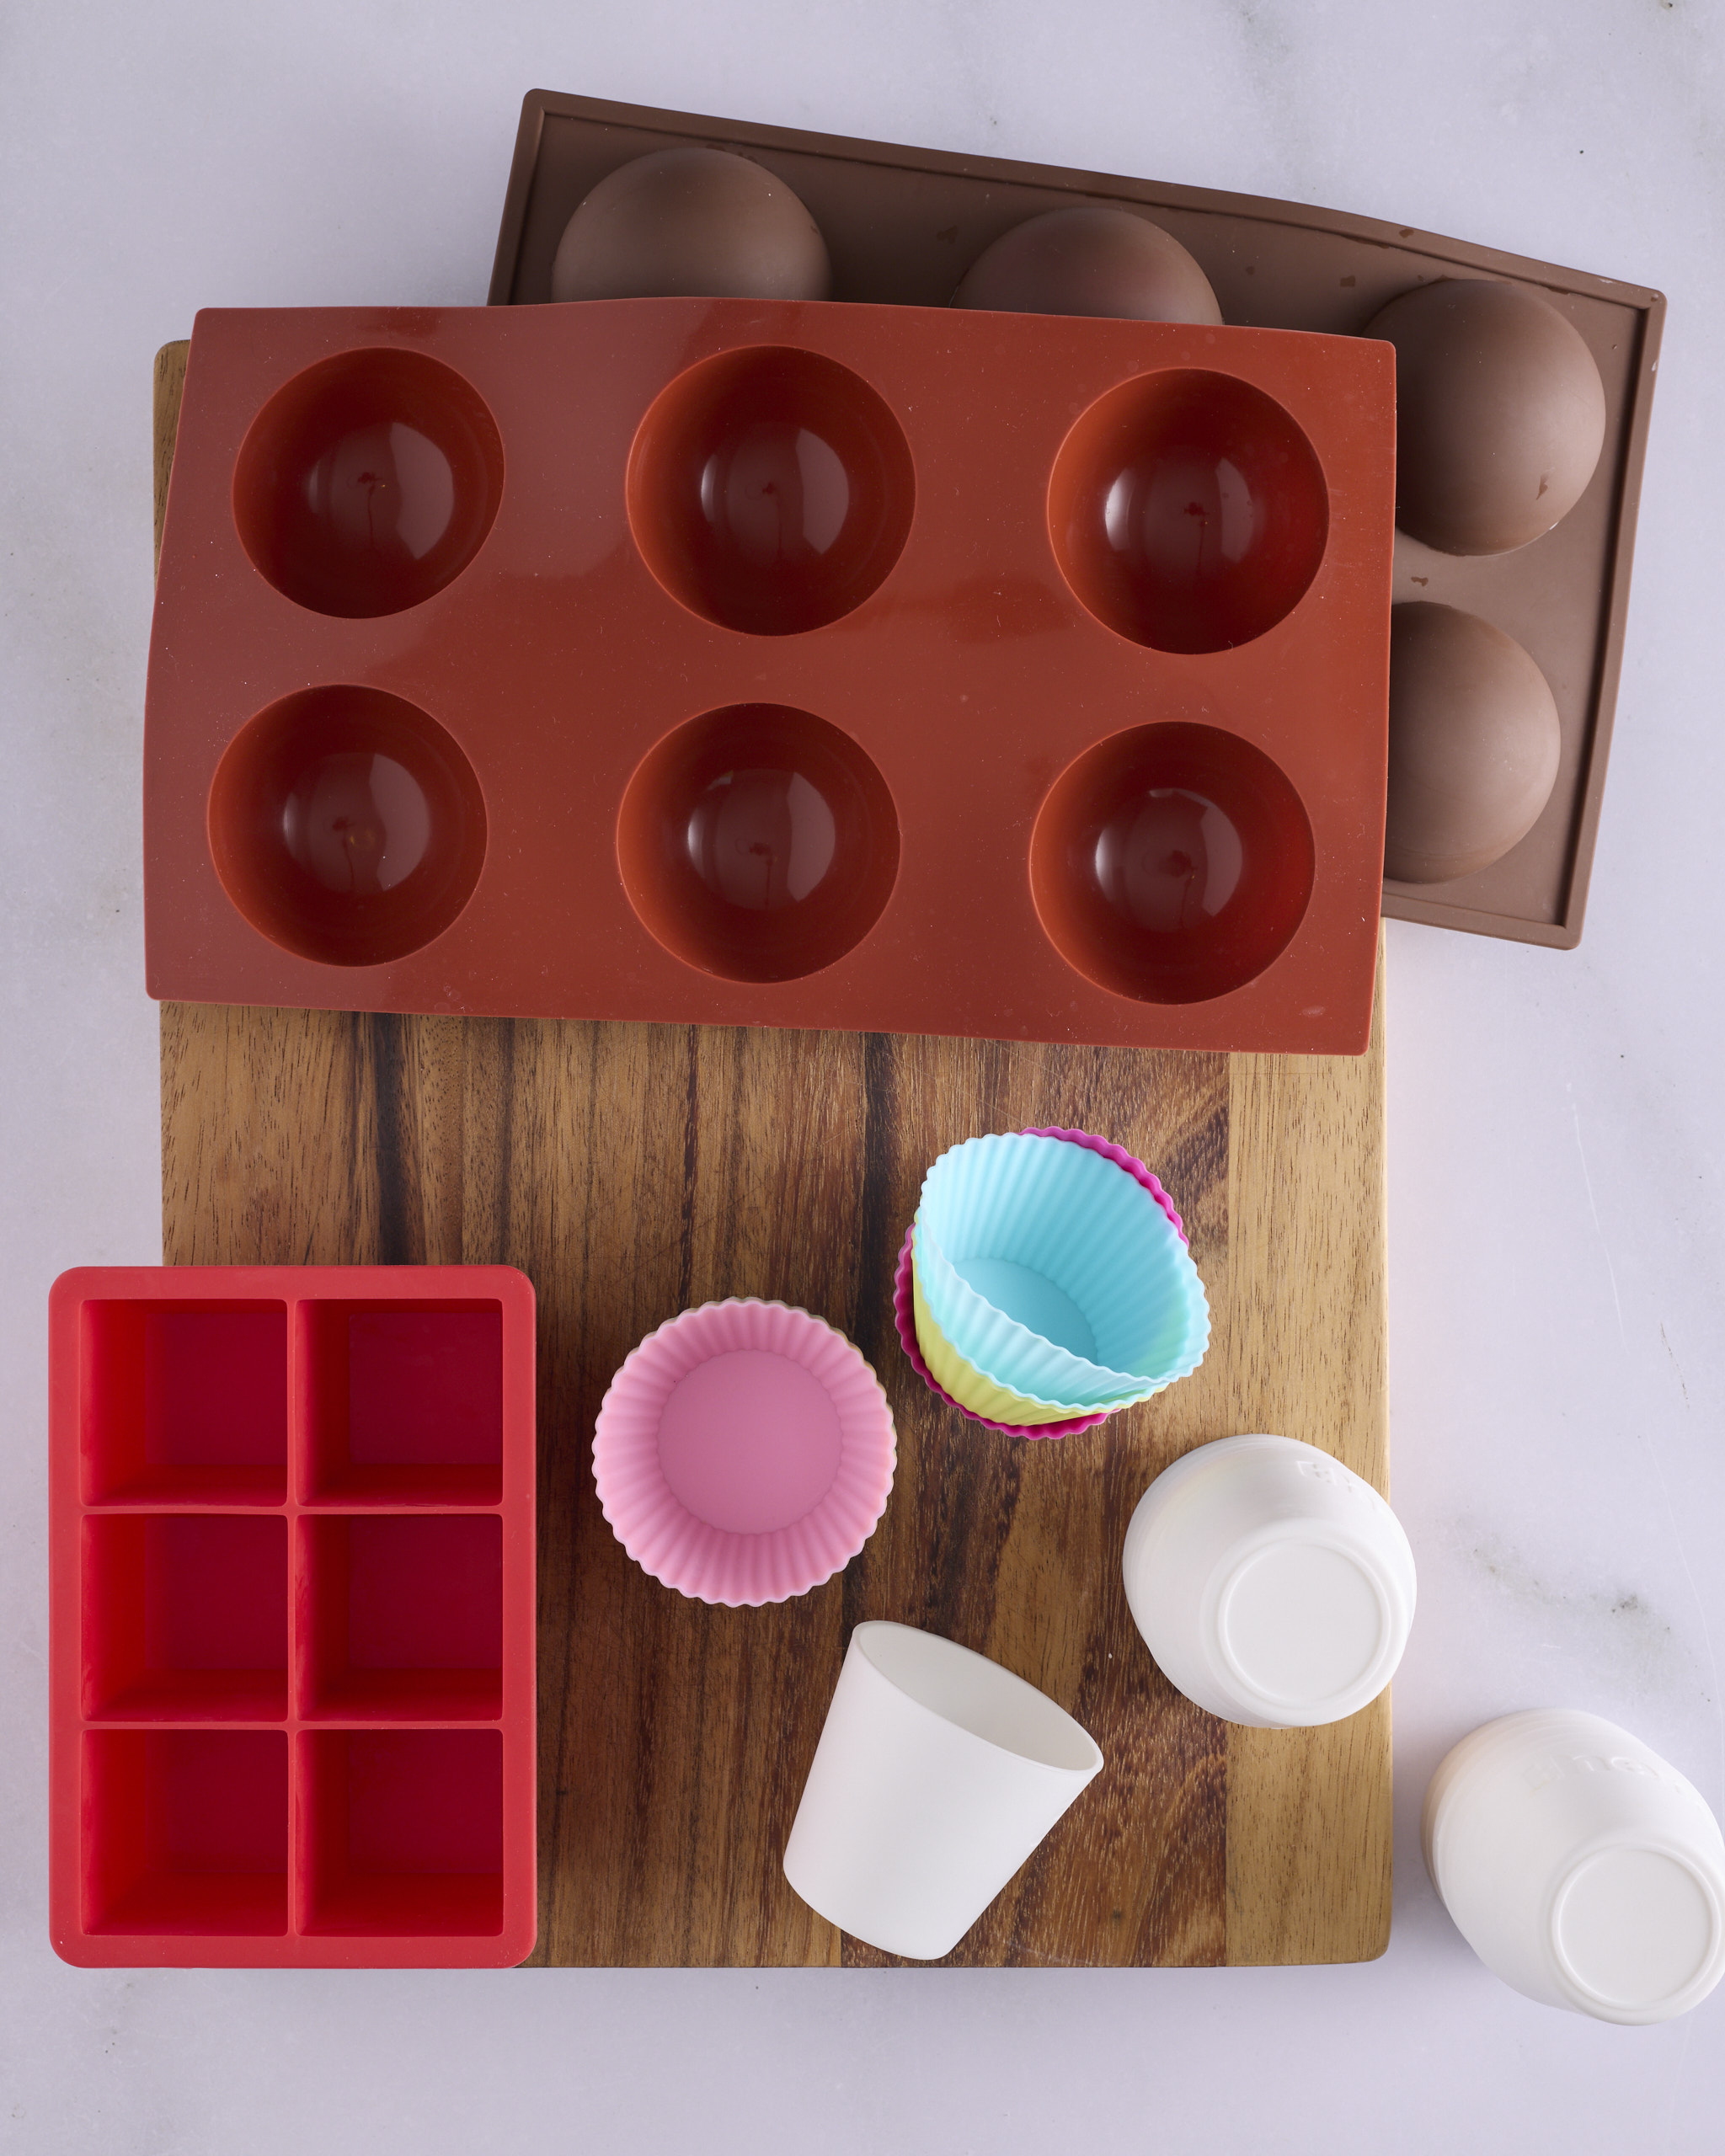
Silicone moulds for freezing the filling inserts for blueberry cheesecake kolache laid out on a wooden board. A six-hole hemisphere mould sits alongside a second hemisphere tray, a square silicone ice cube tray, patterned silicone muffin cups and white dariole moulds.

You can find a good number of videos demonstrating how to fill Czech kolaches, after they’ve proved, just before you put them in the oven. Usually this involves pressing a glass, jar, or measuring cup firmly into the individual dough balls and then piping or spooning in the filling. 

My first few attempts at this technique were disappointing, often with the filling not staying put while the buns baked. Or I didn’t make the hole big enough and most of the filling escaped over the sides of the buns as they baked. 

Here’s where we borrow from the professionals. 

To make my method more foolproof, I’ve adapted the technique of using frozen filling inserts that’s often used in professional bakeries. The best way to create the inserts is by using flexible silicone moulds. I have a few types that would work in my kitchen. My chefy go to are hemisphere silicone moulds I bought when I thought I was going to start making mini entremets. I’m still going to – really! In any event the hemispheres were perfect for this recipe, as you’ll see. 

I also have a dozen silicone dariole moulds waiting for me to get back to panna cotta. Silicone mini muffin baking cups would do just fine. And if you’re pressed, pull out the giant silicone ice cube tray that’s still lurking in the back of your cupboard unused. 

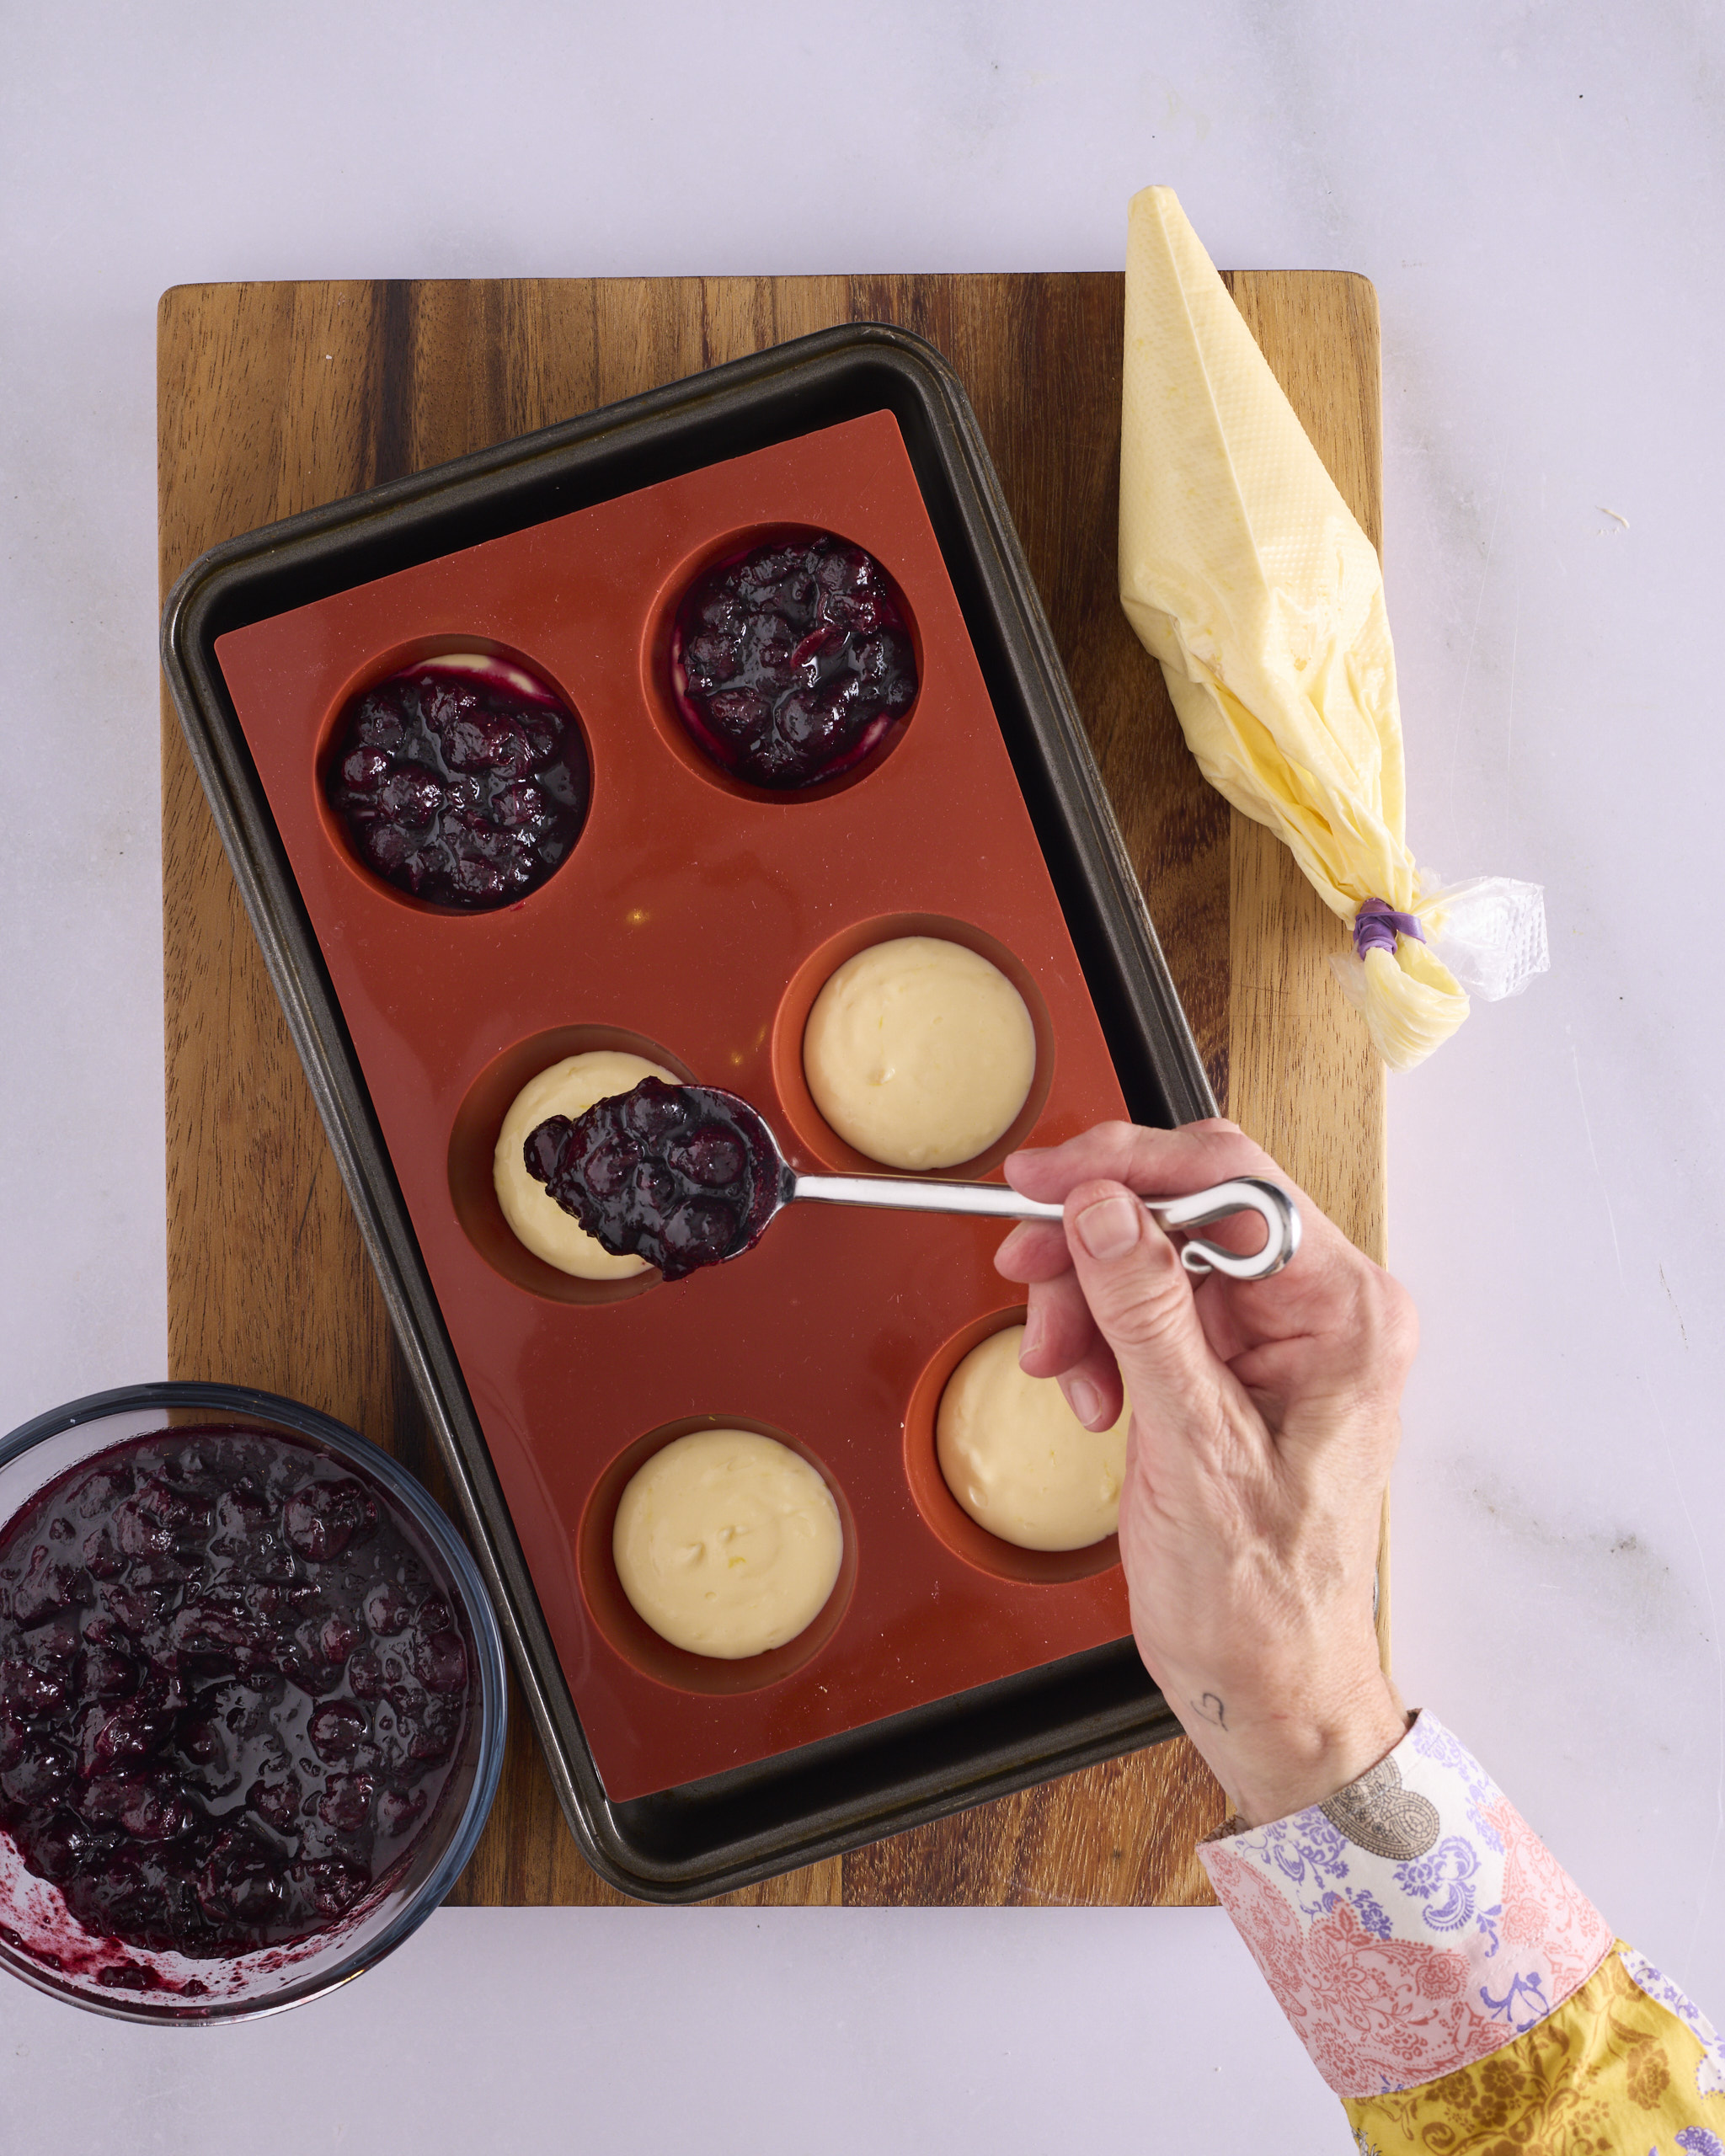
Sandra spoons blueberry rosemary jam over the lemon cheesecake layer in a silicone hemisphere mould to make the frozen filling inserts for blueberry cheesecake kolache. Two moulds are already topped with jam, three hold cheesecake waiting for it, and a piping bag of cheesecake filling and a bowl of jam sit alongside on the tray.

I’ve layered the filling into twelve 6.5cm diameter hemisphere shaped silicone moulds. Place each mould on a baking sheet or tray to keep the moulds level once filled.   

You’re aiming to add a total of about 3 tablespoons of filling per mould. Start by piping or spooning 1 ½ tablespoons of the cheesecake mixture into the mould. Gently spread the mixture with an offset spatula and I also drop the tray onto the kitchen bench a couple times from a height of about 15cm. Then spoon 1 ½ tablespoons of blueberry rosemary jam over the cheesecake mix. Level it off with an offset spatula and try not to mix the two layers together.   

Place the trays in the freezer, making sure that they stay level. Freeze until solid and keep in  the freezer until you’re ready to fill the proved buns.   

Cinnamon crumble

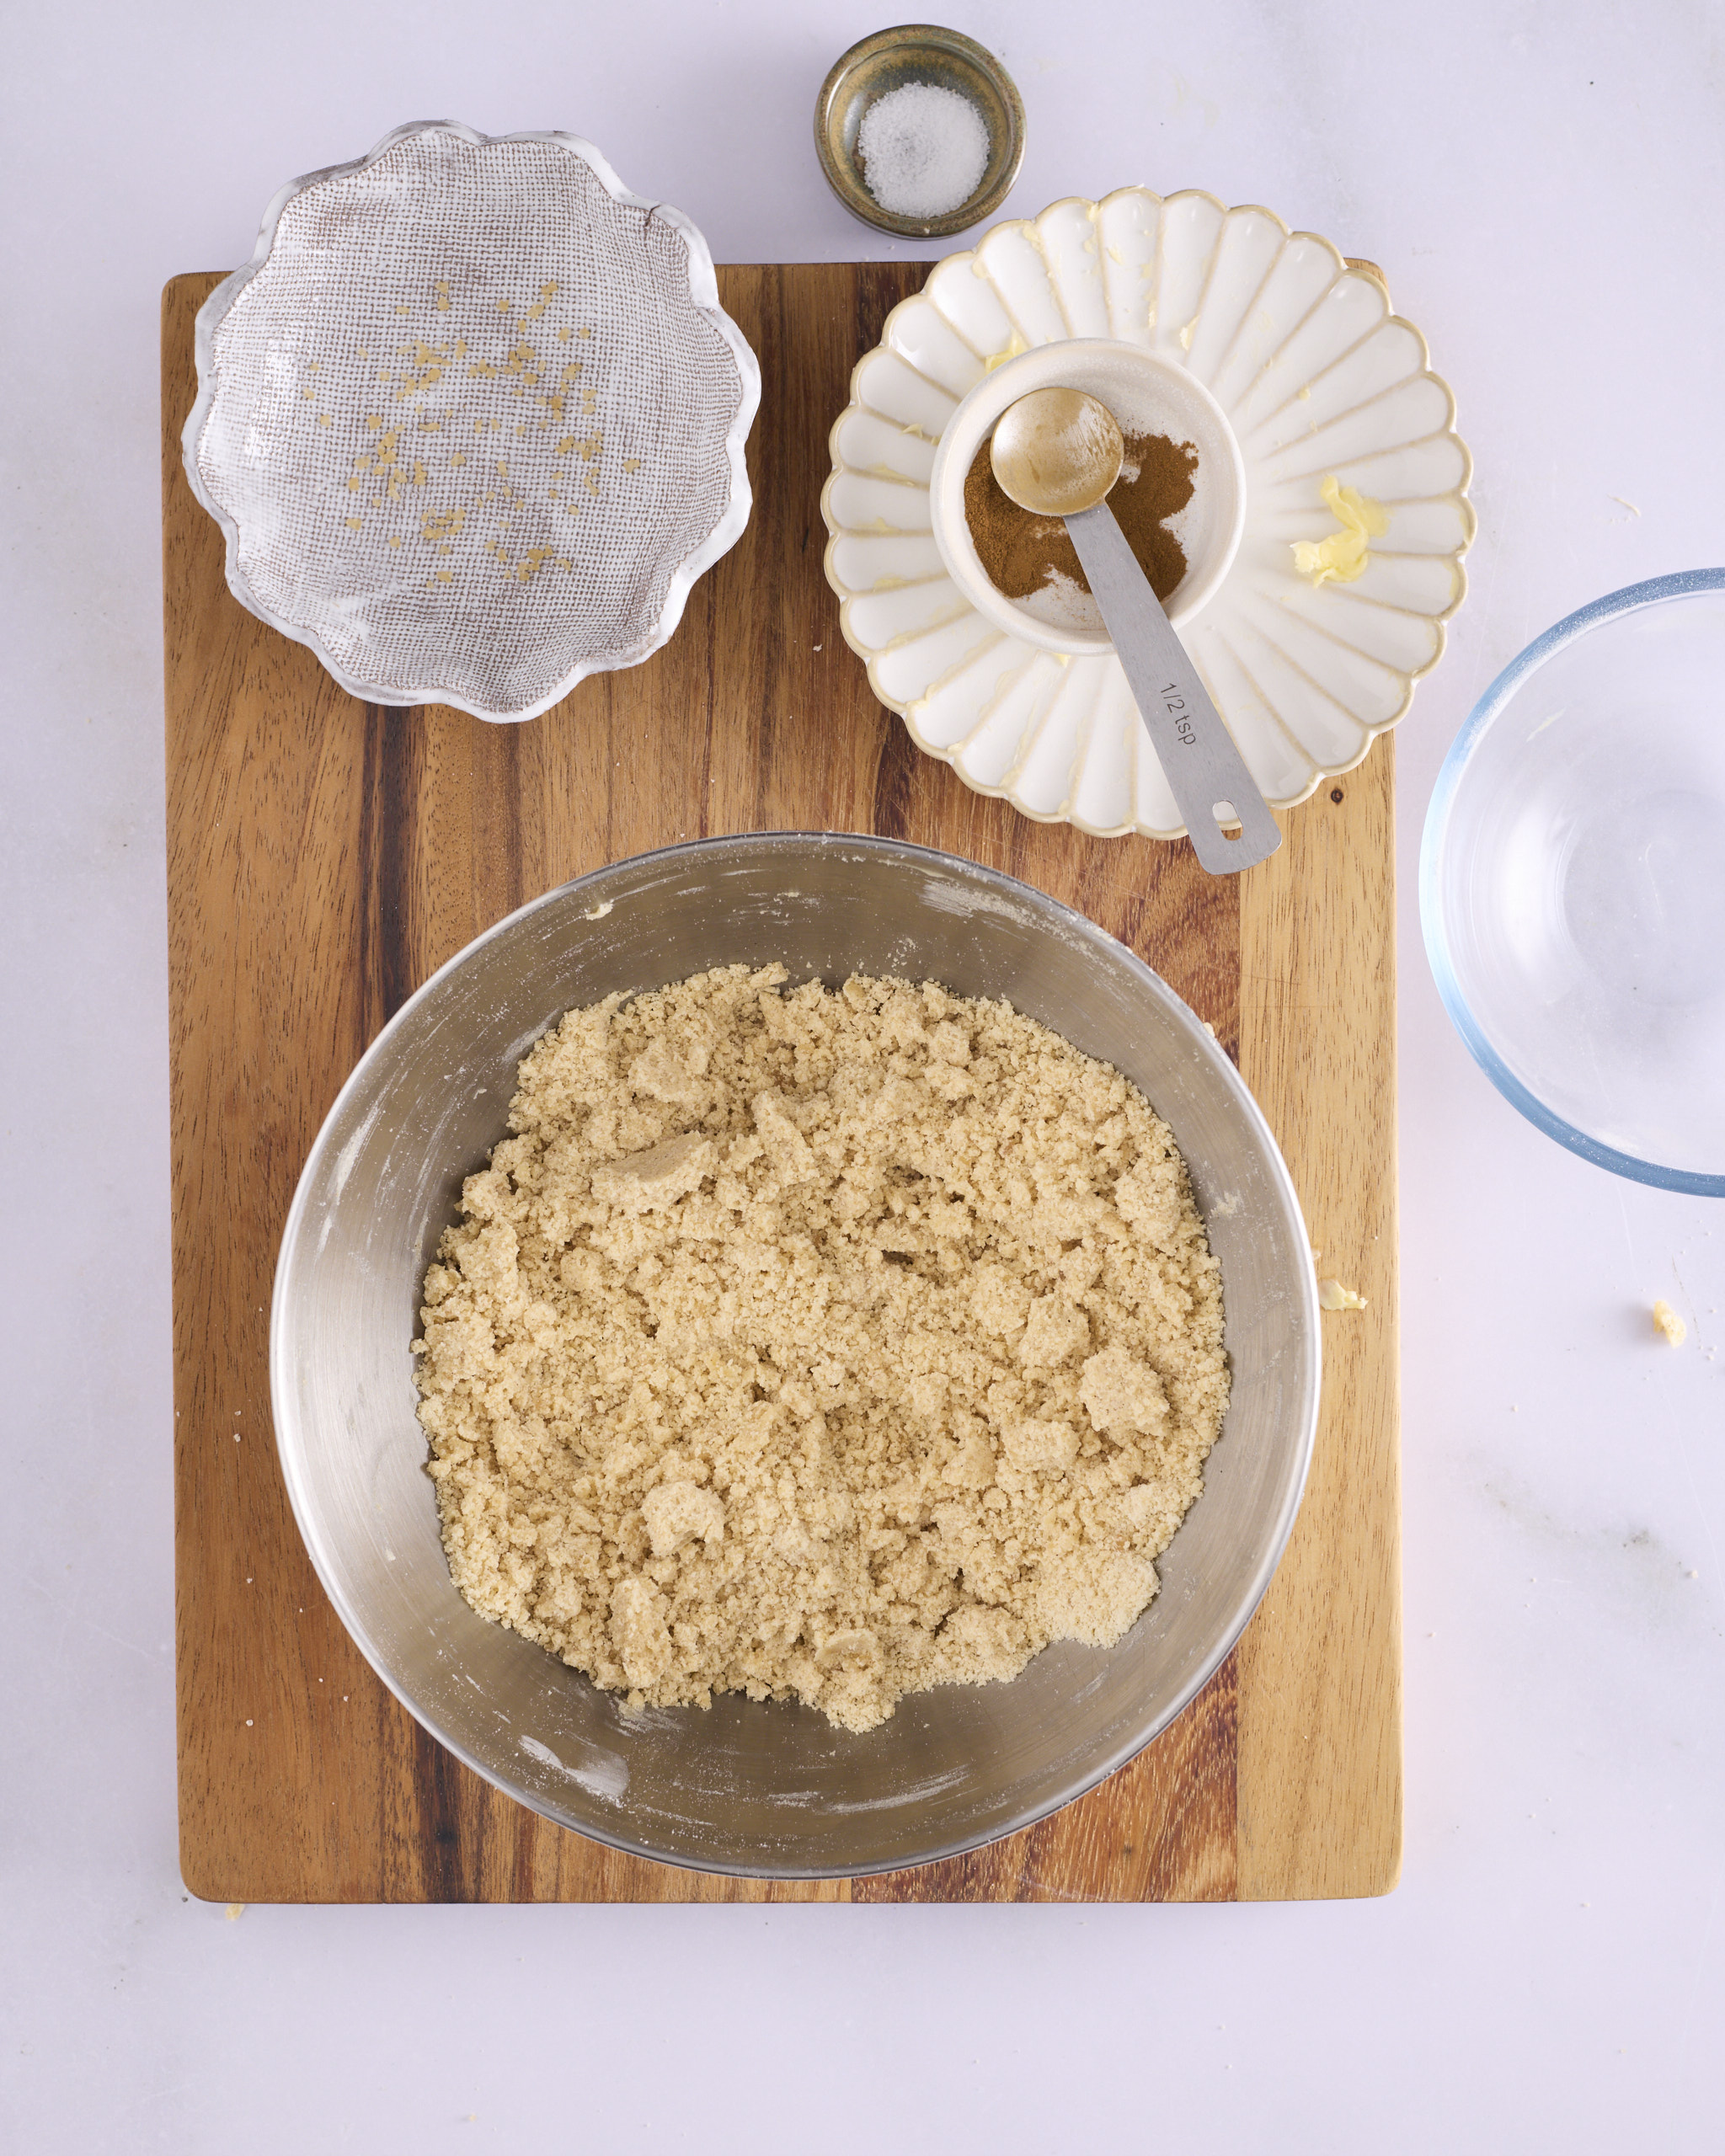
Cinnamon crumble for blueberry cheesecake kolache in a stand mixer bowl on a wooden board, rubbed to a coarse sandy texture. A sifter, a small bowl of salt and a dish of cinnamon with a half teaspoon measure sit beside it.

Sift 100g all-purpose flour, ¼ teaspoon cinnamon, and a pinch of salt into the bowl of a stand mixer. Add 50g raw sugar and using the paddle attachment, mix on low until combined. Add 50g of slightly soft unsalted butter and mix on medium-low until just combined. Break up any large lumps, then refrigerate in a sealed container until ready to assemble the blueberry cheesecake buns.

Foundation sweet dough

You can absolutely make the foundation sweet dough on the day you want to make this blueberry cheesecake kolache recipe. But that’ll prove to be a long day of baking and isn’t conducive to serving them up to your brunch guests before noon. And my method calls for the filling to be frozen before it’s pressed into the risen buns. All in all, better to start the dough the night before you want to bake. 

For a detailed discussion of my foundation sweet dough method and its origin story, you can find that on the Foundation Sweet Dough recipe.

In a rush?

If you don’t want to make the dough the night before and refrigerate it overnight, you can instead leave the kneaded dough on the bench at room temperature for about 2 hours, or until doubled in size, and then proceed with shaping the buns.

On the day you bake

Get organised

Before pulling the foundation sweet dough out of the fridge to start forming your kolaches, you need to decide what proving environment you’re able to set up in your kitchen. Commercial bakeries have purpose made proving cabinets with precise settings for temperature and humidity to achieve perfectly risen dough. Proving in a sealed environment also prevents moisture evaporating and airflow causing a skin forming over the dough. 

I have a dough setting on my double oven and set both ovens to 30°C. This higher temperature helps the dough that comes out of the fridge get going faster than if it’s sitting on the bench at room temperature. Unless of course it’s January in Australia, then the bench is fine! 

To help create a moist environment in the oven, I’ve used two very large sturdy plastic bags (70cm x 80cm) that can hold a tray of six buns or a couple of loaves of bread. As I seal up the bag with a tray of buns inside, I blow up the bag with a hair dryer and seal it with a bag clip. This is why I use both my ovens. 

Your trays will be fine in a warm oven without the plastic bag on two racks. If you want to add a bit of humidity you can add a bowl of just boiled water in the corner of the oven. 

Odds are you don’t, like me, have fifty 70cm x 80cm plastic bags tucked up on the top shelf in the pantry. Have we had the Sandra is a hoarder conversation yet? No bother, another method used by home bakers is proving their bread in large sealed plastic storage containers on the kitchen bench. 

I prove the dough balls on 2 large rimmed baking trays (25cm x 37cm) lined with baking paper. 

So make your plan and assemble your proving equipment before taking the foundation sweet dough out of the fridge. 

Assembling the blueberry cheesecake buns

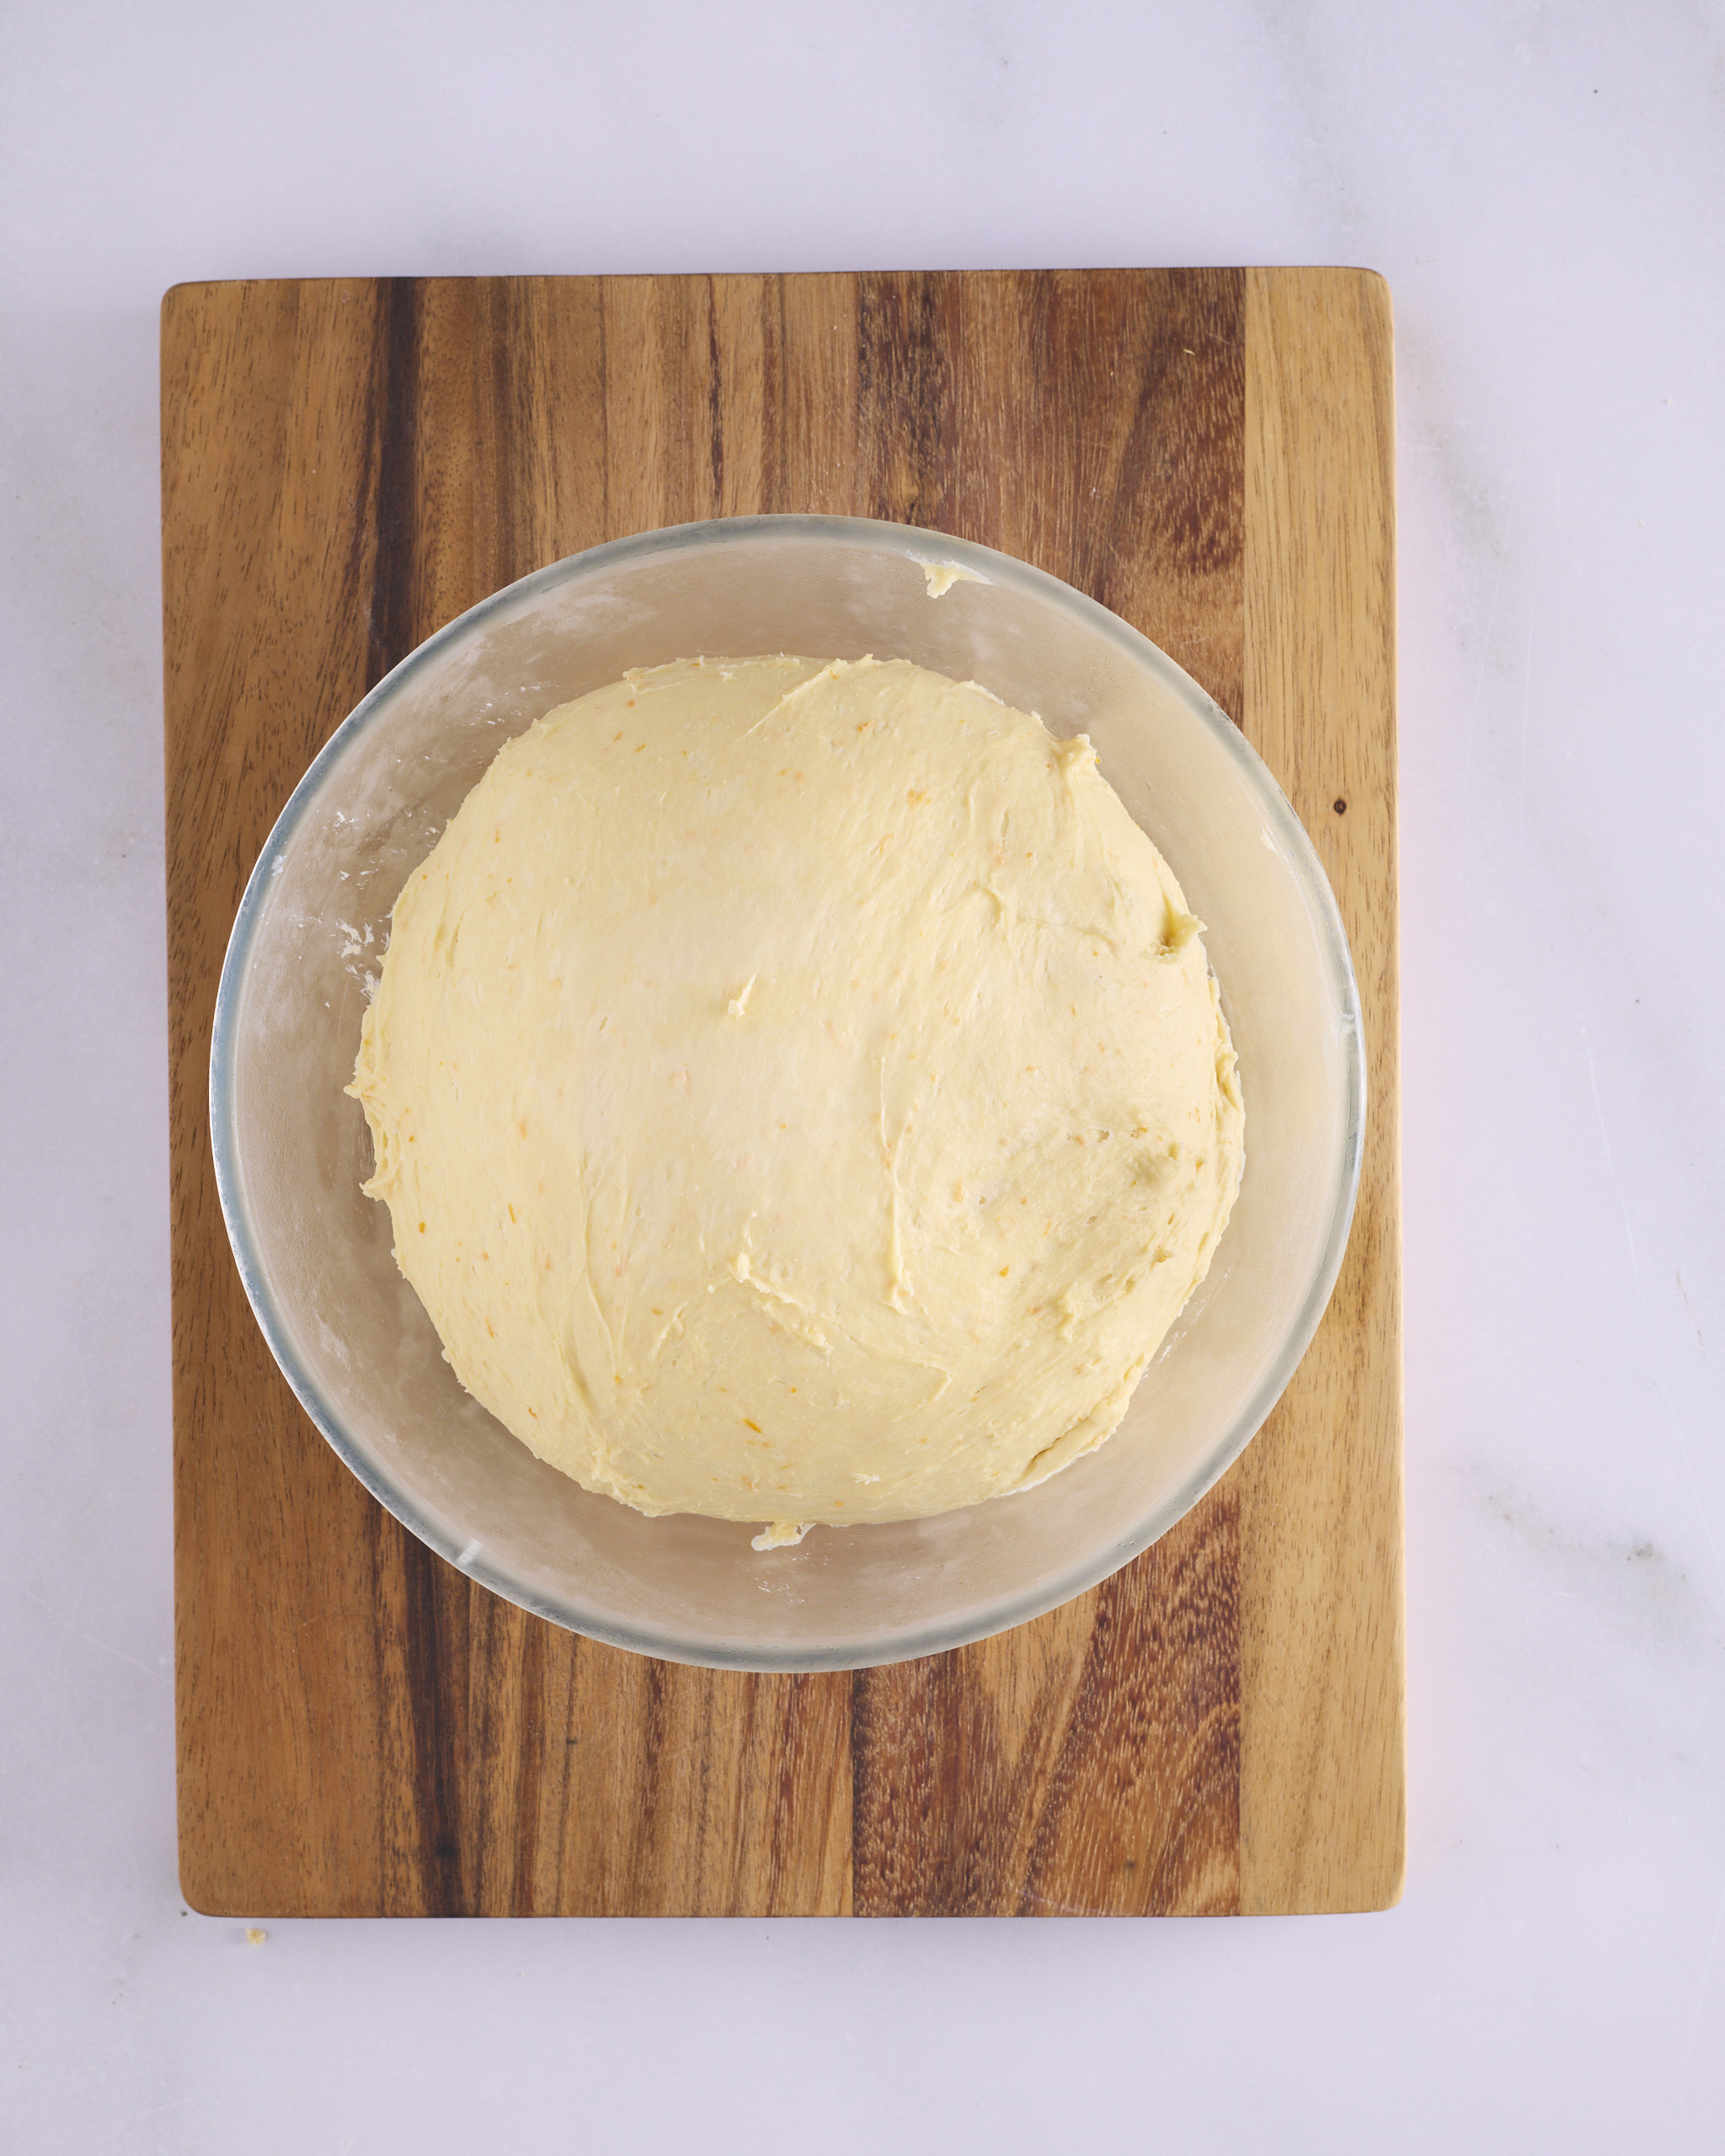
The foundation sweet dough risen in a glass bowl on a wooden board, smooth and domed, with flecks of orange zest through the surface.

The risen dough should weigh approximately 1300g. Accounting for some wastage, this should yield twelve 100g dough balls for the Czech kolache. But I do recommend double checking the weight of the dough before you start. 

Shaping the Czech kolache dough balls is a three-step process. For the first two steps I don’t put flour on the bench top. The dough ball forms better with a bit of friction. I do use a little flour to roll the dough balls out. So, you can either set up two separate areas of the kitchen bench to perform the no flour / flour steps or just scrape the excess flour away with a bench scraper between the steps. 

The dough is easier to manage if it stays slightly chilled, which is why I weigh out the dough as I go for each ball. 

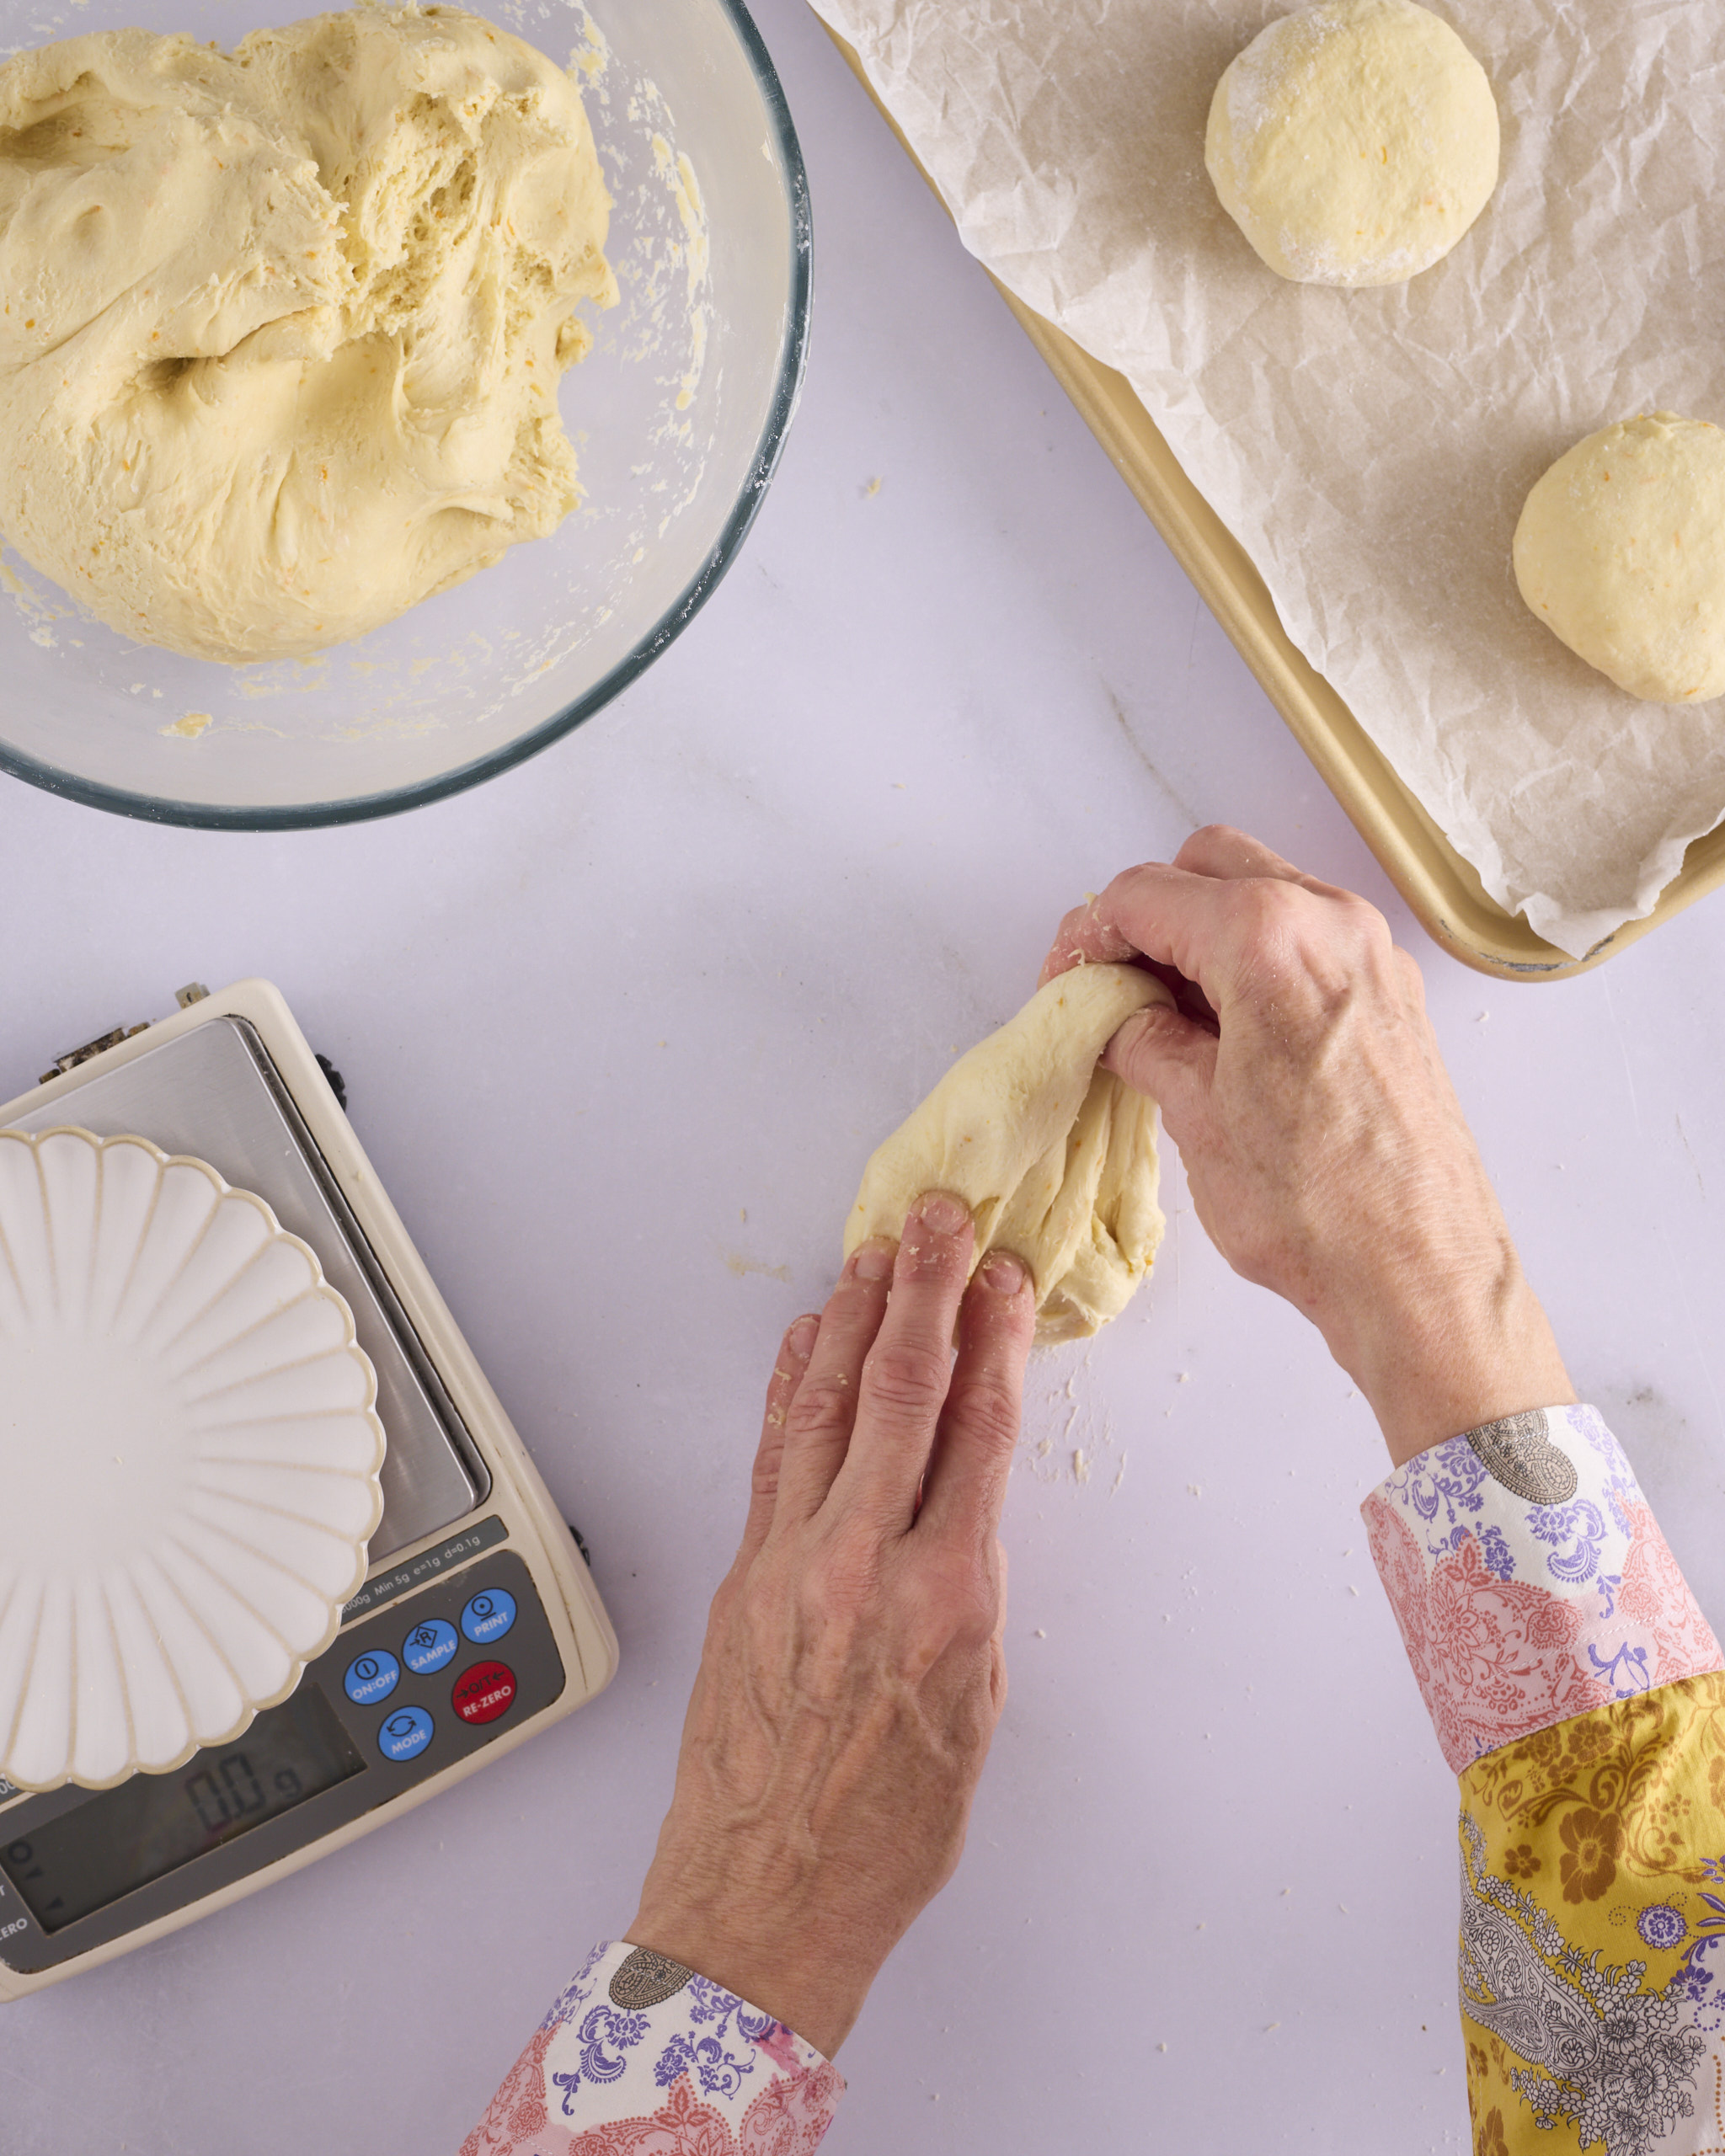
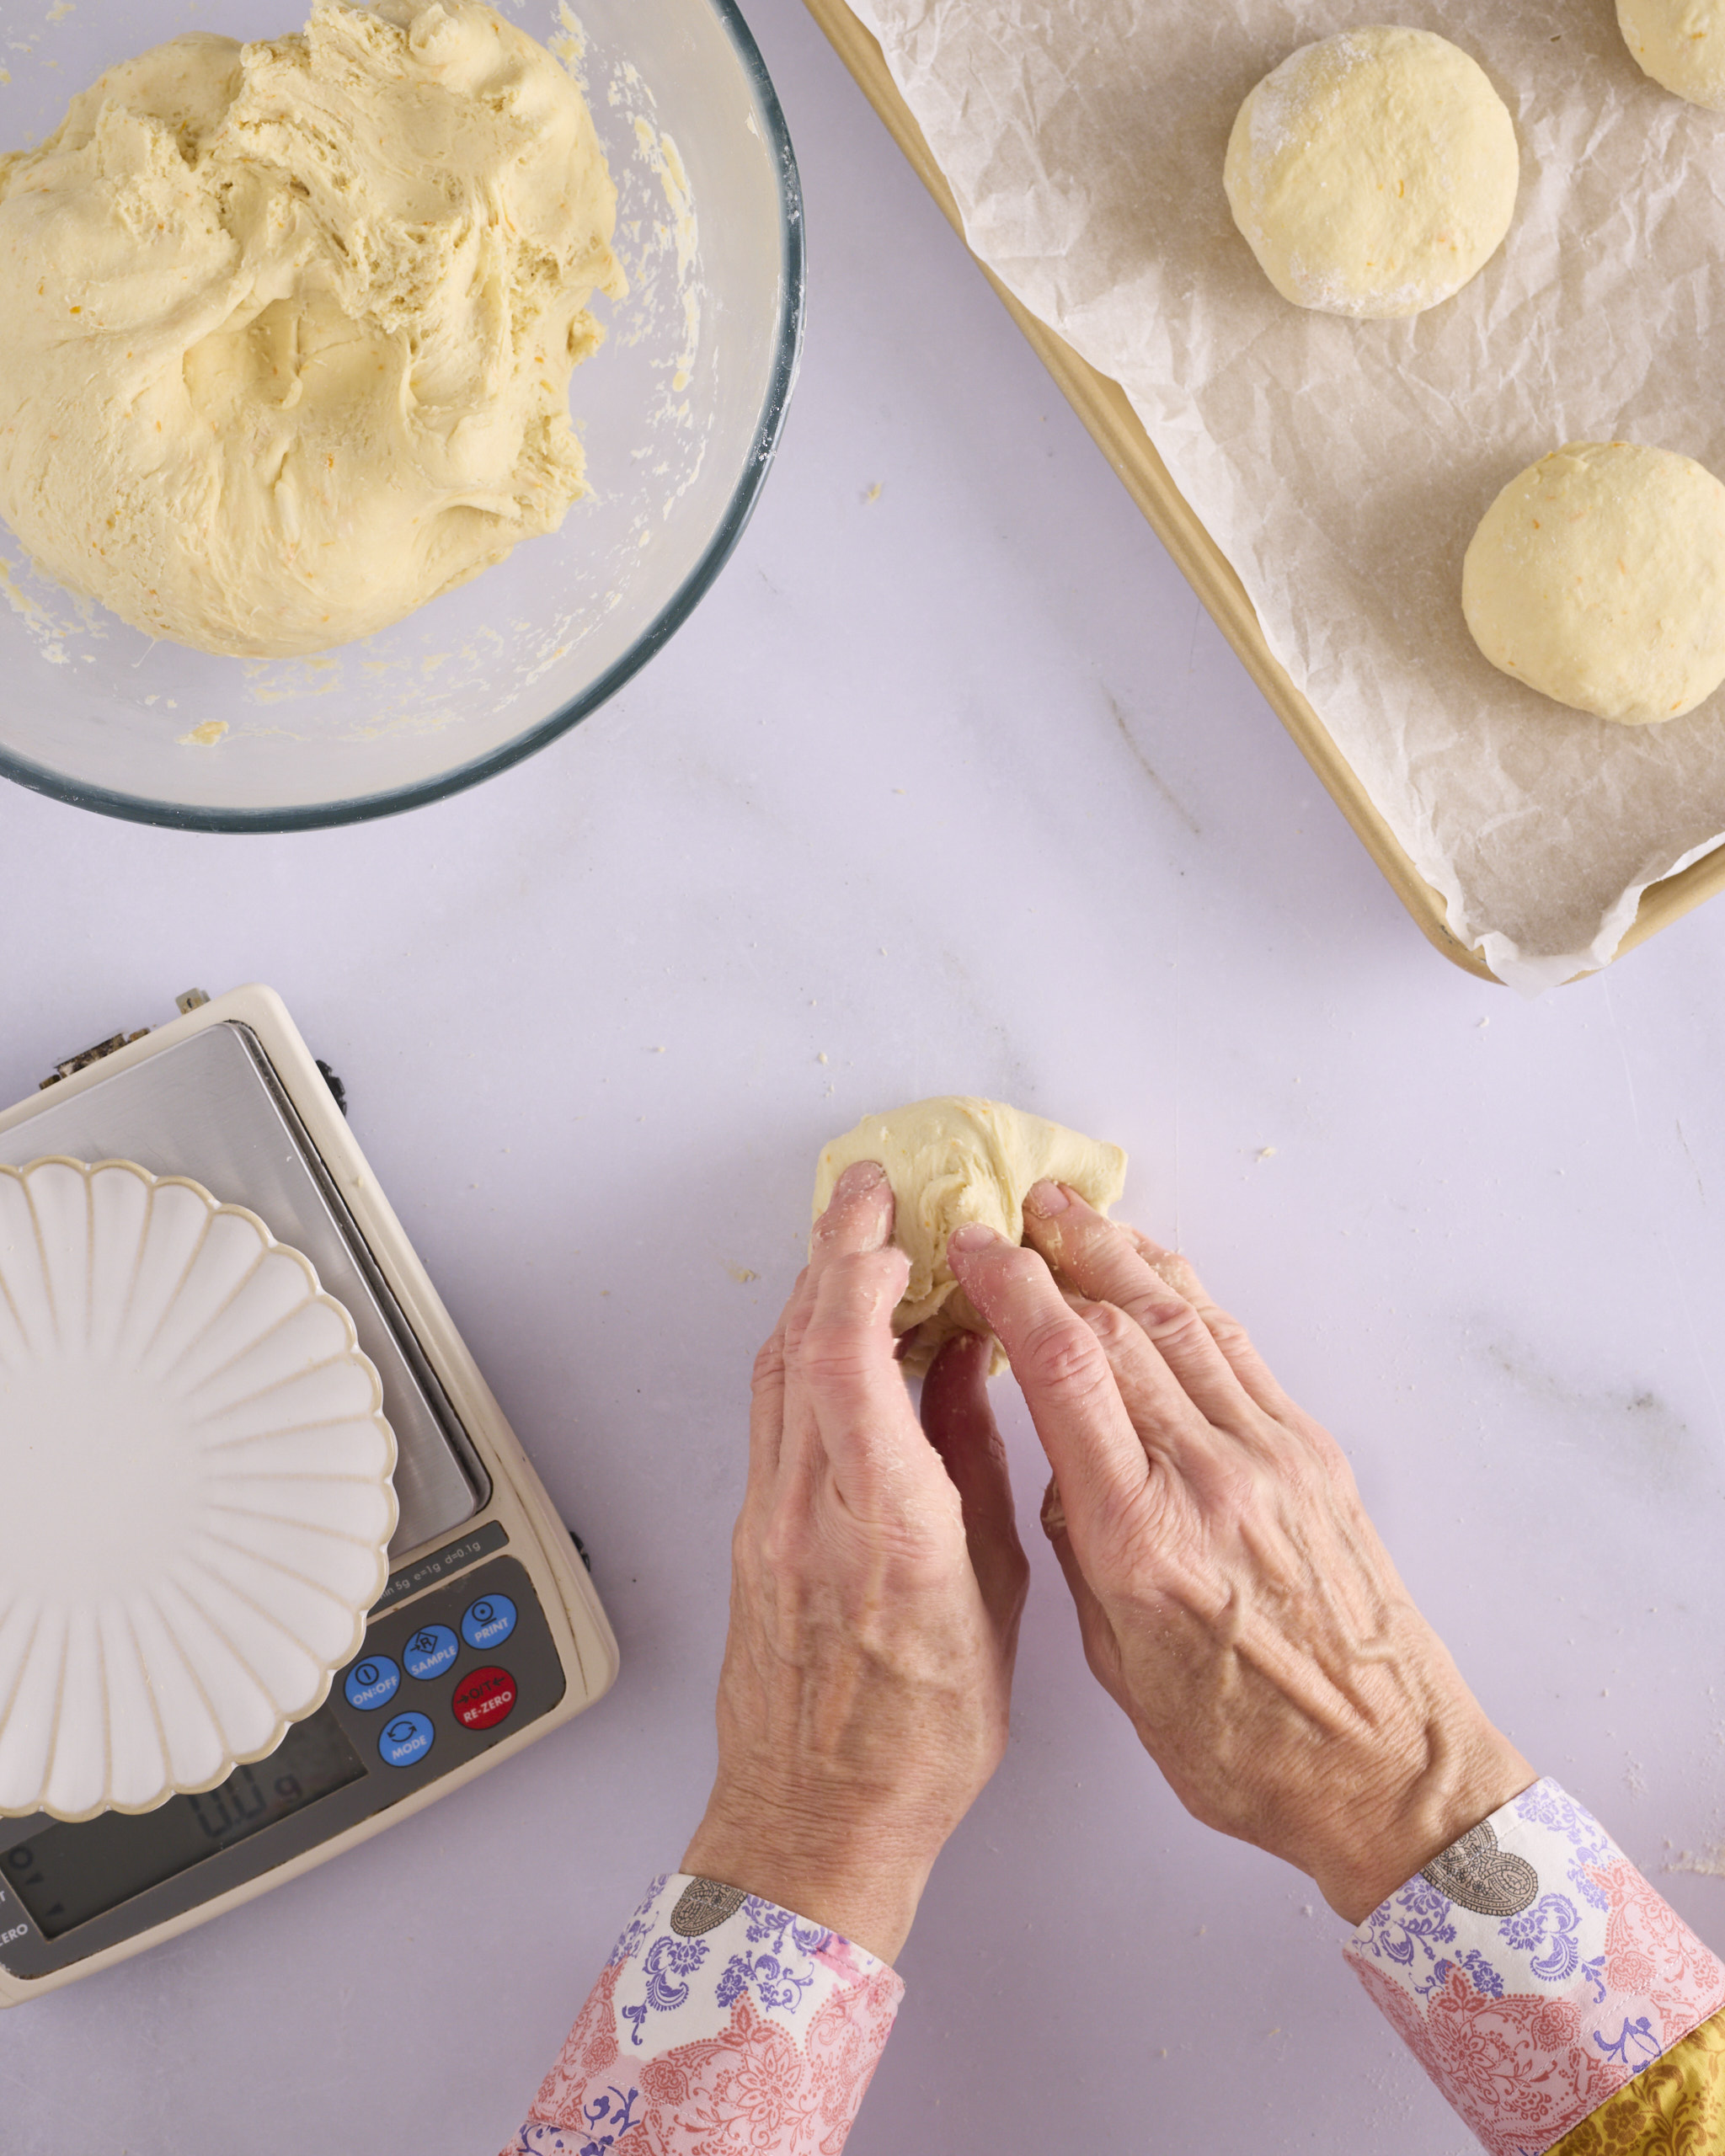
Sandra stretches a corner of a 100g piece of foundation sweet dough for blueberry cheesecake kolache on the bench, with digital scales alongside and two shaped dough balls on a lined baking tray.
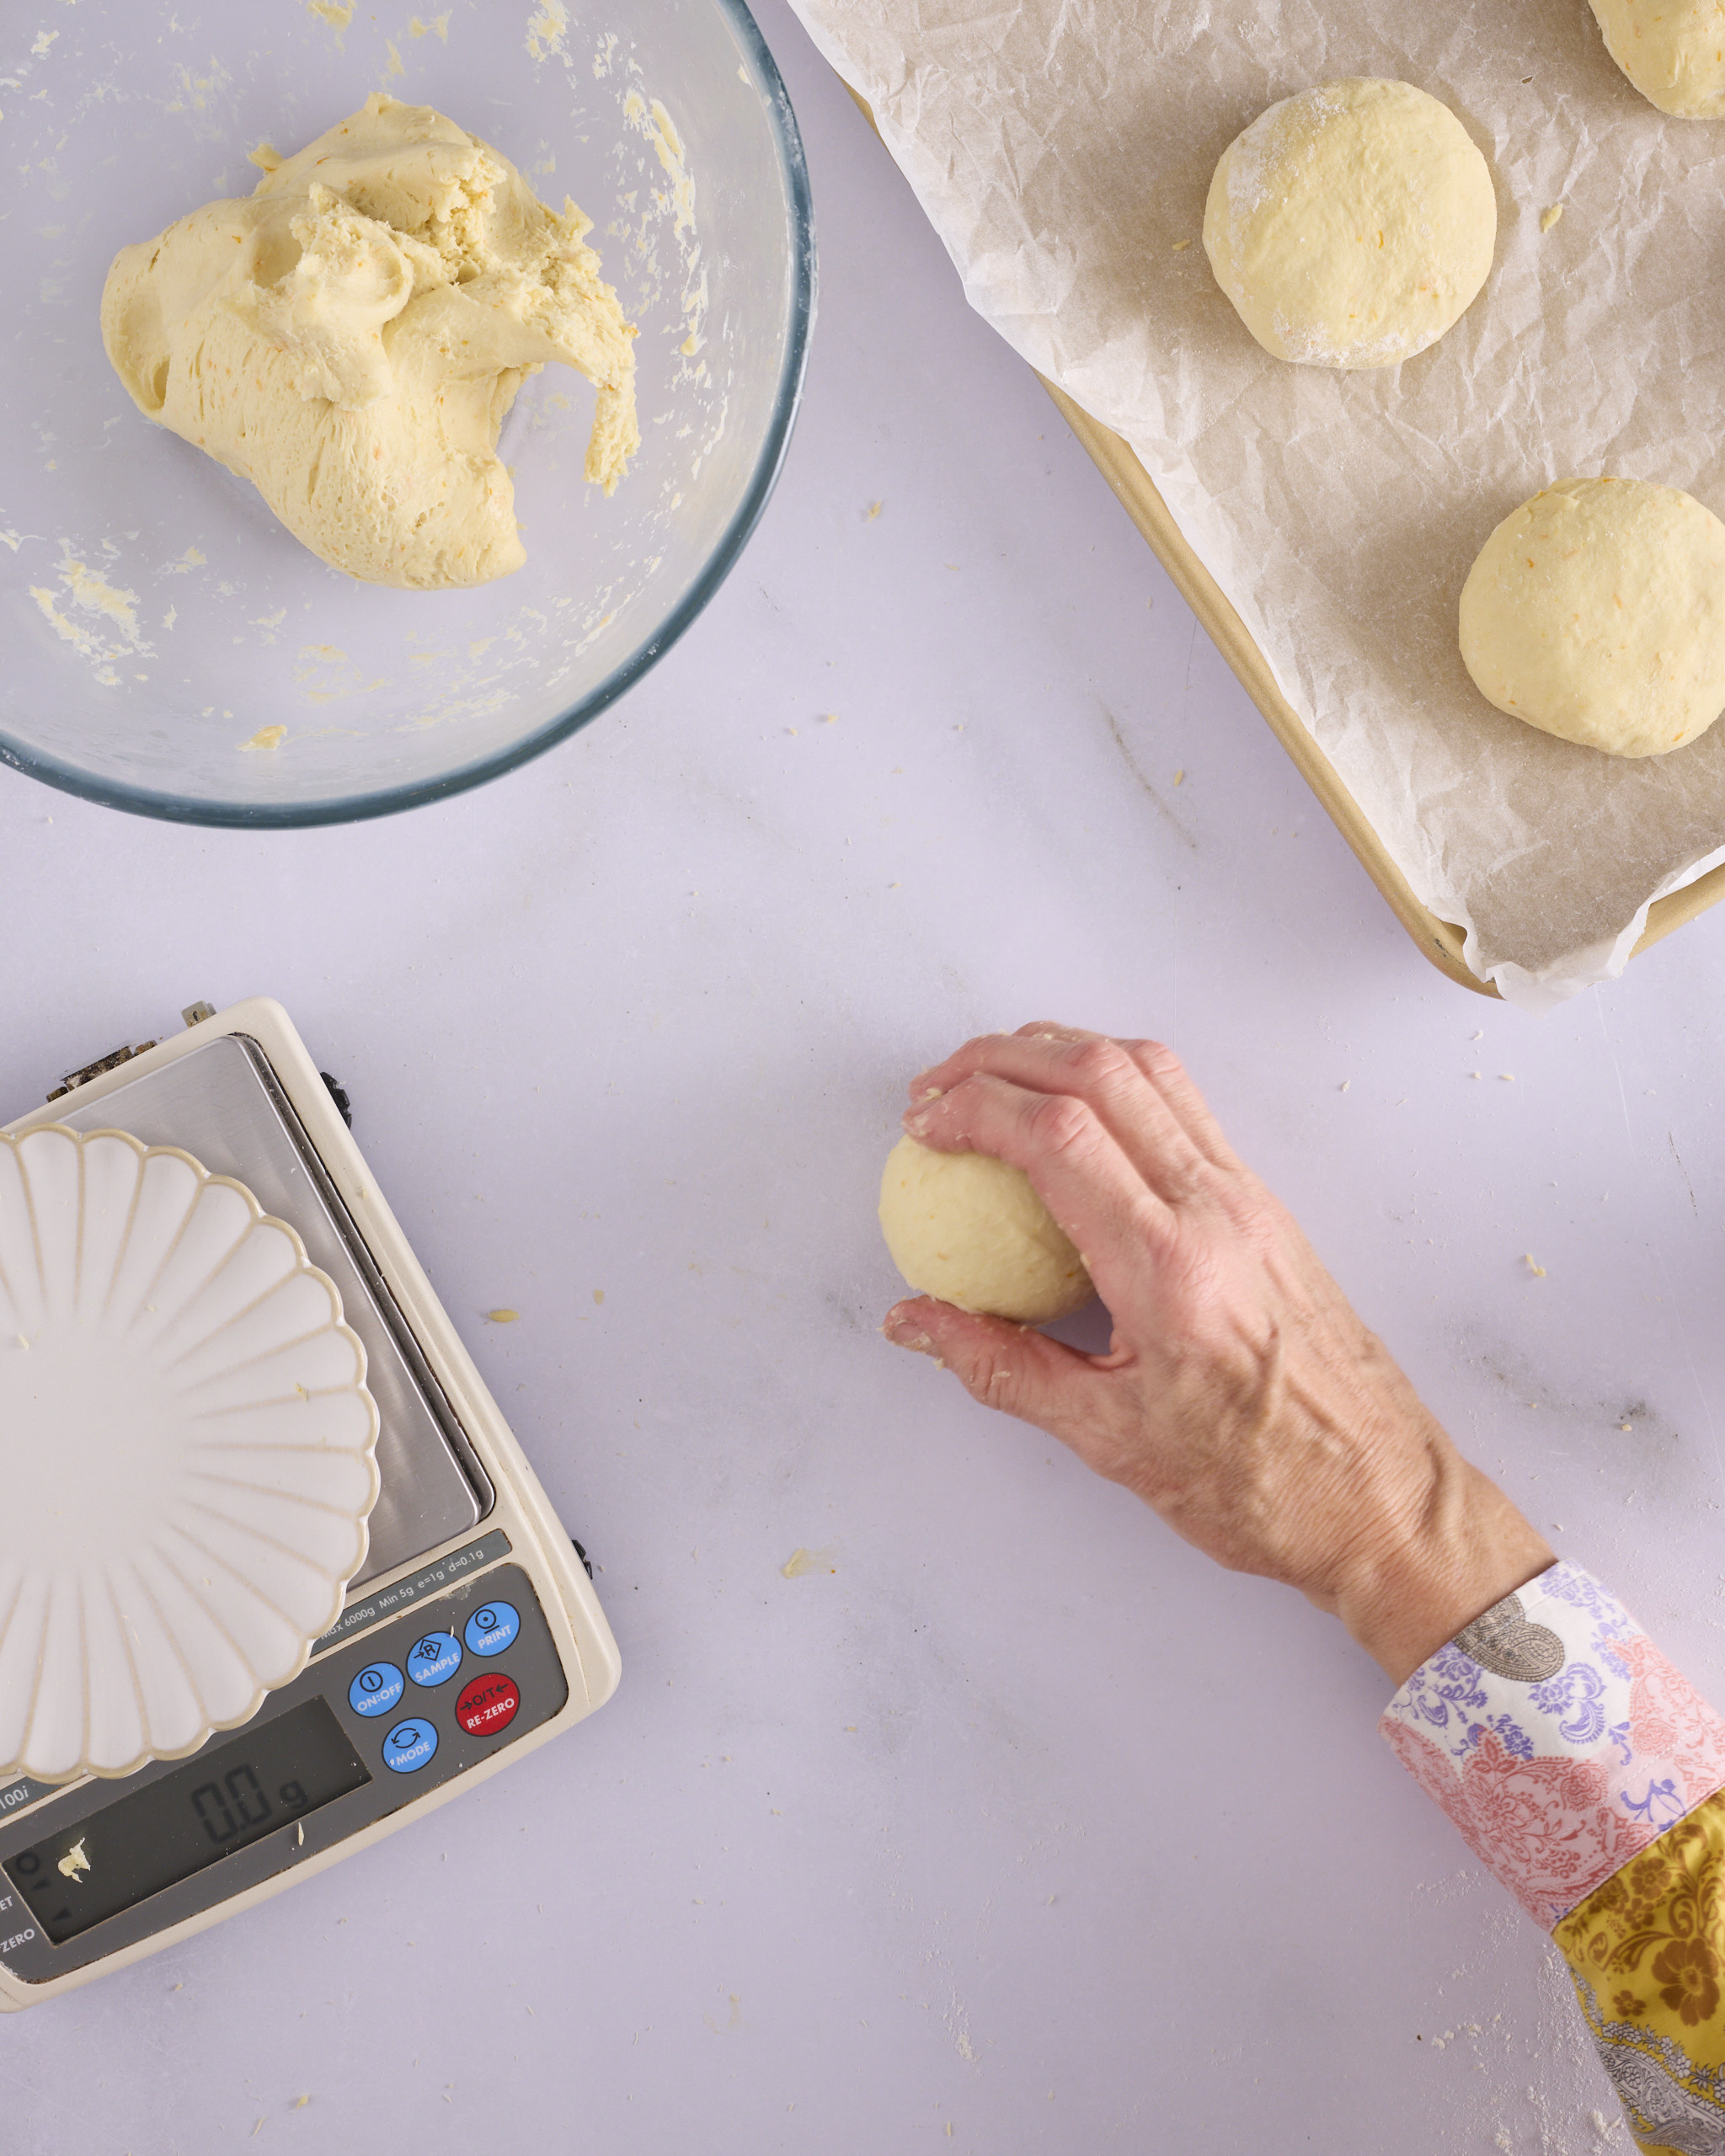
Sandra presses the stretched dough back into the centre of the 100g ball for blueberry cheesecake kolache, with the bowl of dough and a lined tray of shaped balls nearby.

First, think of the 100g lump of dough as having ‘corners’. Stretch a corner out and press it back down into the centre of the dough in one movement. Rotate the dough a quarter turn and repeat the process seven times. 

Sandra rolls a 100g dough ball for blueberry cheesecake kolache in small circles on the bench to tighten the surface, with digital scales and a lined tray of shaped balls alongside.
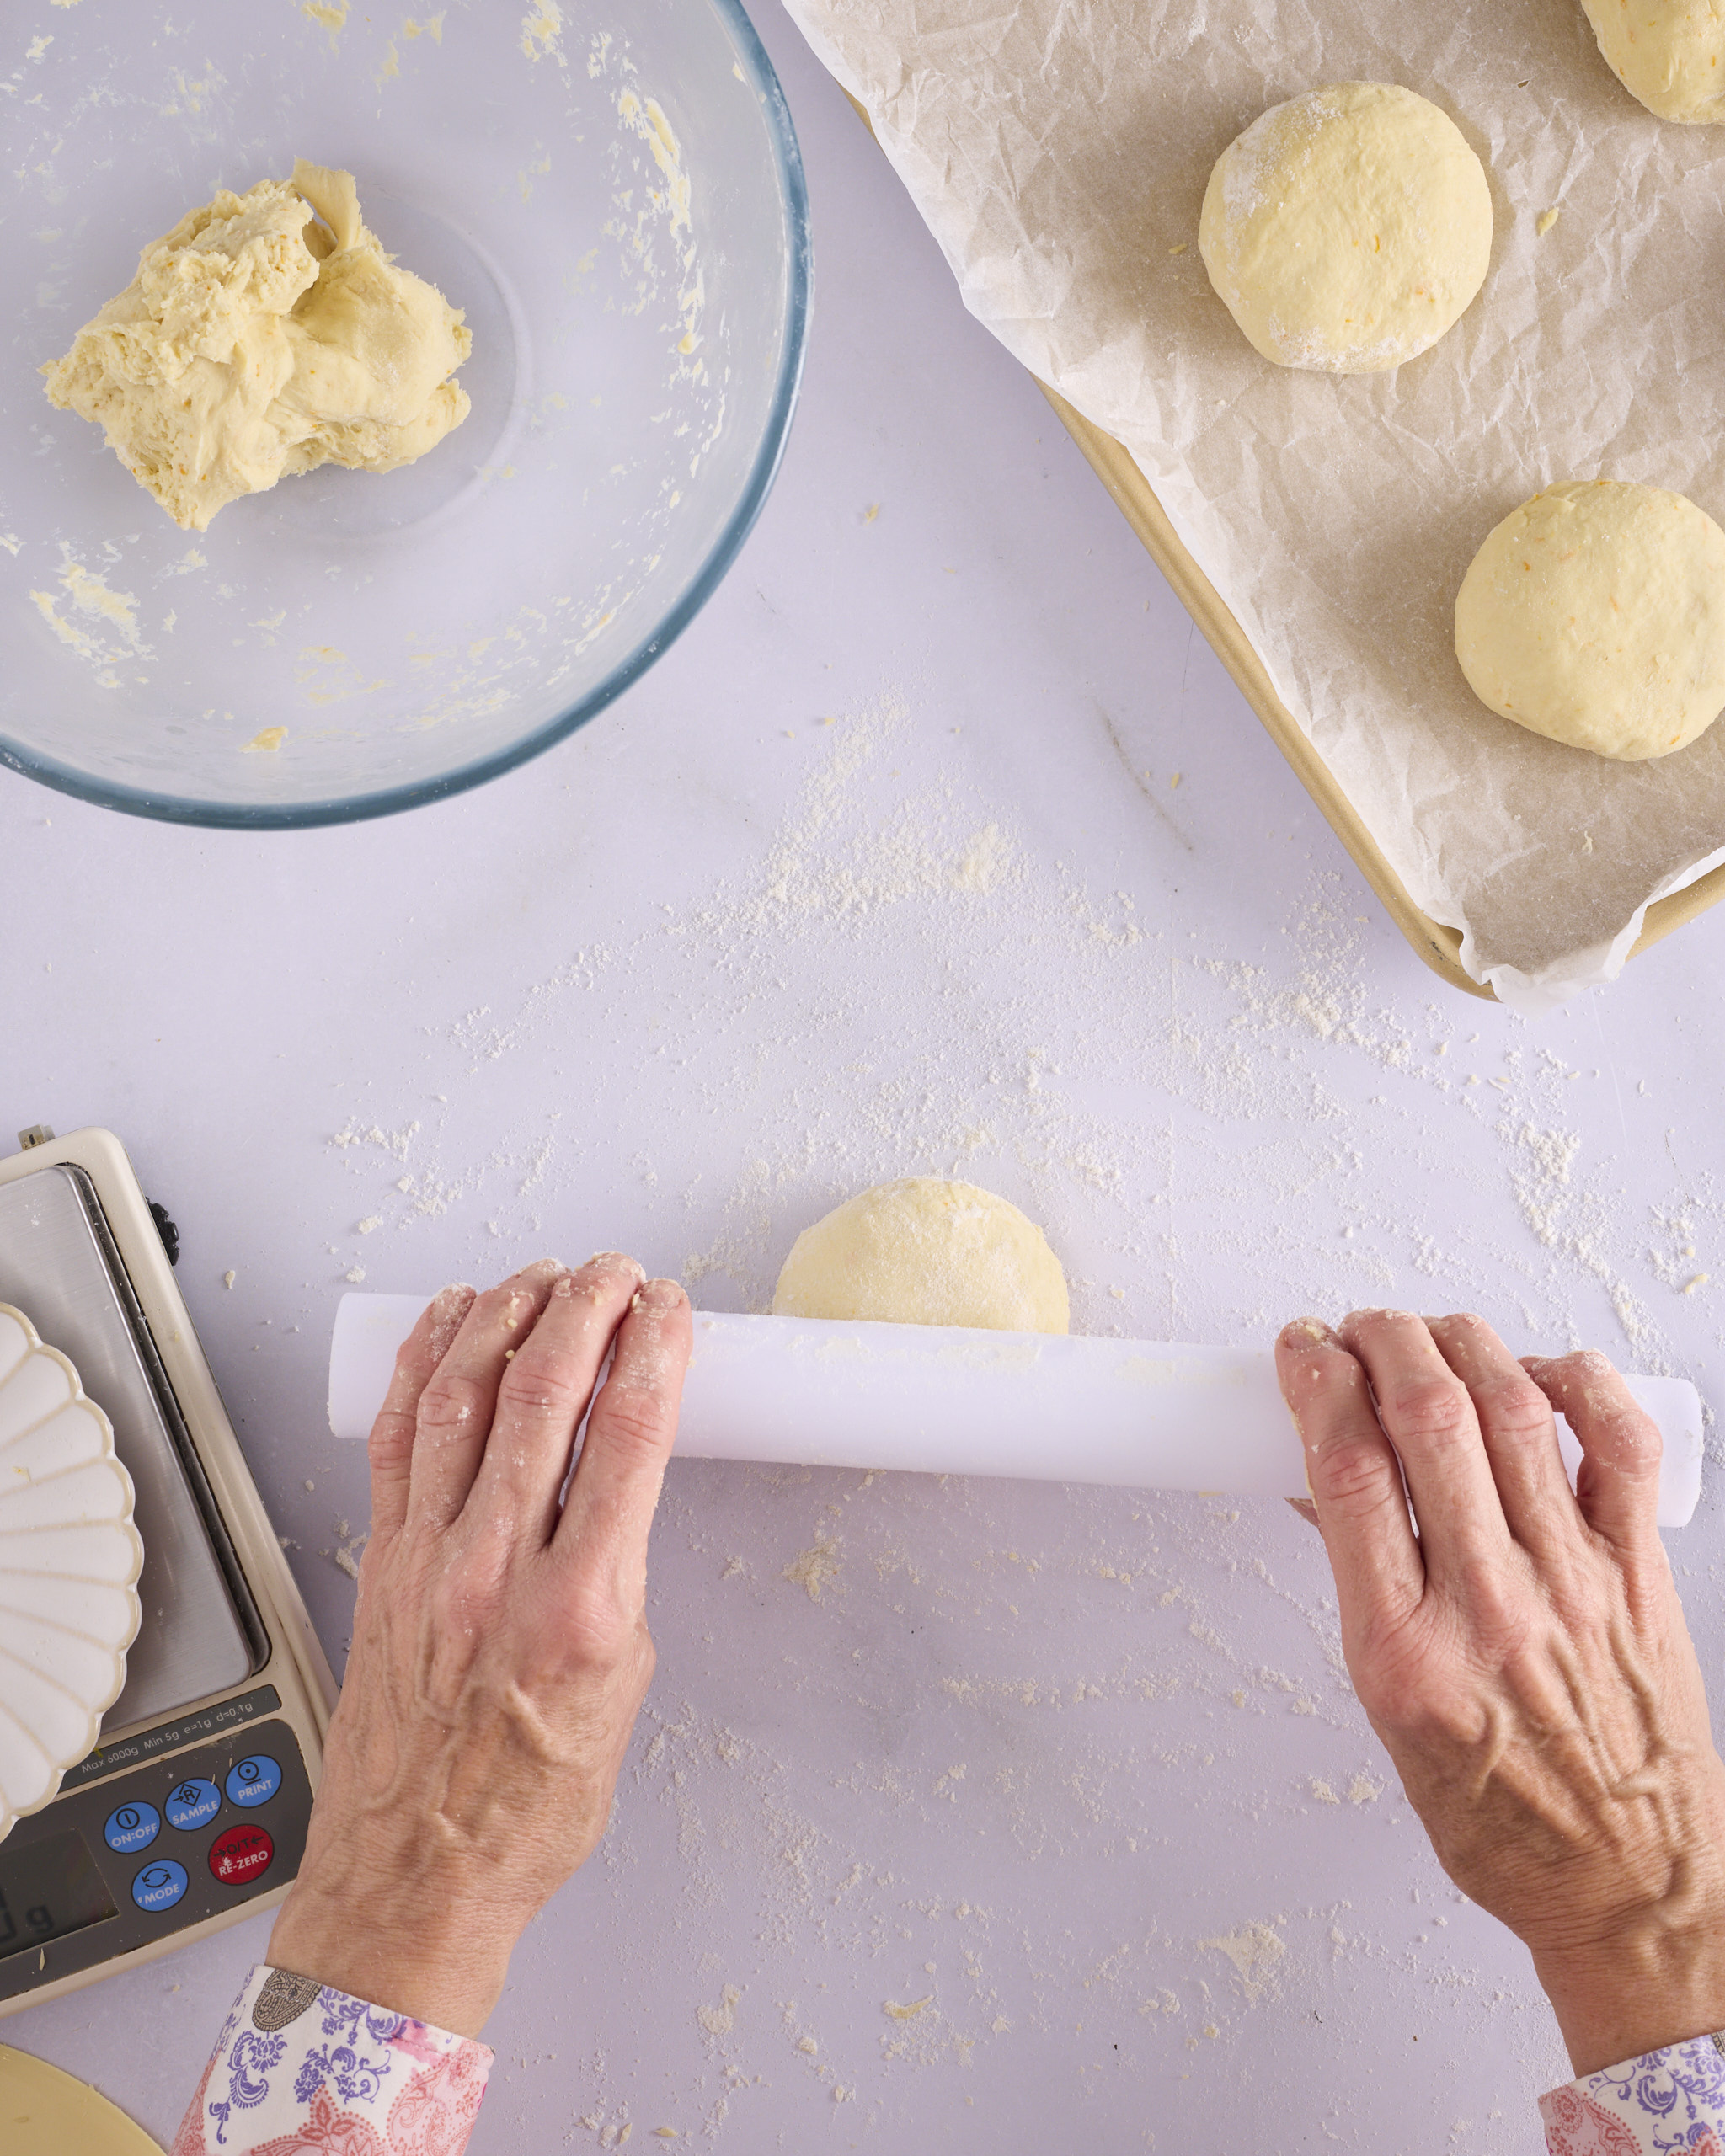
Sandra uses a small rolling pin flattens a shaped dough ball for blueberry cheesecake kolache into a disc on a lightly floured bench, with the bowl of dough and a lined tray alongside.

Then, to form a nice tight dough ball, place the dough ball on the bench with the pinched side down. Create a cage with your fingers and, without compressing the dough ball, vigorously roll it around in small circles to form a tight surface over the top of the ball. 

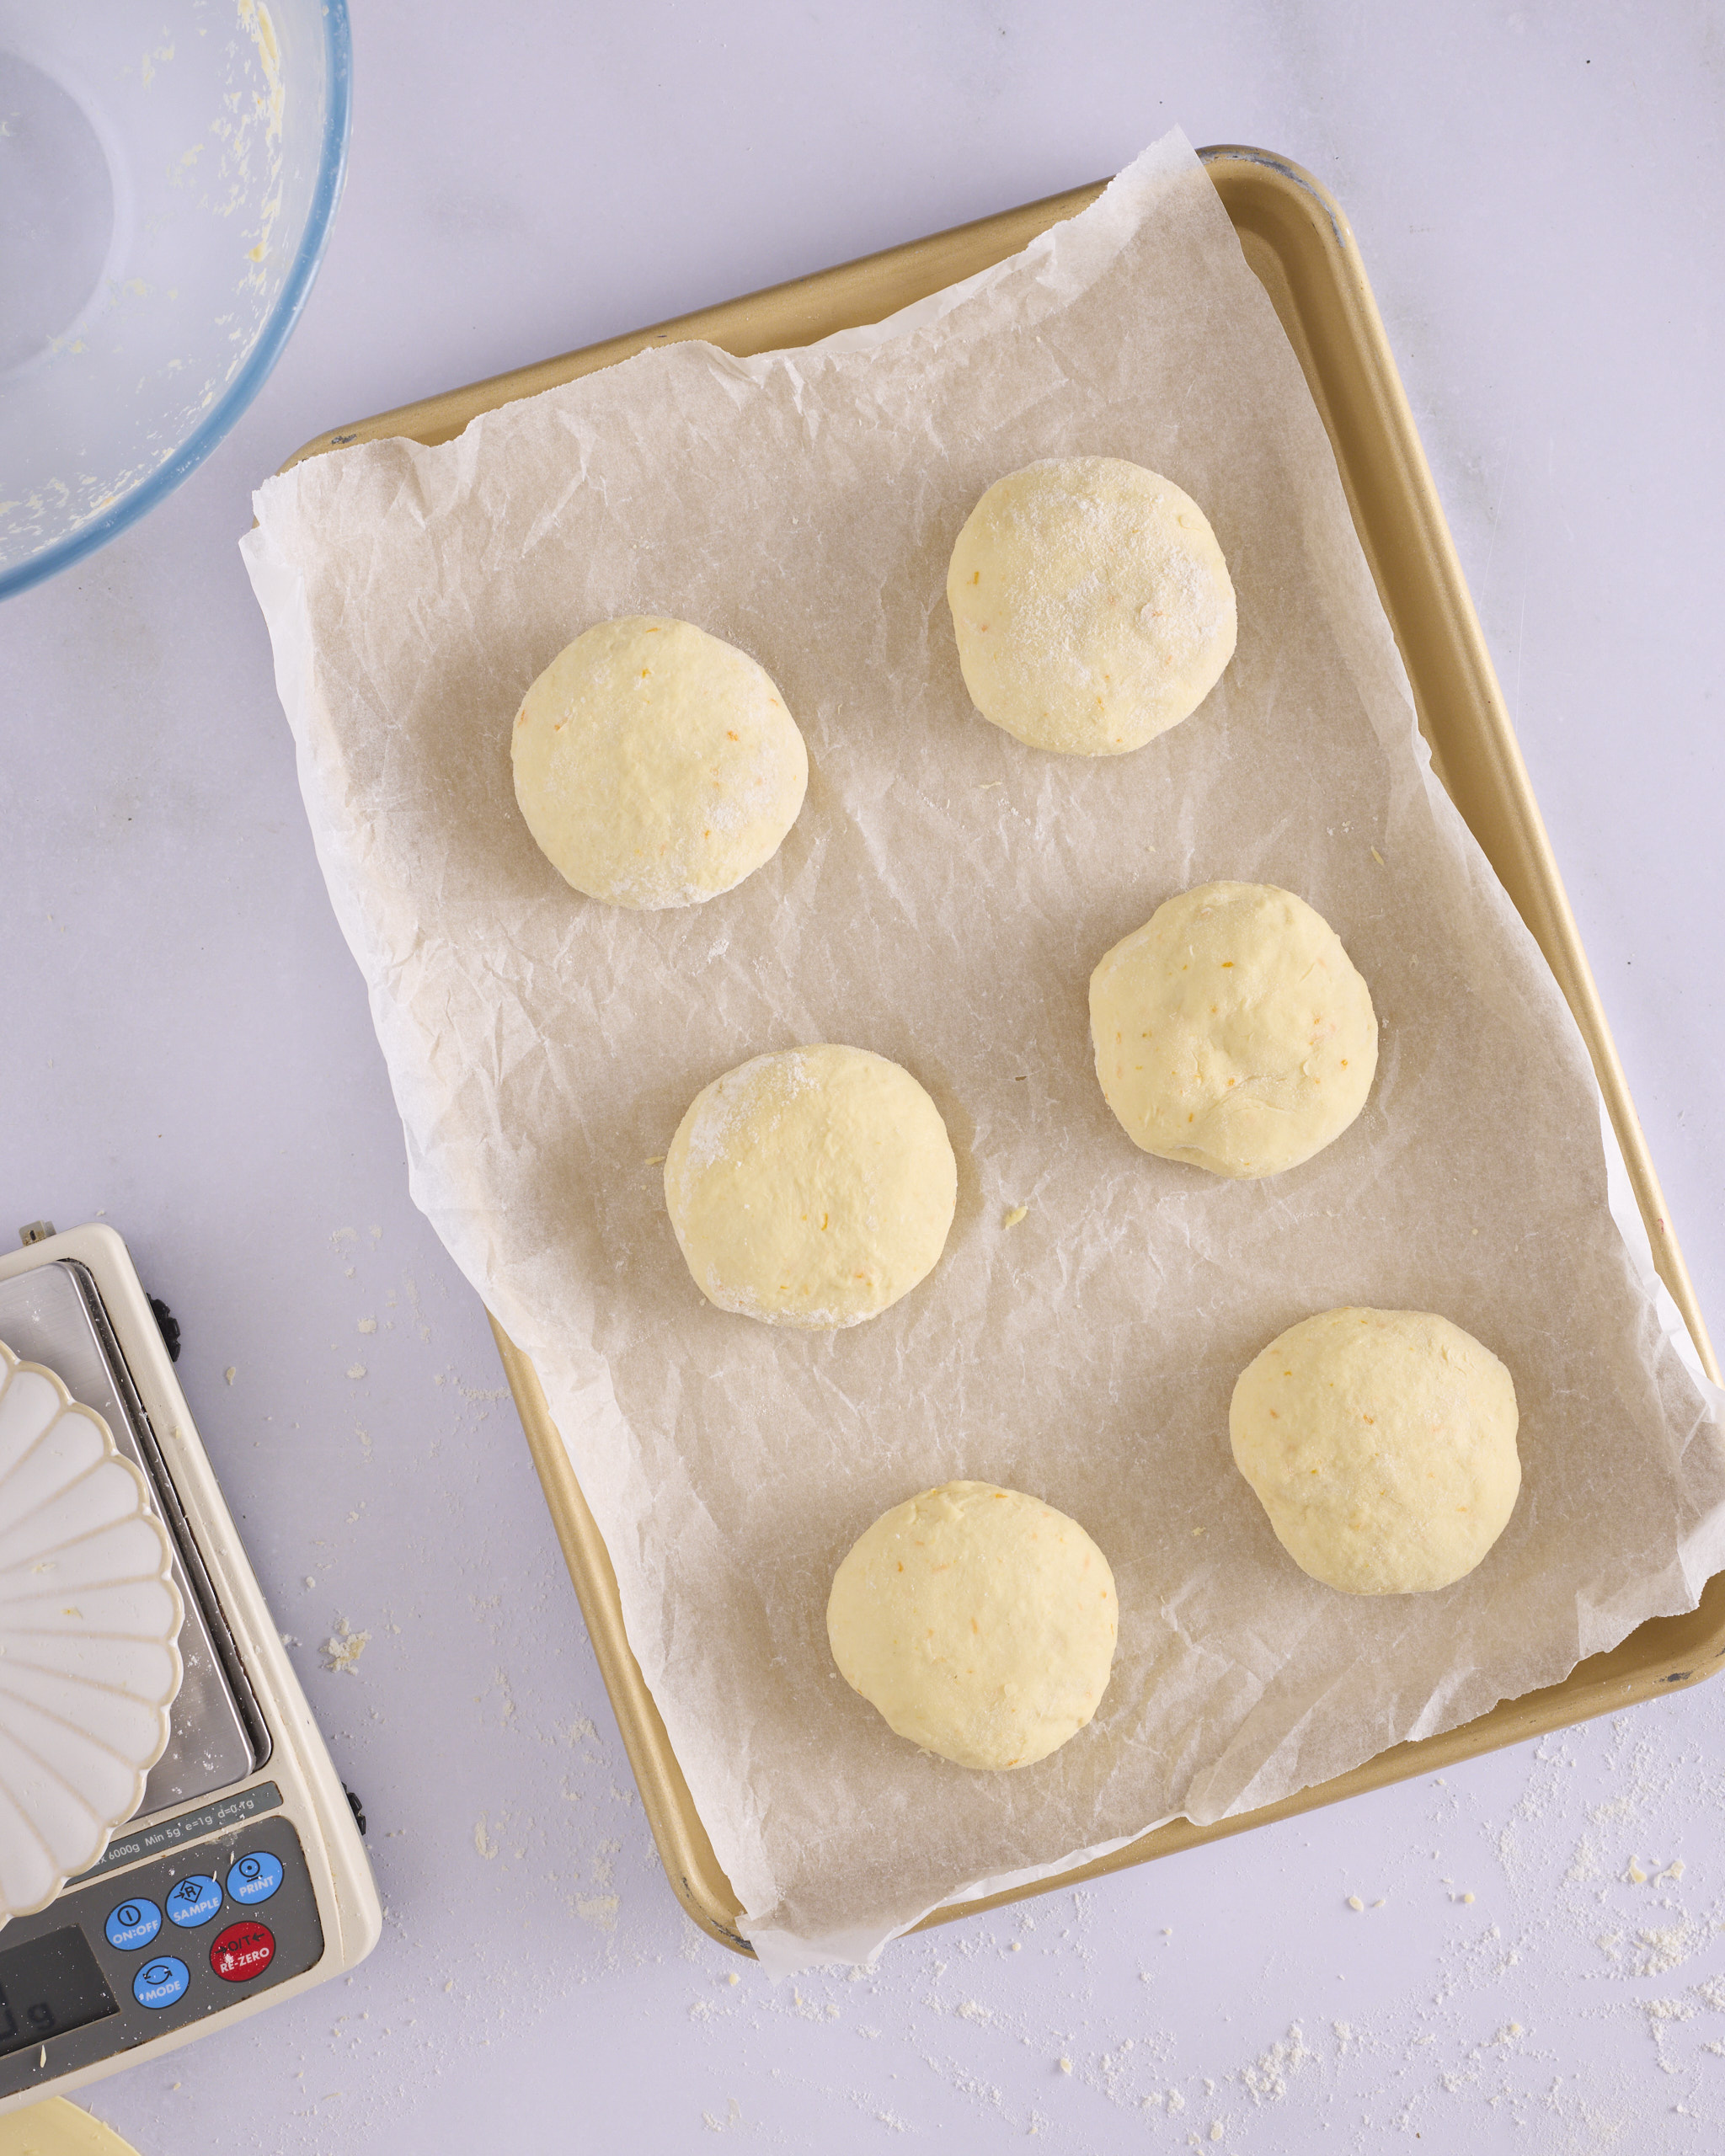
Finally, shake a little flour over the bench and the dough ball, then use a rolling pin to slightly flatten it into a disc shape. Place the shaped kolache on the baking paper lined baking sheet, making sure the balls are evenly spaced across the sheet in two rows of three.

Six shaped and flattened dough discs for blueberry cheesecake kolache spaced in two rows of three on a gold baking tray lined with baking paper, ready to prove.

Transfer the two baking sheets of six dough balls each to your proving set up. See the detailed explanation above under the heading – ‘get organised.’  

I place each baking sheet inside a large plastic bag, billowing the bag as I go so it doesn’t catch on the dough. Then if twist the bag close and blow it up to create a dome with a hairdryer (on the cool setting). The go onto the middle rack in separate ovens set at 30°C. 

Proving time will depend on your proving set up and the ambient temperature of that environment. You are aiming for the Czech kolaches to be just under doubled in size. My method takes 40-45 minutes. And remember that the dough started cold from the fridge, so the yeast will take a while to get going.   

Meanwhile, prepare the egg wash by beating 2 egg yolks and 2 tablespoons cream or milk together in a small bowl.

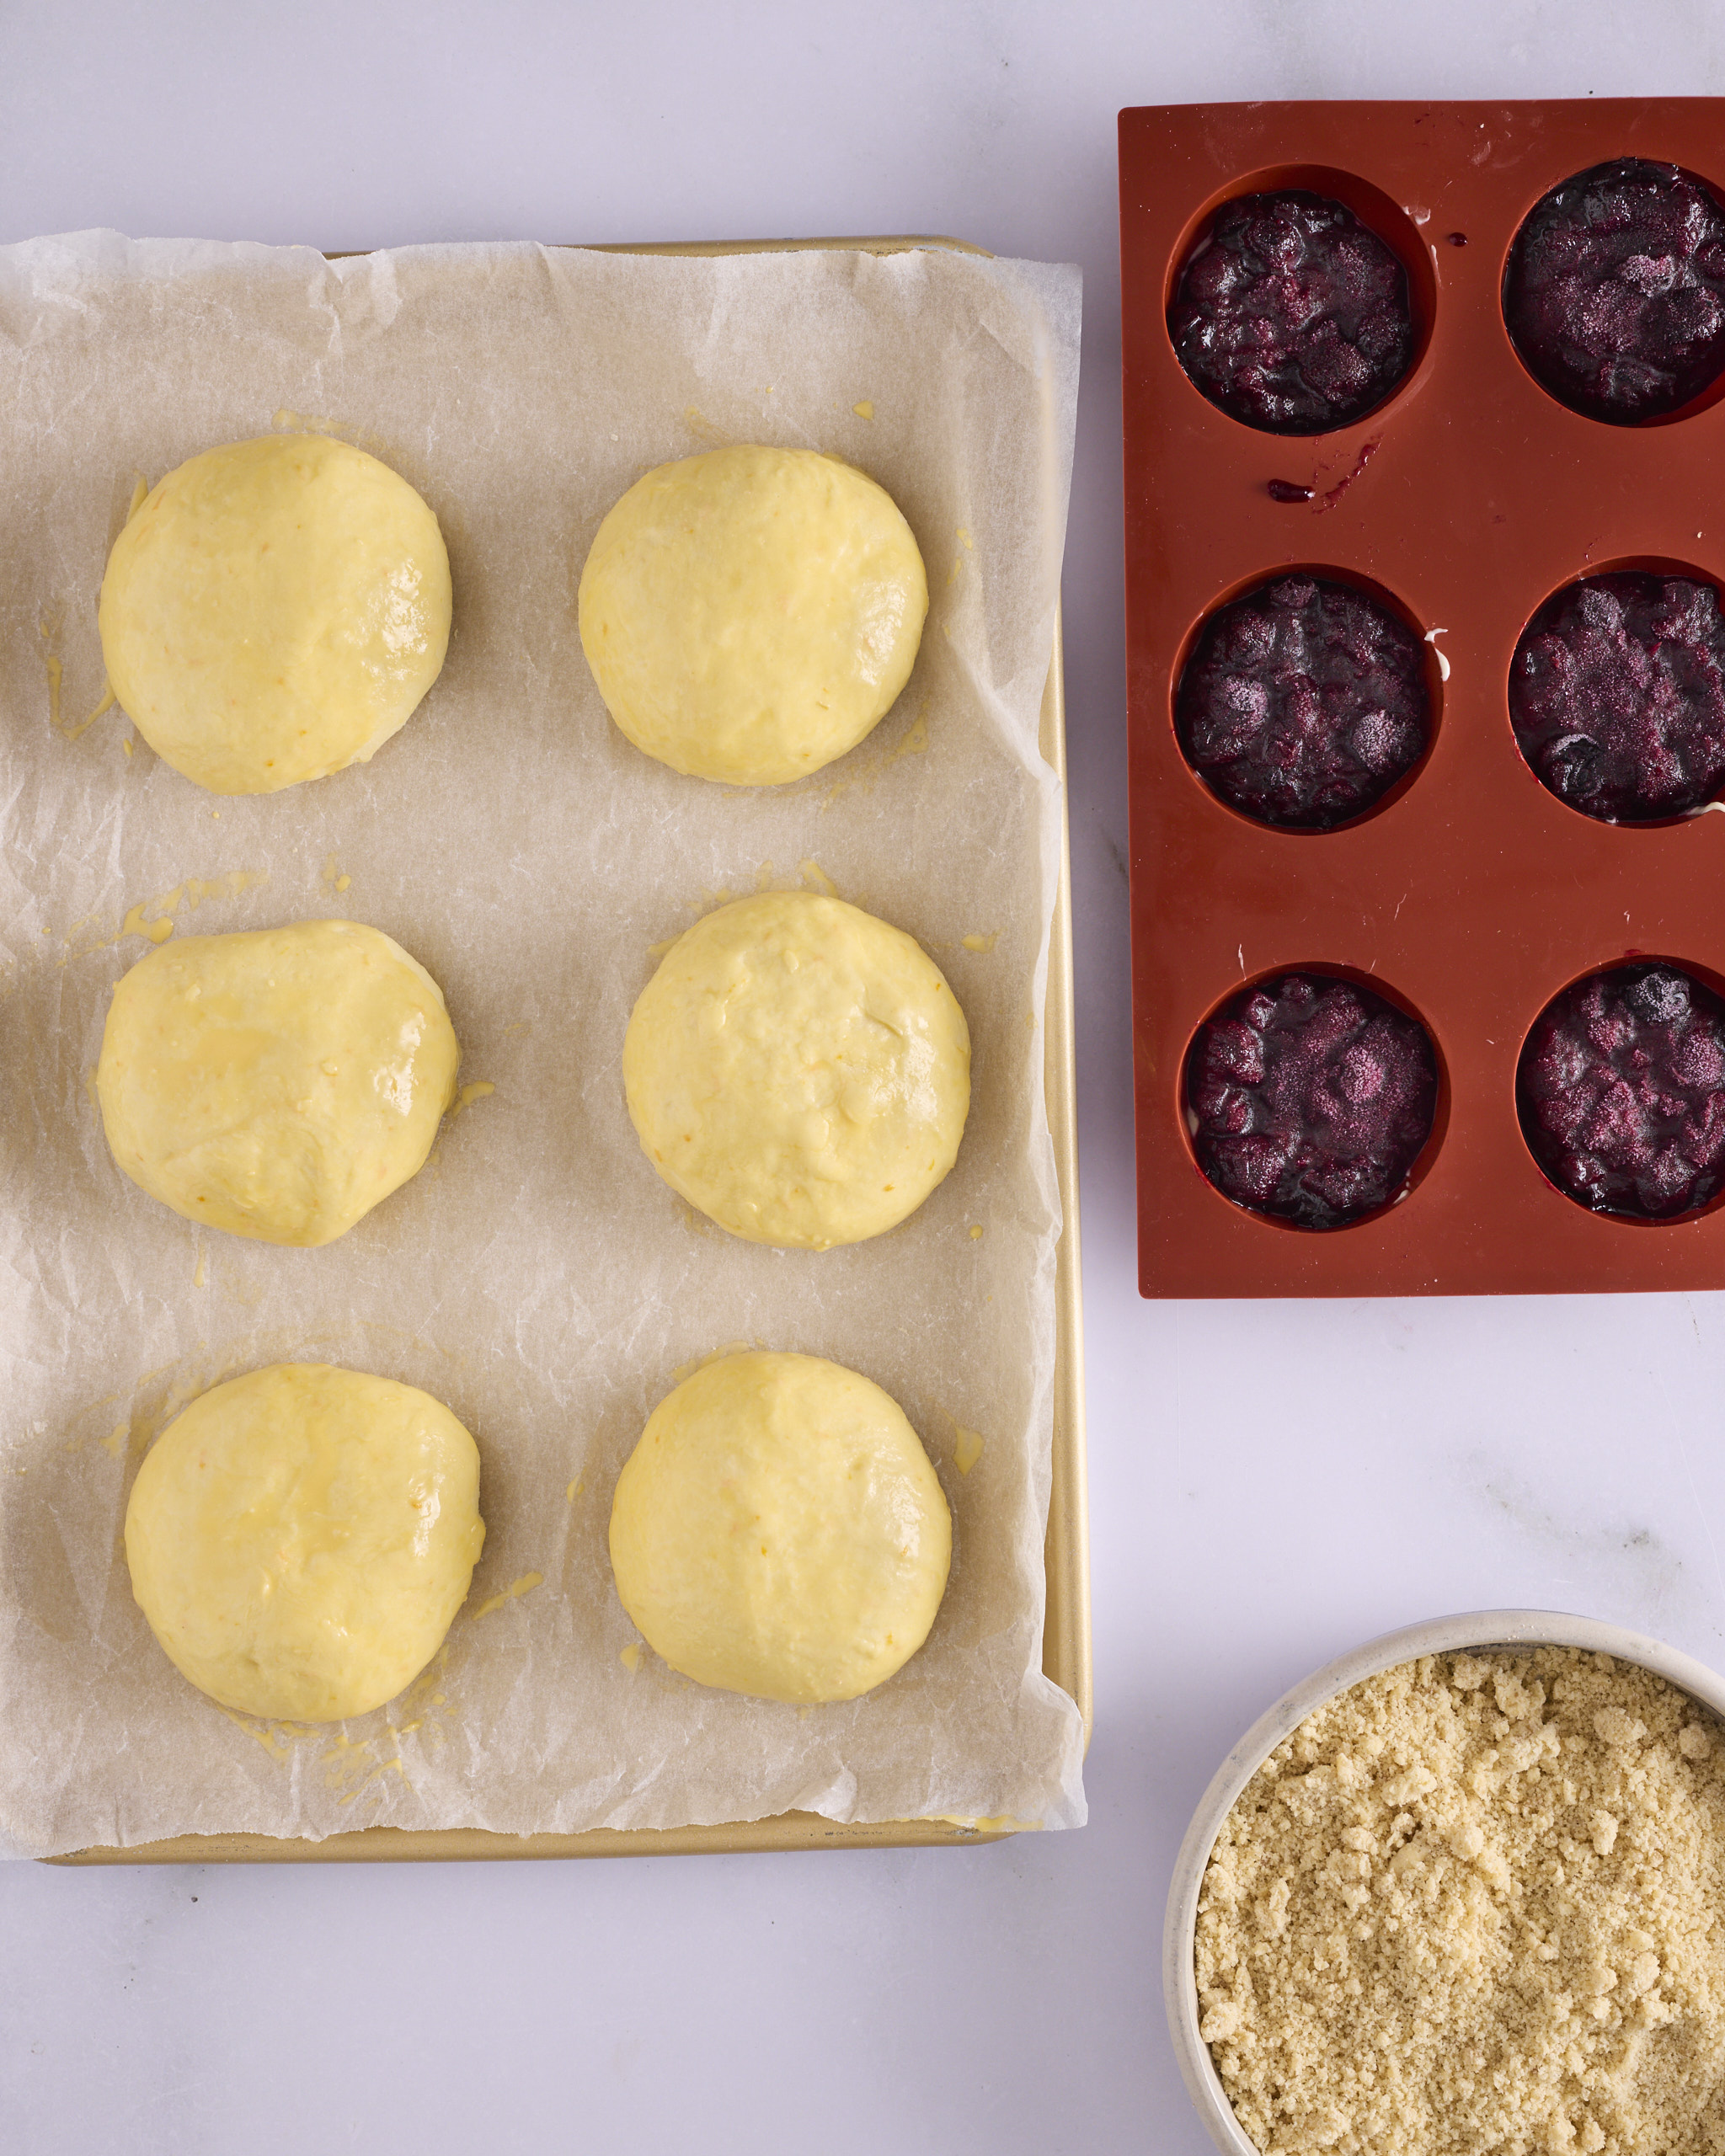
Six proved dough discs for blueberry cheesecake kolache on a lined gold baking tray, brushed with egg wash and risen to just under double. A silicone mould of frozen blueberry rosemary jam and cheesecake inserts sits alongside with a bowl of cinnamon crumble.
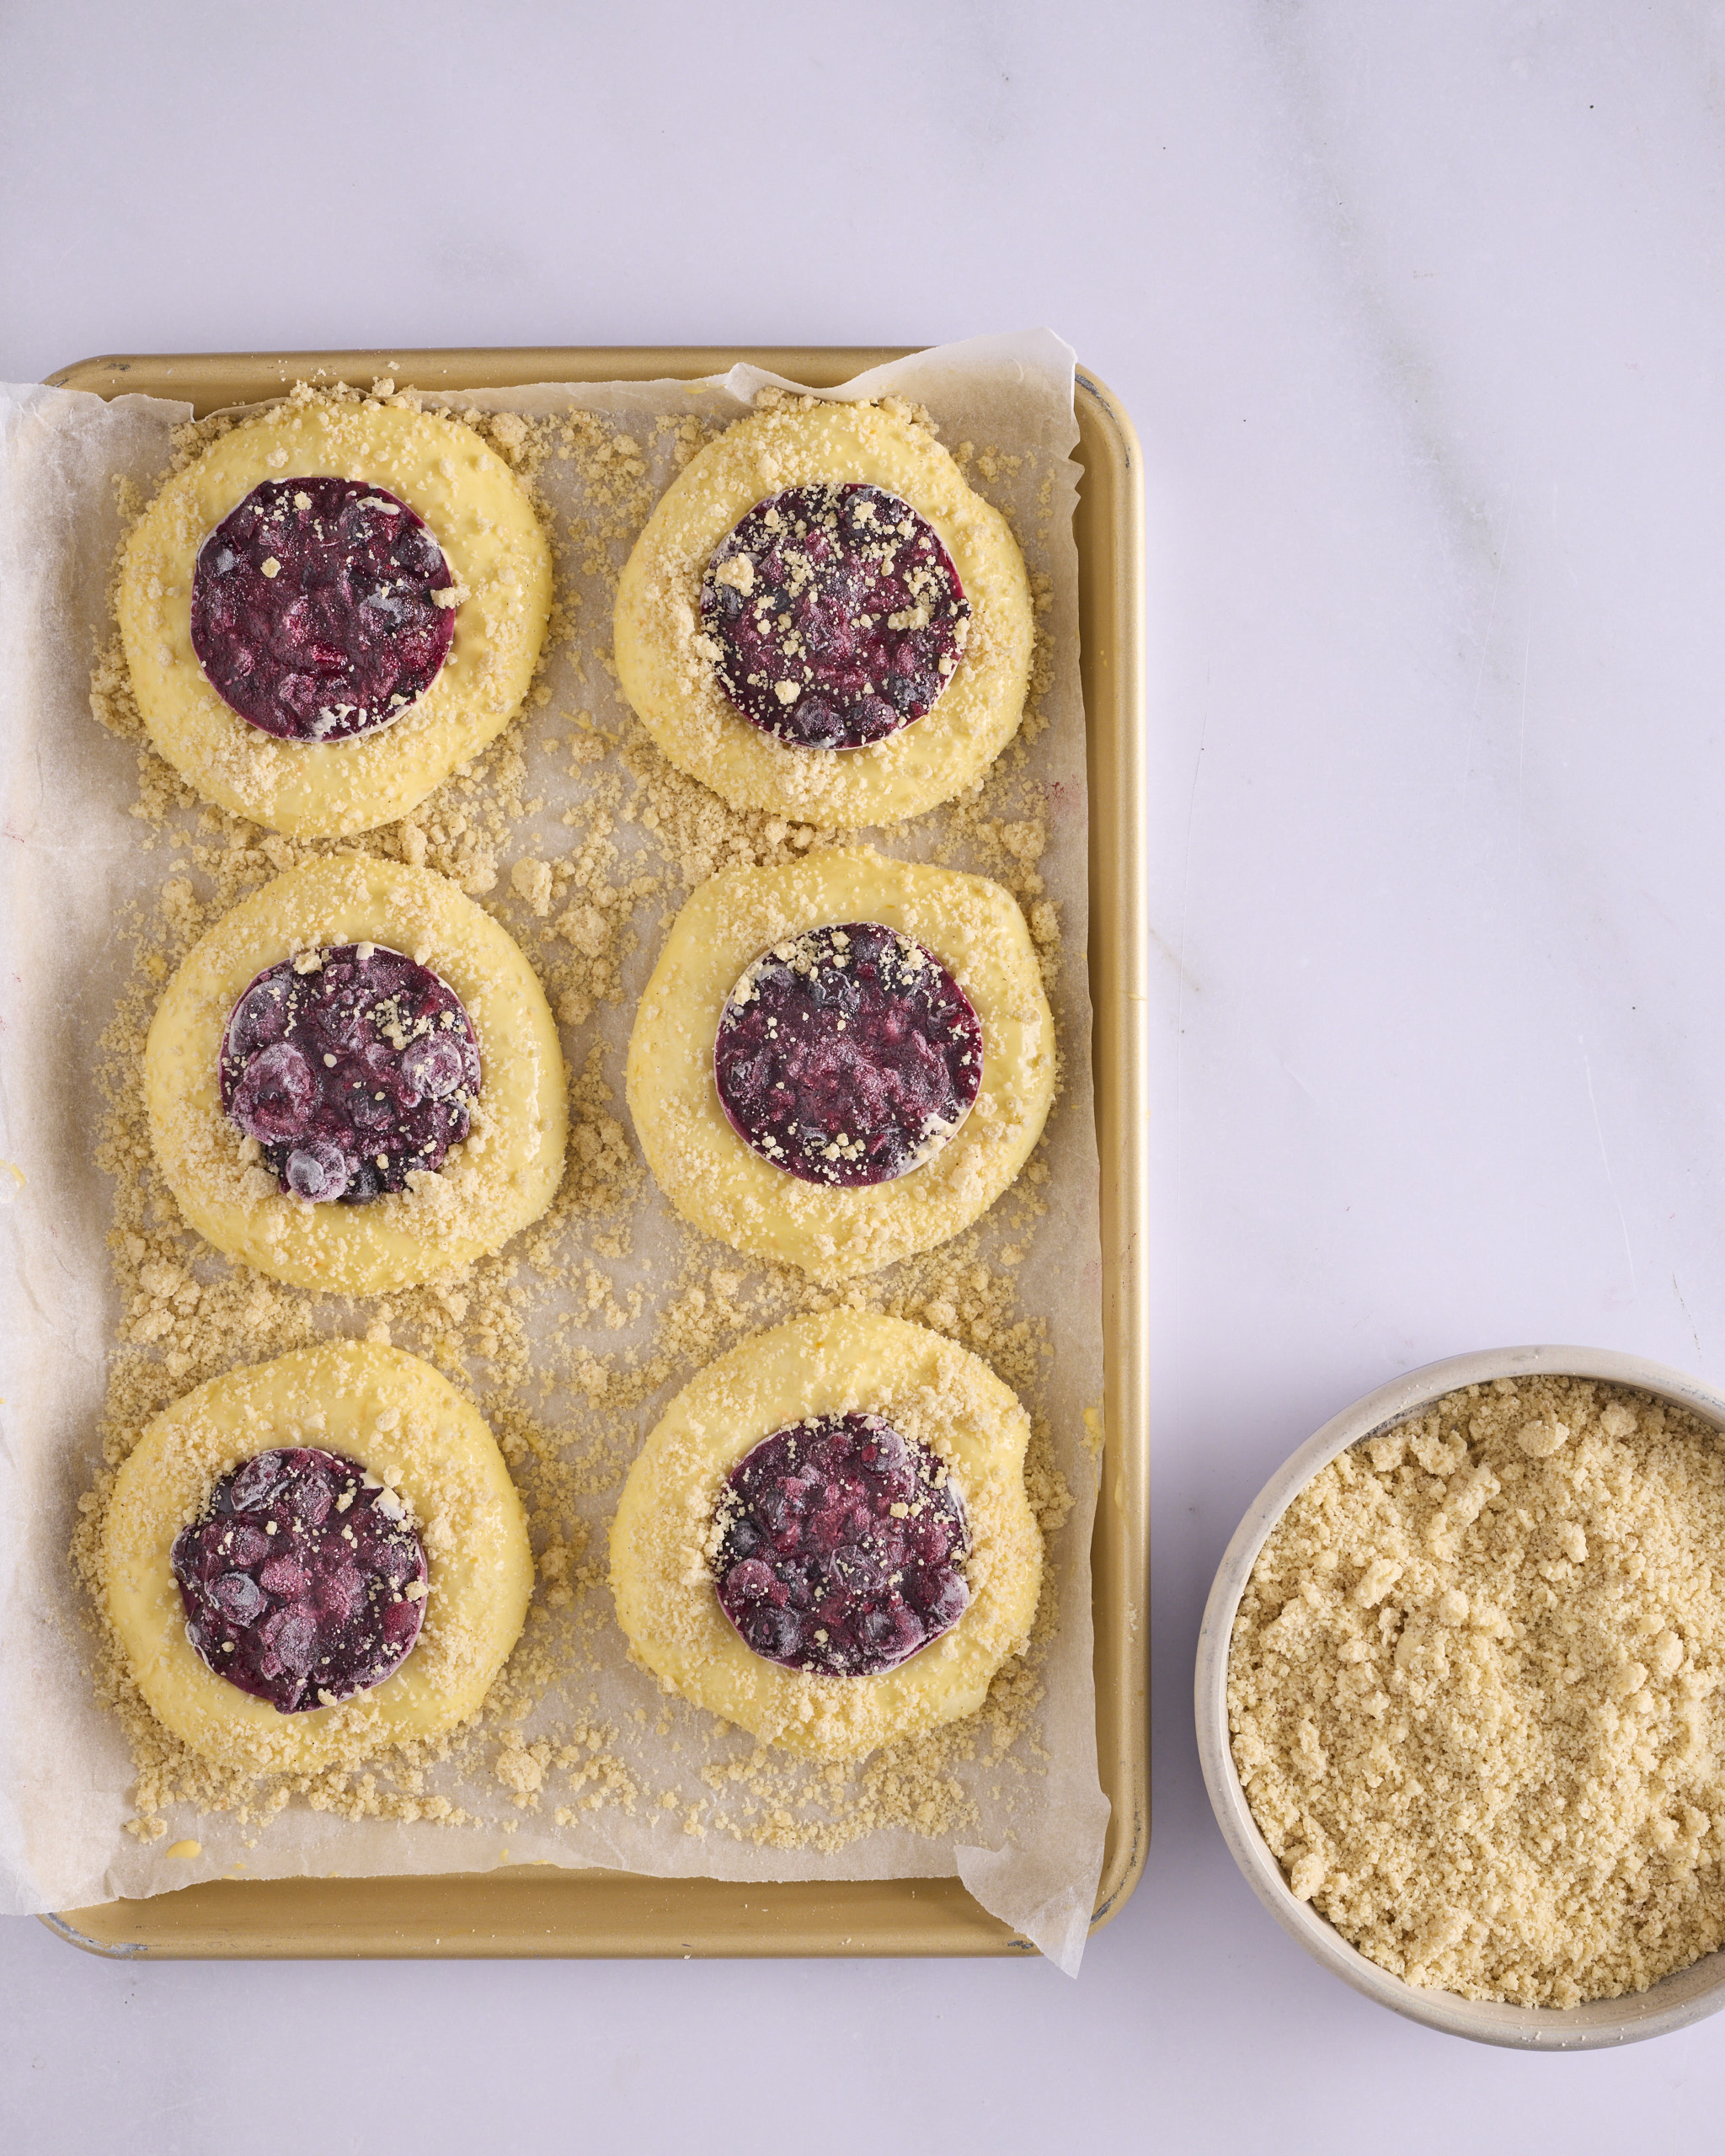
Six blueberry cheesecake kolache assembled and ready to bake on a lined gold baking tray. A frozen insert of blueberry rosemary jam over cheesecake is pressed into the centre of each bun, with cinnamon crumble scattered over the exposed dough and across the paper. A bowl of cinnamon crumble sits beside the tray.

The next step is to fill the buns before baking them. 

Preheat the oven to 165°C fan forced (note the temperature is turned down to 155°C fan forced immediately after the blueberry cheesecake buns go into the oven). 

Using a silicone pastry brush, cover each bun with egg wash. Brush any drips that pool at the bottom of the bun up the side of the bun. 

Unmould the frozen blueberry cheesecake inserts. If they’re not easy to release from the silicone mould you’ve used, run an offset spatula around the inside of the mould to help the insert release. Firmly press one insert into the centre of each disc of dough, jam side up. Be careful to note when you’re starting to feel the bottom of the tray—you don’t want to press through the bottom of the bun. The insert may sit slightly above the top of the dough, which is fine as it will shrink back as it defrosts and the bun rises around it. 

Having the crumble at the ready, egg wash the exposed dough a second time, one tray at a time. Do not egg wash over the blueberry cheesecake inserts. Then generously sprinkle the crumble over the exposed dough. Avoid too much crumble landing on top of the blueberry cheesecake inserts.

Baking the blueberry cheesecake buns

If baking in one oven, over two racks, have one at the top third of the oven and the second at the bottom third of the oven. Swap the trays when the top tray starts to turn golden. Also rotate the trays 180 degrees at the same time. If baking across two ovens, put the racks in the middle of the oven and turn the trays 180 degrees halfway through the bake. 

Once the trays are placed in the 165°C fan forced oven, immediately turn the temperature down to 155°C fan forced. 

Keep in mind that the frozen insert will need to defrost before the cheesecake filling starts to bake. The jam will also take time to defrost and, as a result, won’t lose too much moisture through the bake. 

Baking time will be around 25 minutes.  

But these blueberry cheesecake kolaches shouldn’t be rushed out of the oven. The cheesecake needs time to defrost and bake to a safe temperature. You can manage this by testing them when the buns are looking golden brown. Use a knife or skewer and ensure it comes out hot. But I prefer the certainty of an instant read thermometer. The target internal temperature for the bun itself is 88°C to 91°C. Then double check that the centre of the insert has reached 68°C. It will come up to 71°C with residual heat, so there’s no need to leave them in any longer.

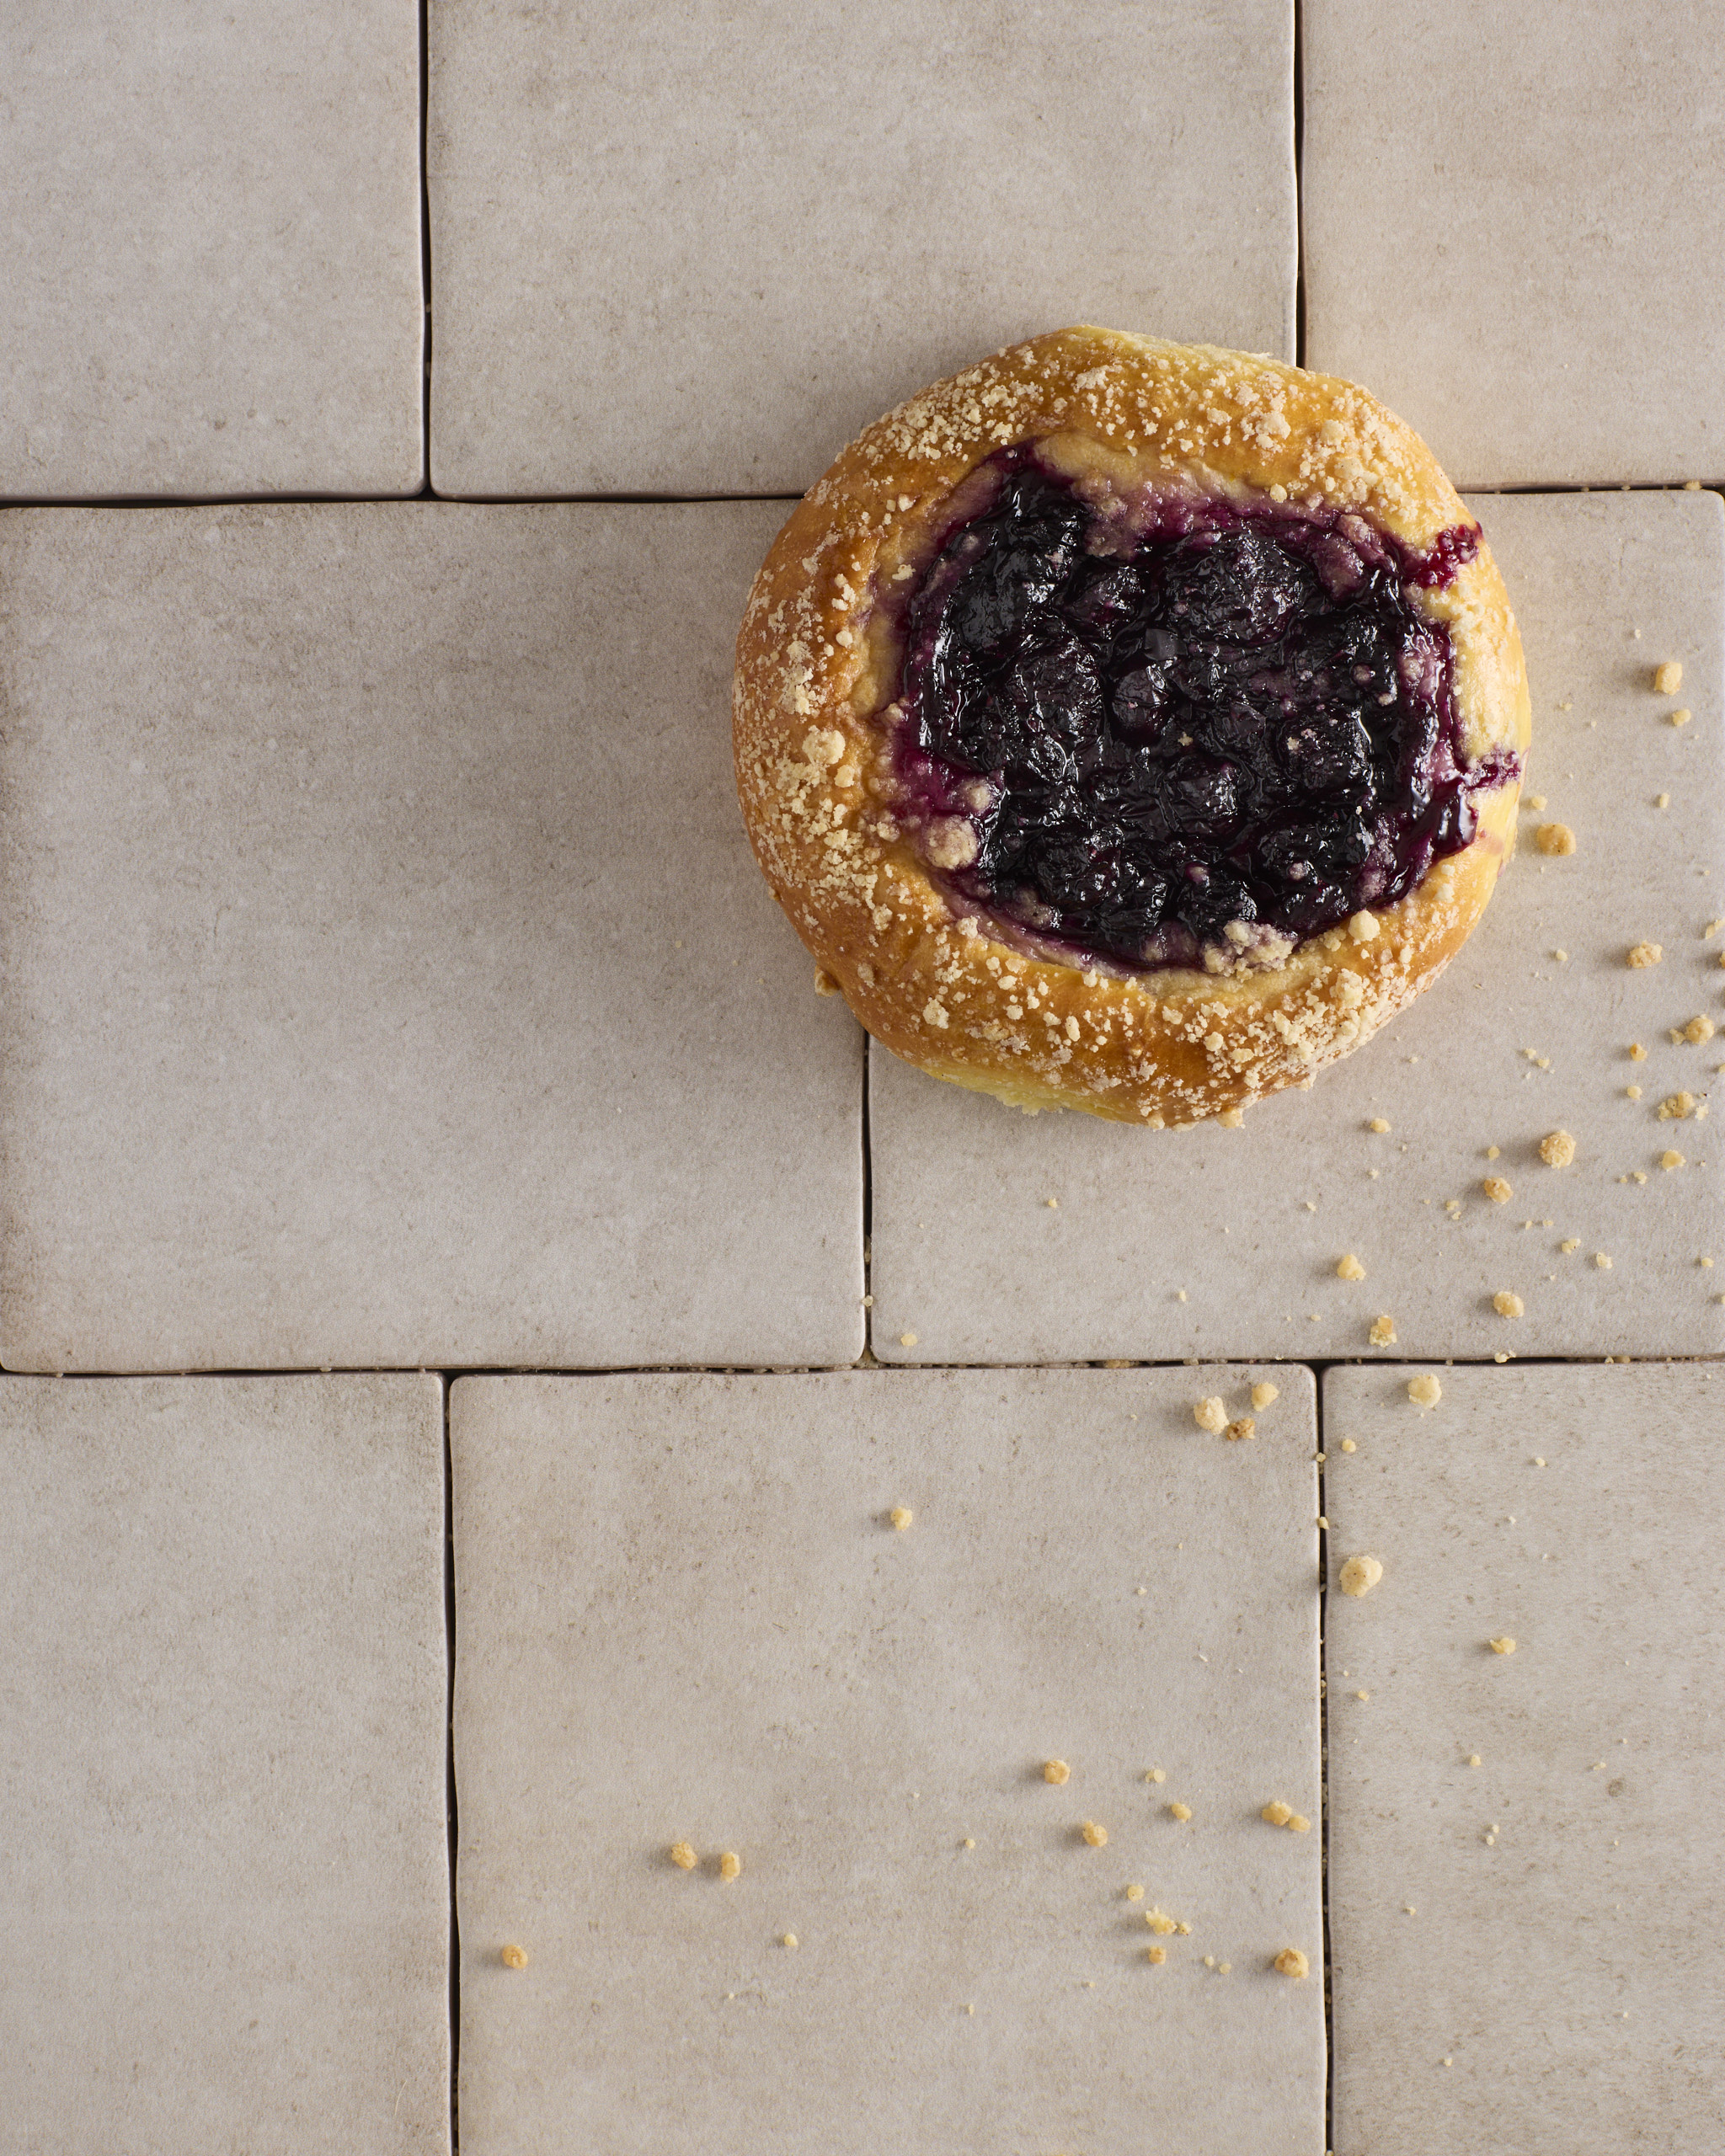
A single blueberry cheesecake kolache on a pale tiled surface, the blueberry rosemary jam glossy and dark in the centre over the cheesecake filling, with cinnamon crumble catching on the golden edge and scattered crumbs across the tiles.

The tangzhong is what makes these worth the two days. It’s the reason the crumb stays soft and the buns are still good the next morning, when a bun made without it has already gone dry. The jam breaks through the edge, the crumble catches wherever it lands, and none of them come out the same as the one beside it.

Blueberry Cheesecake Kolaches

Six baked blueberry cheesecake kolache on a gold baking tray lined with baking paper. Each filled sweet bun has a centre of blueberry rosemary jam over the cheesecake filling, with cinnamon crumble scattered across the golden edges. Jam has run down the side of two of the buns onto the paper.
Traditional Czech fillings for kolaches include a fresh curd cheese (tvaroh), poppy seeds, fresh fruit and plum jam. I've swapped in a filling that layers cheesecake with my blueberry rosemary jam. The buns are sprinkled with a cinnamon crumble before baking. The Czechs call their streusel-style topping posypka. My method is really straightforward and I've worked in a chefy technique that makes filling the buns foolproof. I think they bake up beautifully – as soon as they're out of the oven you can see just how delicious they are going to taste. The jam finds the low side of every bun and I've stopped fighting it.
Prep Time 1 hour 30 minutes
Cook Time 25 minutes
Inactive Cooking Time 13 hours
Course Breakfast, Brunch, Freezes
Cuisine Czech
Servings 12

Equipment

  • Stand mixer (with paddle and dough hook attachments)
  • Microplane
  • Digital kitchen scales
  • Instant read thermometer
  • 12 silicone moulds 6.5cm diameter cavities each (silicon muffin moulds, hemisphere moulds, etc)
  • Piping bage (optional)

Ingredients  

Foundation sweet dough

Tangzhong:

  • 35 g all-purpose flour
  • 120 g full cream milk
  • ½ teaspoon table salt

Dough:

  • 60 g white sugar
  • 2 oranges
  • 350 g full cream milk
  • 1 large egg
  • 575 g all-purpose flour
  • 1 tablespoon instant yeast
  • 115 g unsalted butter

Blueberry rosemary jam:

  • 350-400 g blueberry rosemary jam

Lemon cheesecake filling:

  • 225 g original Philadelphia cream cheese
  • 75 g white sugar
  • 1 egg yolk
  • 1 lemon
  • ¼ teaspoon table salt

Cinnamon crumble:

  • 100 g all-purpose flour
  • 50 g raw sugar
  • 50 g unsalted butter
  • ¼ teaspoon cinnamon
  • Pinch of table salt

Egg wash:

  • 2 egg yolks
  • 2 tablespoons cream (or milk)

Instructions 

What to make ahead

    Blueberry rosemary jam:

    • Make the blueberry rosemary jam. It can be made weeks in advance and keeps in the fridge.

    Lemon cheesecake filling:

    • Weigh 75g white sugar into the bowl of a stand mixer and zest the lemon over the bowl using a Microplane.
    • Using the paddle attachment, mix the sugar and zest on medium for 2 minutes.
    • Add 225g Original Philadelphia cream cheese, 1 egg yolk, and ¼ teaspoon table salt to the bowl. The cream cheese can be cold straight out of the fridge.
    • Start the mixer on low and increase briefly to medium until the cheesecake batter is smooth.
    • Transfer to a medium sized piping bag (optional) and refrigerate.

    Freezing the filling inserts:

    • Place each set of six 6.5cm diameter hemisphere silicone moulds on a baking tray to keep them level.
    • Pipe or spoon 1½ tablespoons of the cheesecake mixture into each mould. Spread gently with an offset spatula and drop the tray onto the bench a couple of times from a height of about 15cm.
    • Spoon 1½ tablespoons of blueberry rosemary jam over the cheesecake and level with an offset spatula, taking care not to mix the two layers.
    • Freeze until solid, keeping the trays level. Keep frozen until ready to fill the proved buns.

    Cinnamon crumble:

    • Sift 100g all-purpose flour, ¼ teaspoon cinnamon, and a pinch of salt into the bowl of a stand mixer. Add 50g raw sugar and mix on low with the paddle attachment until combined.
    • Add 50g slightly soft unsalted butter and mix on medium-low until just combined.
    • Break up any large lumps, then refrigerate the crumble in a sealed container.

    Make the tangzhong:

    • Weigh 35g all-purpose flour and 120g full cream milk into a small pan and add ½ teaspoon table salt.
    • Heat over medium low heat while whisking until the mixture forms a thick paste.
    • Remove from the heat, transfer to a small bowl or container and chill until slightly cold.

    Make and knead the foundation sweet dough:

    • Weigh 60g white sugar into the bowl of a stand mixer and zest 2 oranges over the bowl using a Microplane.
    • Using the paddle attachment, mix on medium for 2 minutes until zest is well incorporated into the sugar.
    • Add the tangzhong, 350g full cream milk, 1 large egg, 575g all-purpose flour, and 1 tablespoon instant yeast.
    • Mix on low with the dough hook until combined.
    • Increase speed to medium and knead for at least 5 minutes to develop the gluten. You want it to stretch and not tear immediately if you test a small piece of the dough.
    • Turn the speed back to low and add 115g slightly chilled unsalted butter, cut into tablespoon sized pieces, a couple of pieces at a time. Wait until each addition is incorporated before adding more. This can take up to 10 minutes.

    Forming the dough ball:

    • Tip the dough onto the bench. Pick a side to be the top of the dough ball and keep it that way.
    • Lift the dough off the bench, stretch it out and drop it back down, gathering it back into a ball with a dough scraper.
    • Repeat until the dough becomes less sticky and more resistant.
    • Then lift the dough about 30cm off the bench, letting it stretch into a tail, flip the tail forward as you land it, roll the dough over and tuck it in, keeping the top facing up. Tuck in around the base with the scraper and repeat a couple of times.
    • The dough is ready when it releases cleanly from the bench and springs back when pressed.
    • Lift into a greased bowl, cover with an oiled sealed lid or oiled plastic wrap.
    • Refrigerate overnight, up to 12 hours.

    On the day you bake

      Get organised:

      • Set up your proving environment before taking the dough out of the fridge.
      • Set the oven to 30°C.
      • Line 2 large rimmed baking trays with baking paper.

      Assembling the blueberry cheesecake buns:

      • Weigh the risen dough, which should be approximately 1300g. Aim for 100g portions, allowing for some wastage or some extra dough being added to a portion.
      • Weigh off a 100g portion and form the buns one at a time.
      • On the bench, first stretch a corner of the dough out and press it back into the centre in one movement, rotating a quarter turn each time, repeat this seven times.
      • Then place the dough ball pinched side down and, with your fingers cupped over the ball like a cage, roll it vigorously in small circles without compressing it. This helps create tension on the surface of the ball.
      • Finally, shake a little flour over the bench and the dough and use a rolling pin to flatten the dough ball slightly to form a disc.
      • Place each disc of dough on the lined trays, evenly spaced, six per tray in two rows of three.

      Prove the buns:

      • Transfer the trays to your proving set up and prove until the buns are just under doubled in size, around 40 to 45 minutes.
      • Meanwhile, prepare the egg wash by beating 2 egg yolks and 2 tablespoons cream or milk together in a small bowl.

      Fill the buns:

      • Preheat the oven to 165°C fan forced.
      • Once the buns are proved, use a silicone pastry brush to cover each bun with egg wash, brushing any drips that pool at the base up the side of the bun.
      • Unmould the frozen filling inserts, running an offset spatula around the inside of the mould if needed.
      • Firmly press one insert into the centre of each disc of dough, jam side up. Be careful to note when you start to feel the bottom of the tray—don't press the filling through the base of the bun. The insert may sit slightly above the dough, which is fine.
      • Egg wash the exposed dough a second time.
      • Generously sprinkle the cinnamon crumble over the exposed dough, avoiding too much landing on the inserts.

      Bake:

      • If baking in one oven over two racks, place one rack in the top third and one in the bottom third. While baking, swap and rotate the trays 180 degrees when the top tray starts to turn golden.
      • If baking across two ovens, use the middle rack and rotate the trays 180 degrees halfway through.
      • Once the trays are in the oven, immediately turn the temperature down to 155°C fan forced.
      • Bake for around 25 minutes.
      • The frozen insert needs to defrost before the cheesecake filling starts to bake, so don't rush the buns out of the oven.
      • When they're golden brown, test the internal temperature of the bun, which should be 88 to 91°C, then double check that the centre of the insert has reached 68°C. It will come up to 71°C with residual heat.

      Just before you cook with abandon…

      Get organised: Mise en place, or putting in place, is harder when a recipe runs across two days, so treat it as two lots of being organised. Weigh and set out each component as you make it, and on bake day get your proving environment set up and your trays lined before the foundation sweet dough comes out of the fridge. The dough is easiest to handle while it's still cold, and that window closes while you're hunting for a rolling pin.
      Digital scales: If you are going to bake, you need a kitchen scale. It's really in the necessity column not the optional column. You don't need to spend a fortune on them; decent ones can be bought for about $70. I find the expensive ones break down just as quickly as the cheaper versions. But I would recommend you go for a known brand from a reputable kitchen shop. For this recipe you'll also use it to weigh the risen dough before dividing it into twelve equal 100g balls.
      Tablespoons: I use 15ml tablespoons in my baking recipes. If yours are 20ml, the filling quantities will run out before the twelfth bun.
      Make ahead: The blueberry rosemary jam can be made a couple weeks in advance and kept in the fridge. The night before you bake, make the lemon cheesecake filling, assemble and freeze the filling inserts, make the cinnamon crumble, and get the dough into the fridge for its overnight rest. That leaves shaping, proving and baking for the day itself.
      Proving without a proving oven: I use two very large sturdy plastic bags (70cm x 80cm), one per tray, inflated so they don't catch on the dough, and prove in two ovens set to 30°C. Your trays will be fine on two racks in a warm oven without the bags — add a bowl of just boiled water in the corner of the oven if you want the humidity. Large sealed plastic storage containers on the bench work too. And if it's January in Australia, the bench is fine on its own but just cover the dough with a sheet of oiled plastic wrap or a cut open oiled plastic bag so the formed kolaches don’t form a skin as they prove.
      Silicone moulds: I've used two moulds of six 6.5cm hemispheres, but there are lots of silicone shapes you can use to form the inserts. Silicone dariole moulds, silicone mini muffin baking cups or a large silicone ice cube tray all work. Whatever you use, keep the cheesecake and the jam layers separate, with the jam side up the same way it goes into the bun.
      Storage: The tangzhong method used in these buns helps keep them fresh — moist and fluffy — for a couple of extra days. I keep them in the fridge in a sealed container and refresh them with a few minutes in a low oven at around 120°C until they're warmed through.
      Freezing: These Blueberry Cheesecake Kolaches freeze really well in a sealed container. When you remove one from the freezer, microwave it for 30 seconds on high and then pop it in a low oven at around 120°C until it's warmed through.
      Keyword blueberry cheesecake buns, blueberry cheesecake kolache, cheesecake kolache

      Leave a Reply

      Your email address will not be published. Required fields are marked *

      Recipe Rating


      Hi, I'm Sandra!

      I live by the words of Harriet Van Horne and I will be exploring every possible way to bring Harriet’s words to life in my kitchen.

      Recipes

      Discover delicious featured food recipes! From quick meals to gourmet delights, Sandra offer inspiring dishes for every occasion. Explore, cook, and enjoy flavorful creations today.

      You might also like..

      Low Sugar Raspberry Jam

      Quick Red Onion Pickle

      S’mores Tart – Chocolate Raspberry Marshmallow Tart

      Lime Cream Cheese Pound Cake

      Subscribe

      Subscribe to my newsletter for a chance to win a FREE APRON (drawn monthly) as well as cooking tips, recipes, offers and exclusive content.

      "*" indicates required fields